By: W13-1 Since: Sept 2018 Licence: MIT
- 1. Setting up
- 2. Design
- 3. Implementation
- 4. Documentation
- 5. Testing
- 6. Dev Ops
- Appendix A: Product Scope
- Appendix B: User Stories
- Appendix C: Use Cases
- Appendix D: Non Functional Requirements
- Appendix E: Glossary
- Appendix F: Instructions for Manual Testing
- F.1. Launch and shutdown
- F.2. Register, logging in, and logging out
- F.3. Basic commands
- F.4. Adding and removing friends
- F.5. Finding a person by name and by group
- F.6. Adding and removing timeslots from the user’s timetable
- F.7. Showing free timeslots across users
- F.8. Importing and exporting the user’s timetable
1. Setting up
1.1. Prerequisites
-
JDK
9or laterJDK 10on Windows will fail to run tests in headless mode due to a JavaFX bug. Windows developers are highly recommended to use JDK9. -
IntelliJ IDE
IntelliJ by default has Gradle and JavaFx plugins installed.
Do not disable them. If you have disabled them, go toFile>Settings>Pluginsto re-enable them.
1.2. Setting up the project in your computer
-
Fork this repo, and clone the fork to your computer
-
Open IntelliJ (if you are not in the welcome screen, click
File>Close Projectto close the existing project dialog first) -
Set up the correct JDK version for Gradle
-
Click
Configure>Project Defaults>Project Structure -
Click
New…and find the directory of the JDK
-
-
Click
Import Project -
Locate the
build.gradlefile and select it. ClickOK -
Click
Open as Project -
Click
OKto accept the default settings -
Open a console and run the command
gradlew processResources(Mac/Linux:./gradlew processResources). It should finish with theBUILD SUCCESSFULmessage.
This will generate all resources required by the application and tests. -
Open
XmlAdaptedPerson.javaandMainWindow.javaand check for any code errors-
Due to an ongoing issue with some of the newer versions of IntelliJ, code errors may be detected even if the project can be built and run successfully
-
To resolve this, place your cursor over any of the code section highlighted in red. Press ALT+ENTER, and select
Add '--add-modules=…' to module compiler optionsfor each error
-
-
Repeat this for the test folder as well (e.g. check
XmlUtilTest.javaandHelpWindowTest.javafor code errors, and if so, resolve it the same way)
1.3. Verifying the setup
-
Run the
seedu.address.MainAppand try a few commands -
Run the tests to ensure they all pass.
1.4. Configurations to do before writing code
1.4.1. Configuring the coding style
This project follows oss-generic coding standards. IntelliJ’s default style is mostly compliant with ours but it uses a different import order from ours. To rectify,
-
Go to
File>Settings…(Windows/Linux), orIntelliJ IDEA>Preferences…(macOS) -
Select
Editor>Code Style>Java -
Click on the
Importstab to set the order-
For
Class count to use import with '*'andNames count to use static import with '*': Set to999to prevent IntelliJ from contracting the import statements -
For
Import Layout: The order isimport static all other imports,import java.*,import javax.*,import org.*,import com.*,import all other imports. Add a<blank line>between eachimport
-
Optionally, you can follow the UsingCheckstyle.adoc document to configure Intellij to check style-compliance as you write code.
1.4.2. Updating documentation to match your fork
After forking the repo, the documentation will still have the SE-EDU branding and refer to the se-edu/addressbook-level4 repo.
If you plan to develop this fork as a separate product (i.e. instead of contributing to se-edu/addressbook-level4), you should do the following:
-
Configure the site-wide documentation settings in
build.gradle, such as thesite-name, to suit your own project. -
Replace the URL in the attribute
repoURLinDeveloperGuide.adocandUserGuide.adocwith the URL of your fork.
1.4.3. Setting up CI
Set up Travis to perform Continuous Integration (CI) for your fork. See UsingTravis.adoc to learn how to set it up.
After setting up Travis, you can optionally set up coverage reporting for your team fork (see UsingCoveralls.adoc).
| Coverage reporting could be useful for a team repository that hosts the final version but it is not that useful for your personal fork. |
Optionally, you can set up AppVeyor as a second CI (see UsingAppVeyor.adoc).
| Having both Travis and AppVeyor ensures your App works on both Unix-based platforms and Windows-based platforms (Travis is Unix-based and AppVeyor is Windows-based) |
1.4.4. Getting started with coding
When you are ready to start coding,
-
Get some sense of the overall design by reading Section 2.1, “Architecture”.
-
Take a look at [GetStartedProgramming].
2. Design
2.1. Architecture
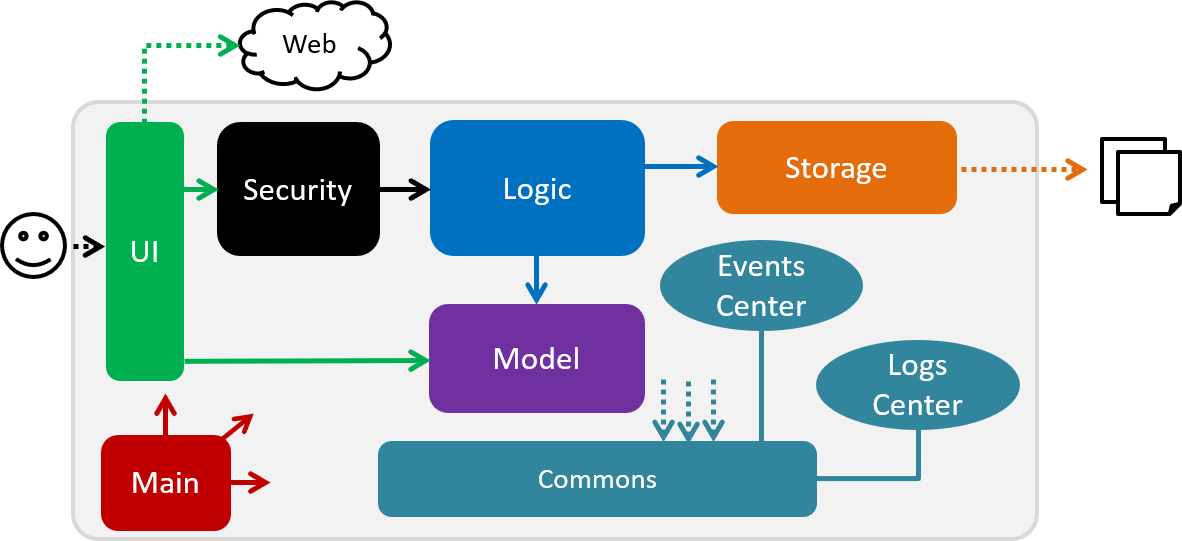
The Architecture Diagram given above explains the high-level design of the App. Given below is a quick overview of each component.
The .pptx files used to create diagrams in this document can be found in the diagrams folder. To update a diagram, modify the diagram in the pptx file, select the objects of the diagram, and choose Save as picture.
|
Main has only one class called MainApp. It is responsible for,
-
At app launch: Initializes the components in the correct sequence, and connects them up with each other.
-
At shut down: Shuts down the components and invokes cleanup method where necessary.
Commons represents a collection of classes used by multiple other components. Two of those classes play important roles at the architecture level.
-
EventsCenter: This class (written using Google’s Event Bus library) is used by components to communicate with other components using events (i.e. a form of Event Driven design) -
LogsCenter: Used by many classes to write log messages to the App’s log file.
The rest of the App consists of five components.
Each of the five components
-
Defines its API in an
interfacewith the same name as the Component. -
Exposes its functionality using a
{Component Name}Managerclass.
For example, the Logic component (see the class diagram given below) defines it’s API in the Logic.java interface and exposes its functionality using the LogicManager.java class.
Events-Driven nature of the design
The Sequence Diagram below shows how the components interact for the scenario where the user issues the command delete 1.
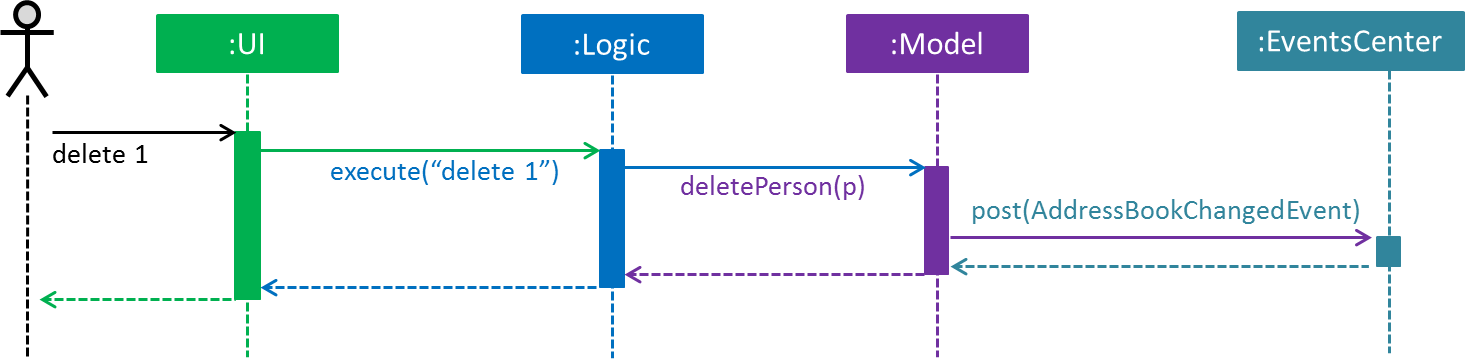
delete 1 command (part 1)
Note how the Model simply raises a AddressBookChangedEvent when the Address Book data are changed, instead of asking the Storage to save the updates to the hard disk.
|
The diagram below shows how the EventsCenter reacts to that event, which eventually results in the updates being saved to the hard disk and the status bar of the UI being updated to reflect the 'Last Updated' time.
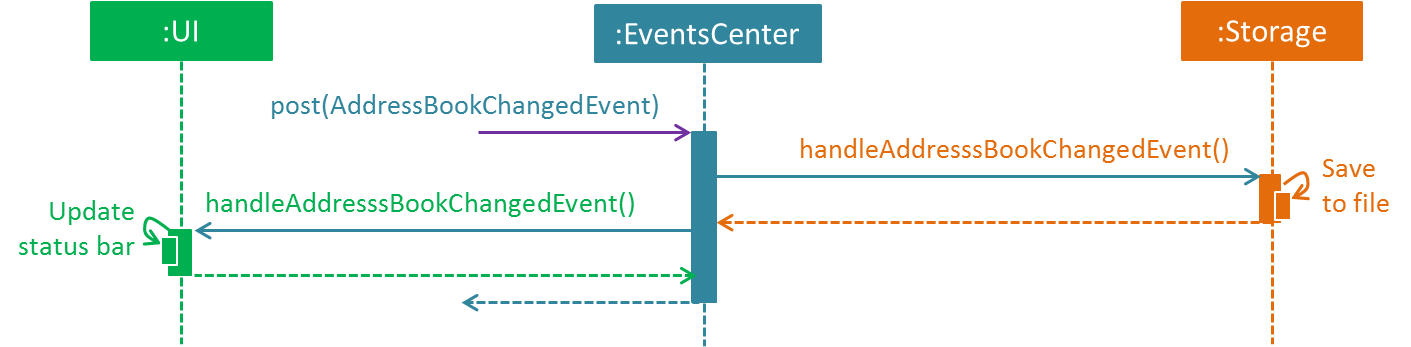
delete 1 command (part 2)
Note how the event is propagated through the EventsCenter to the Storage and UI without Model having to be coupled to either of them. This is an example of how this Event Driven approach helps us reduce direct coupling between components.
|
The sections below give more details of each component.
2.2. UI component
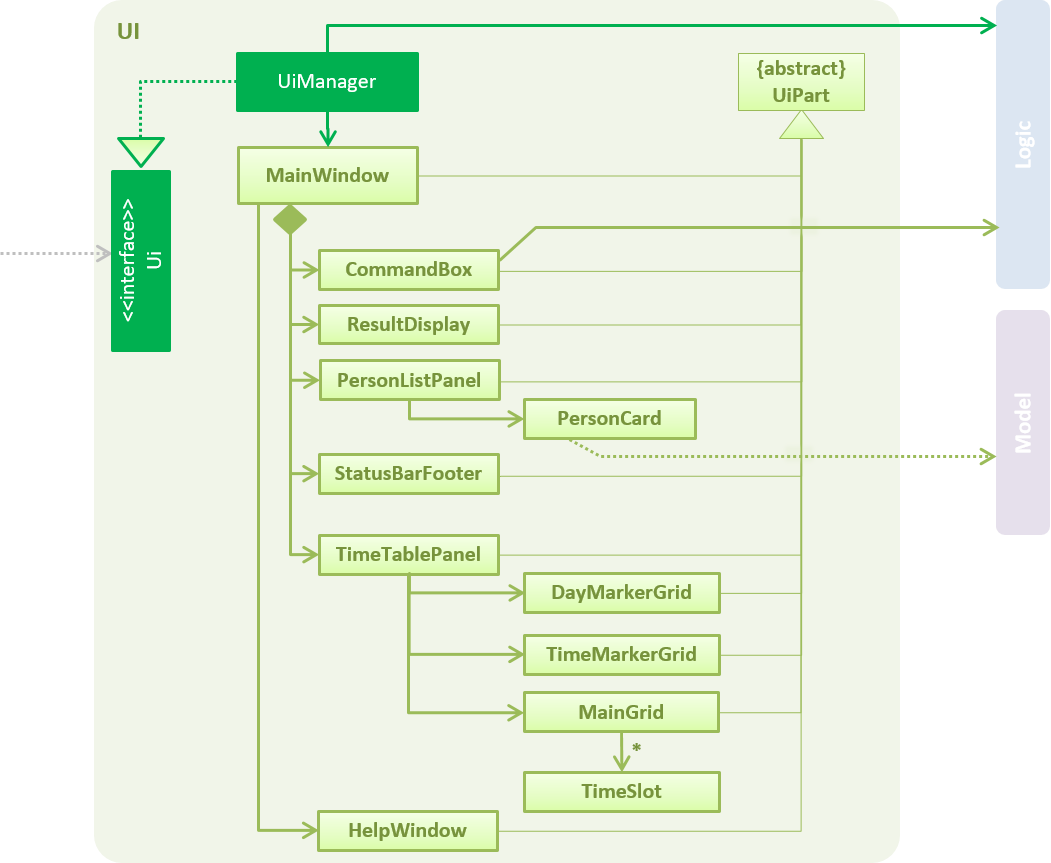
API : Ui.java
The UI consists of a MainWindow that is made up of parts e.g.CommandBox, ResultDisplay, PersonListPanel, StatusBarFooter, BrowserPanel etc. All these, including the MainWindow, inherit from the abstract UiPart class.
The UI component uses JavaFx UI framework. The layout of these UI parts are defined in matching .fxml files that are in the src/main/resources/view folder. For example, the layout of the MainWindow is specified in MainWindow.fxml
The UI component,
-
Executes user commands using the
Logiccomponent. -
Binds itself to some data in the
Modelso that the UI can auto-update when data in theModelchange. -
Responds to events raised from various parts of the App and updates the UI accordingly.
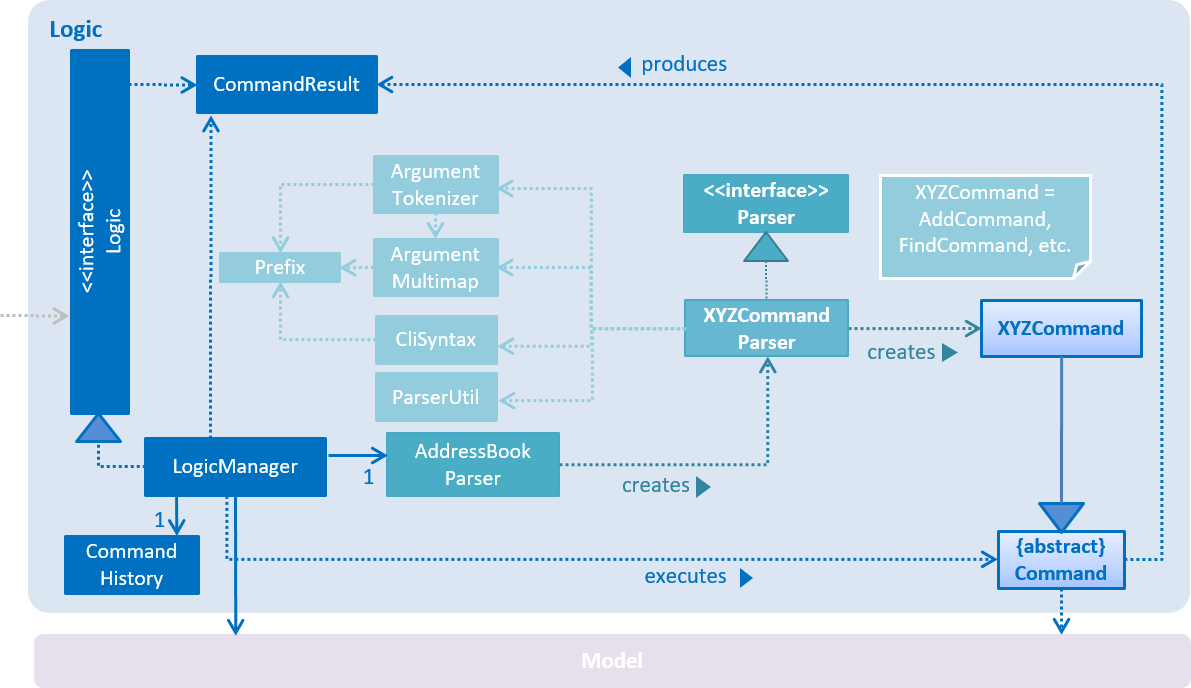
2.3. Logic component
API :
Logic.java
-
Logicuses theAddressBookParserclass to parse the user command. -
This results in a
Commandobject which is executed by theLogicManager. -
The command execution can affect the
Model(e.g. adding a person) and/or raise events. -
The result of the command execution is encapsulated as a
CommandResultobject which is passed back to theUi.
Given below is the Sequence Diagram for interactions within the Logic component for the execute("delete 1") API call.
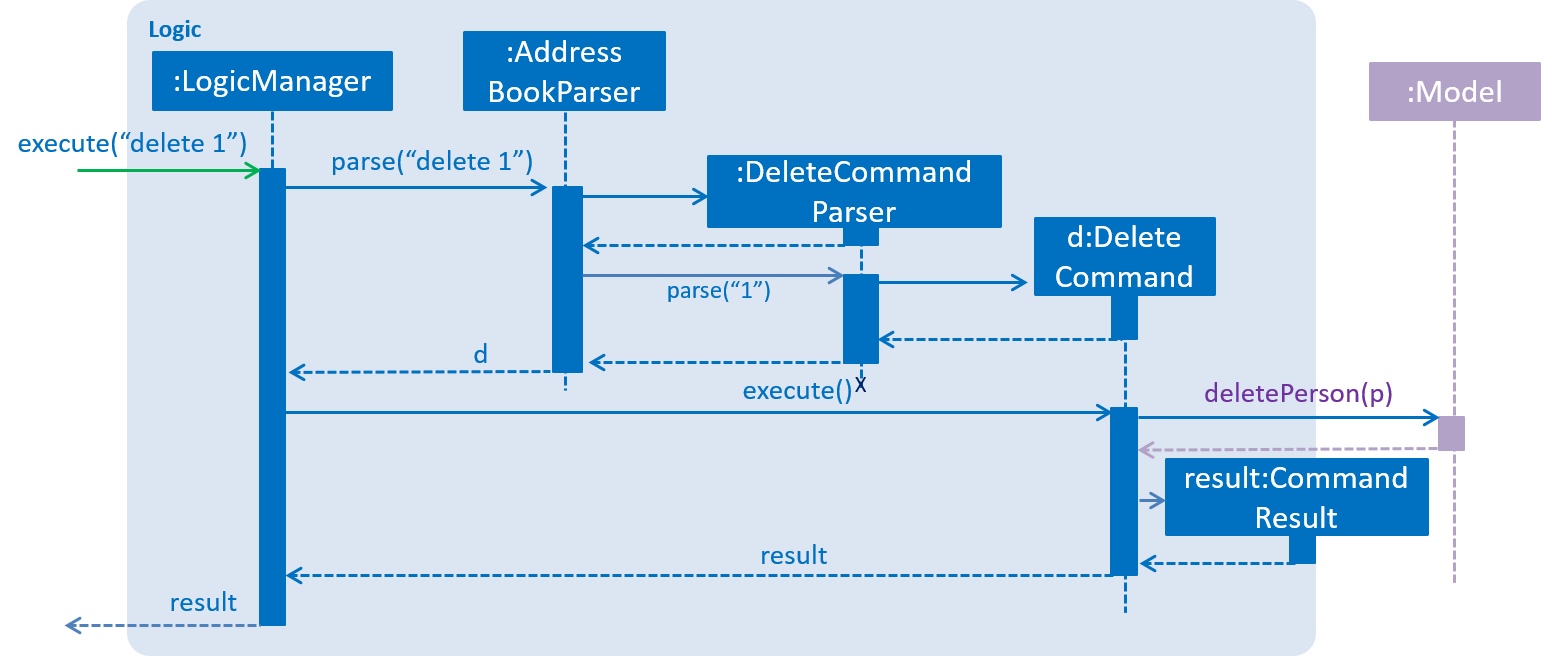
delete 1 Command2.4. Model component
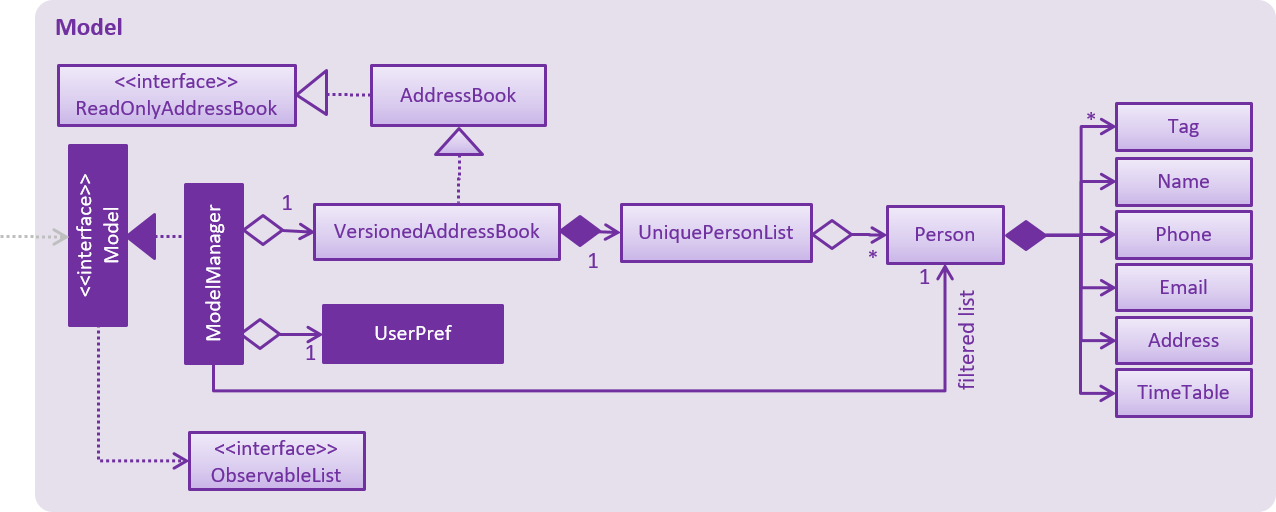
API : Model.java
The Model,
-
stores a
UserPrefobject that represents the user’s preferences. -
stores the Address Book data.
-
exposes an unmodifiable
ObservableList<Person>that can be 'observed' e.g. the UI can be bound to this list so that the UI automatically updates when the data in the list change. -
does not depend on any of the other three components.
As a more OOP model, we can store a Tag list in Address Book, which Person can reference. This would allow Address Book to only require one Tag object per unique Tag, instead of each Person needing their own Tag object. An example of how such a model may look like is given below.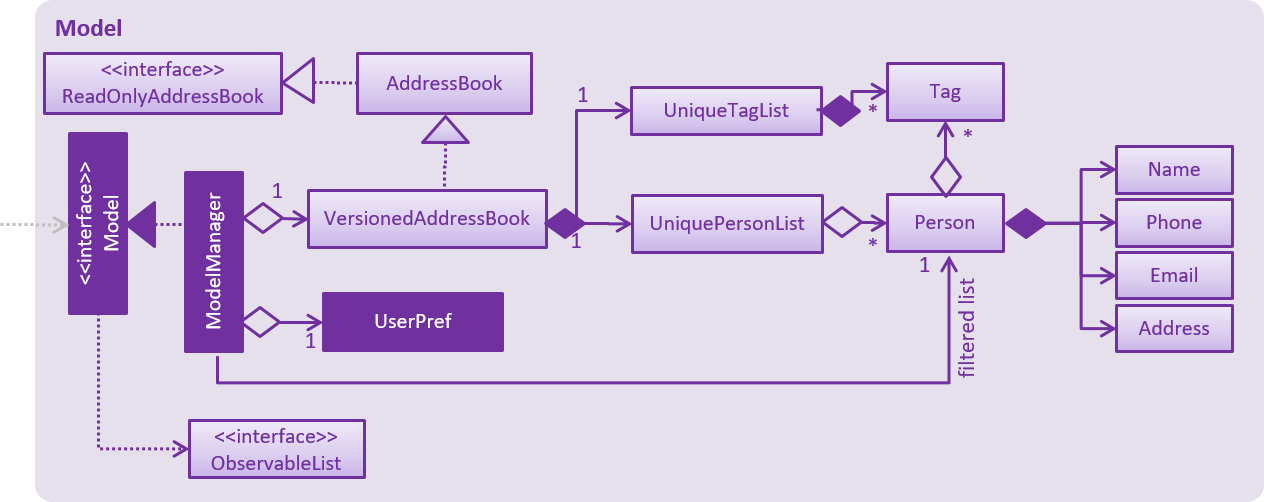
|
2.5. Security component

API : Security.java
The Security component is a module that ensures the users that are using the application are
authenticated, and an instance of an authenticated user will be created and stored in ModelManager every time a user
is logged in so as to allow the application to do user-specific tasks.
It also handles all the commands entered to check for security clearance. On top of that, it is able to hash passwords and save them into a file named users.json at root folder.
In Figure 9, AppUsers is an object that stores the list of AccountCredentials. This object is created when FreeTime runs. Storage Component will try to find a user.json file to convert that into the AppUsers object. If the file is not found, or the data is corrupted, this program will create a new AppUsers object with default Users in it.
More information is detailed below in Security Implementation.
2.6. Storage component

API : Storage.java
The Storage component,
-
can save
AppUsersobjects in json format and read it back. -
can save
UserPrefobjects in json format and read it back. -
can save the Address Book data in xml format and read it back.
2.7. Common classes
Classes used by multiple components are in the seedu.addressbook.commons package.
3. Implementation
This section describes some noteworthy details on how certain features are implemented.
3.1. Undo/Redo feature
3.1.1. Current Implementation
The undo/redo mechanism is facilitated by VersionedAddressBook.
It extends AddressBook with an undo/redo history, stored internally as an addressBookStateList and currentStatePointer.
Additionally, it implements the following operations:
-
VersionedAddressBook#commit()— Saves the current address book state in its history. -
VersionedAddressBook#undo()— Restores the previous address book state from its history. -
VersionedAddressBook#redo()— Restores a previously undone address book state from its history.
These operations are exposed in the Model interface as Model#commitAddressBook(), Model#undoAddressBook() and Model#redoAddressBook() respectively.
Given below is an example usage scenario and how the undo/redo mechanism behaves at each step.
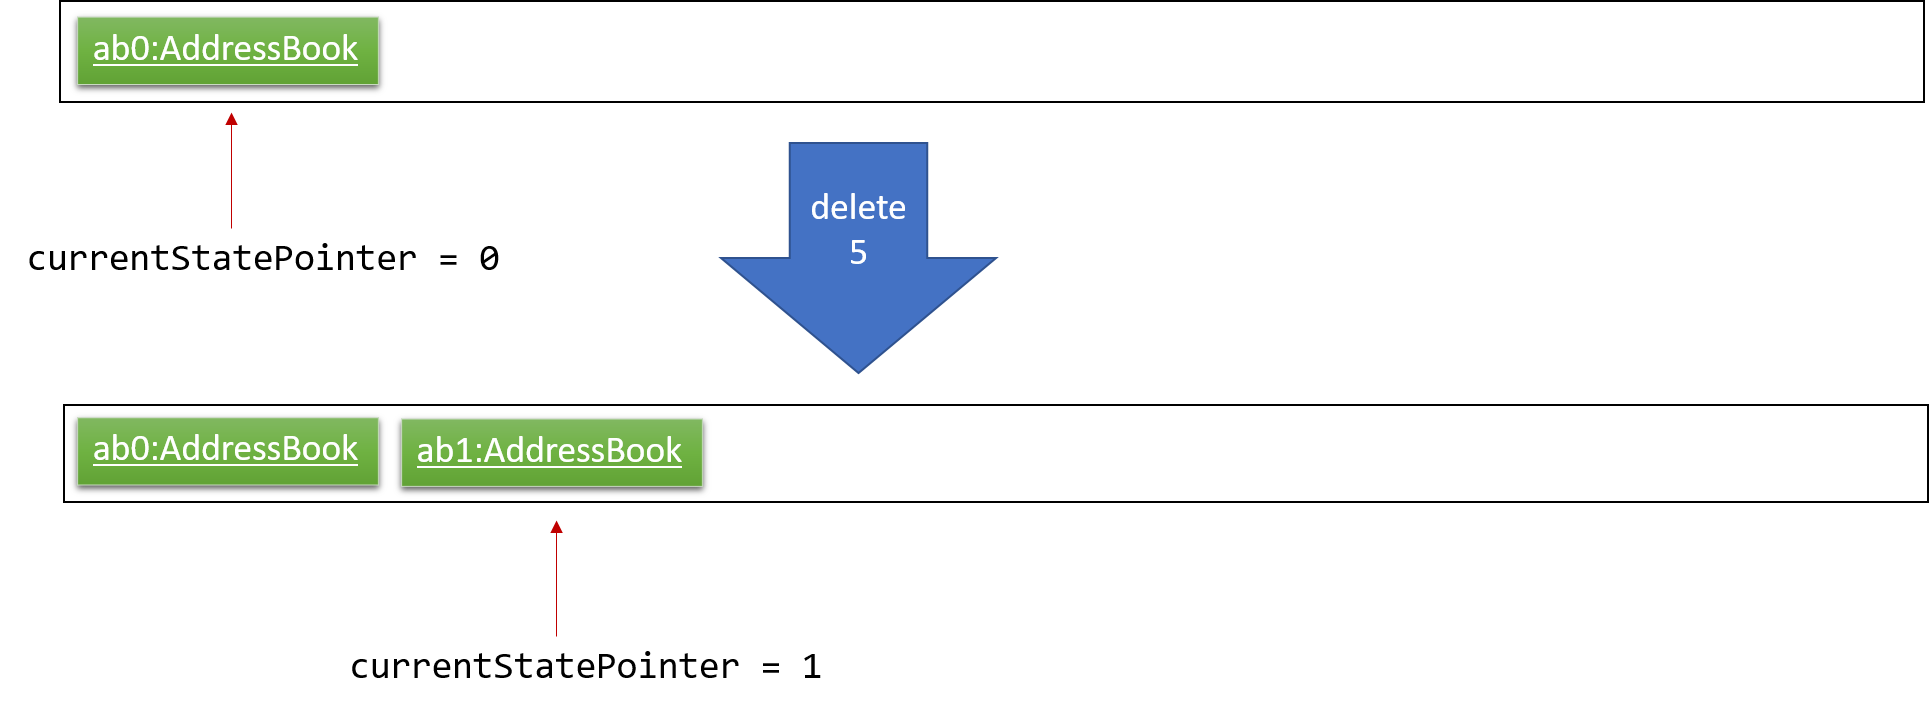
Step 1. The user launches the application for the first time. The VersionedAddressBook will be initialized with the initial address book state, and the currentStatePointer pointing to that single address book state.

Step 2. The user executes delete 5 command to delete the 5th person in the address book. The delete command calls Model#commitAddressBook(), causing the modified state of the address book after the delete 5 command executes to be saved in the addressBookStateList, and the currentStatePointer is shifted to the newly inserted address book state.
Step 3. The user executes add n/David … to add a new person. The add command also calls Model#commitAddressBook(), causing another modified address book state to be saved into the addressBookStateList.
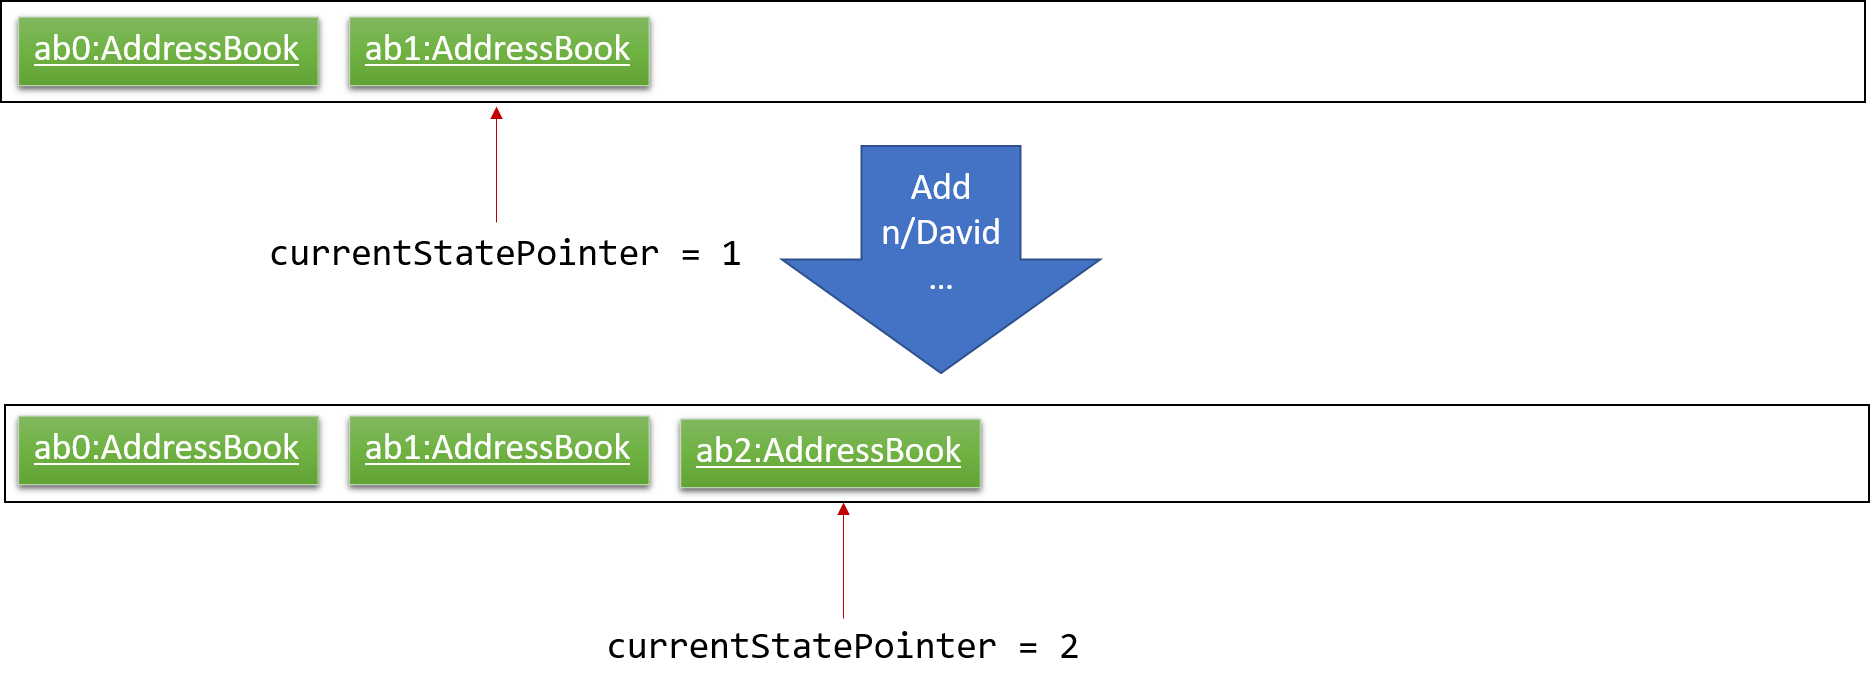
If a command fails its execution, it will not call Model#commitAddressBook(), so the address book state will not be saved into the addressBookStateList.
|
Step 4. The user now decides that adding the person was a mistake, and decides to undo that action by executing the undo command. The undo command will call Model#undoAddressBook(), which will shift the currentStatePointer once to the left, pointing it to the previous address book state, and restores the address book to that state.
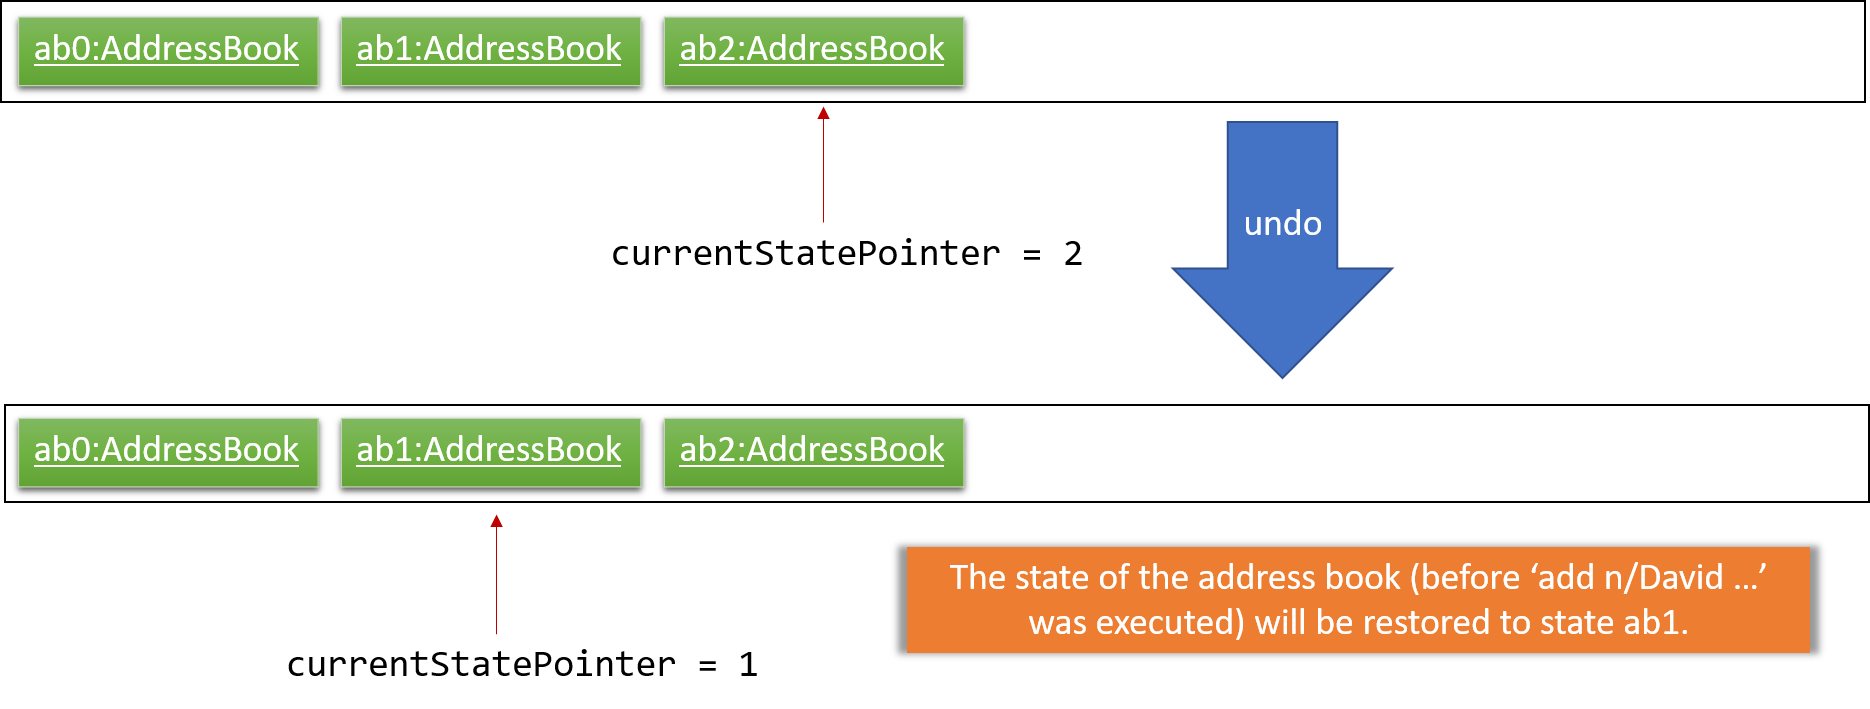
If the currentStatePointer is at index 0, pointing to the initial address book state, then there are no previous address book states to restore. The undo command uses Model#canUndoAddressBook() to check if this is the case. If so, it will return an error to the user rather than attempting to perform the undo.
|
The following sequence diagram shows how the undo operation works:
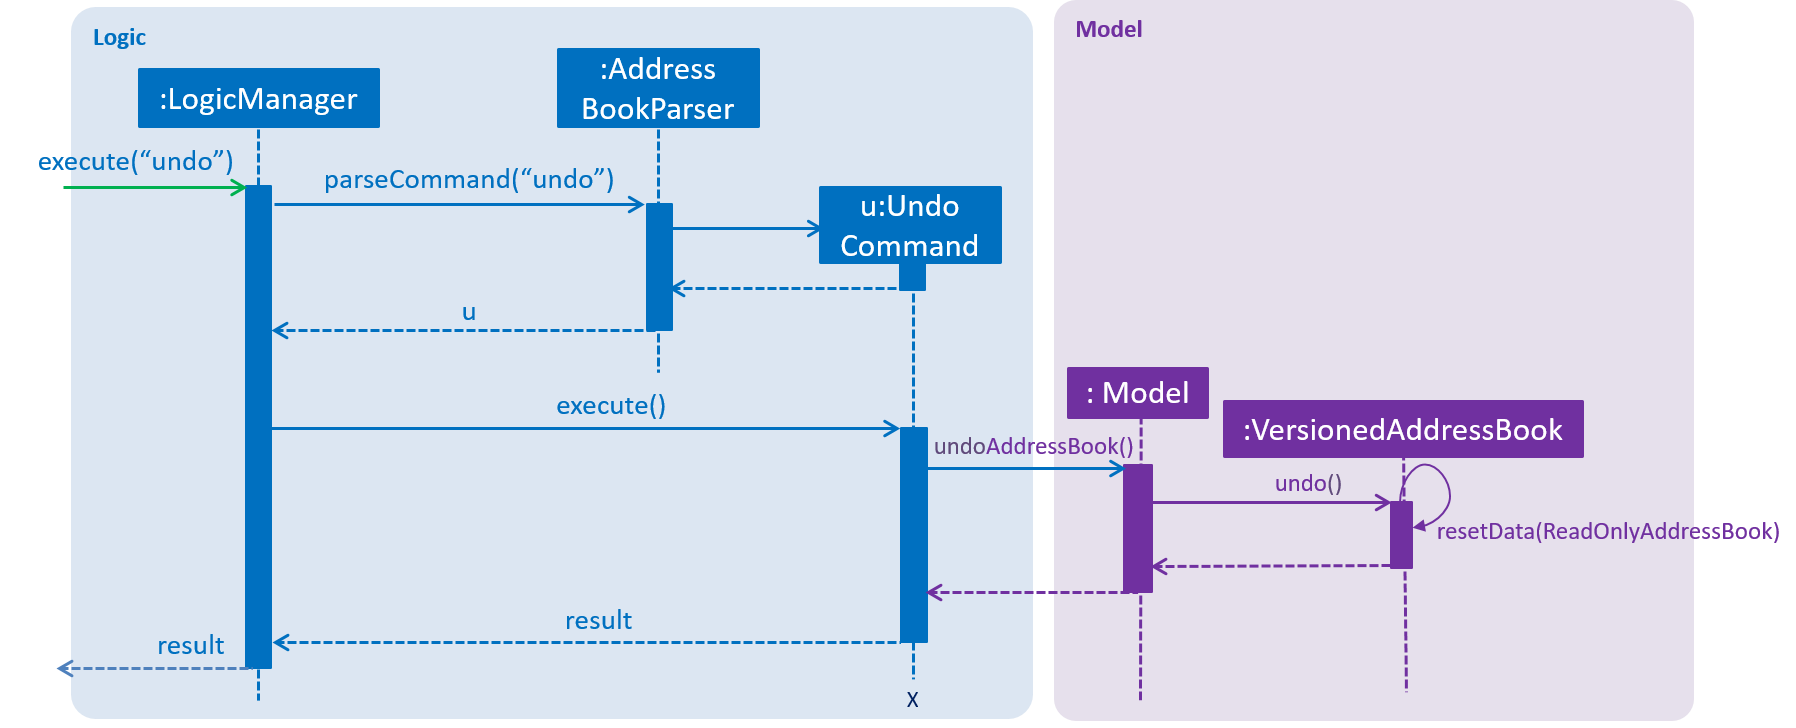
undo CommandThe redo command does the opposite — it calls Model#redoAddressBook(), which shifts the currentStatePointer once to the right, pointing to the previously undone state, and restores the address book to that state.
If the currentStatePointer is at index addressBookStateList.size() - 1, pointing to the latest address book state, then there are no undone address book states to restore. The redo command uses Model#canRedoAddressBook() to check if this is the case. If so, it will return an error to the user rather than attempting to perform the redo.
|
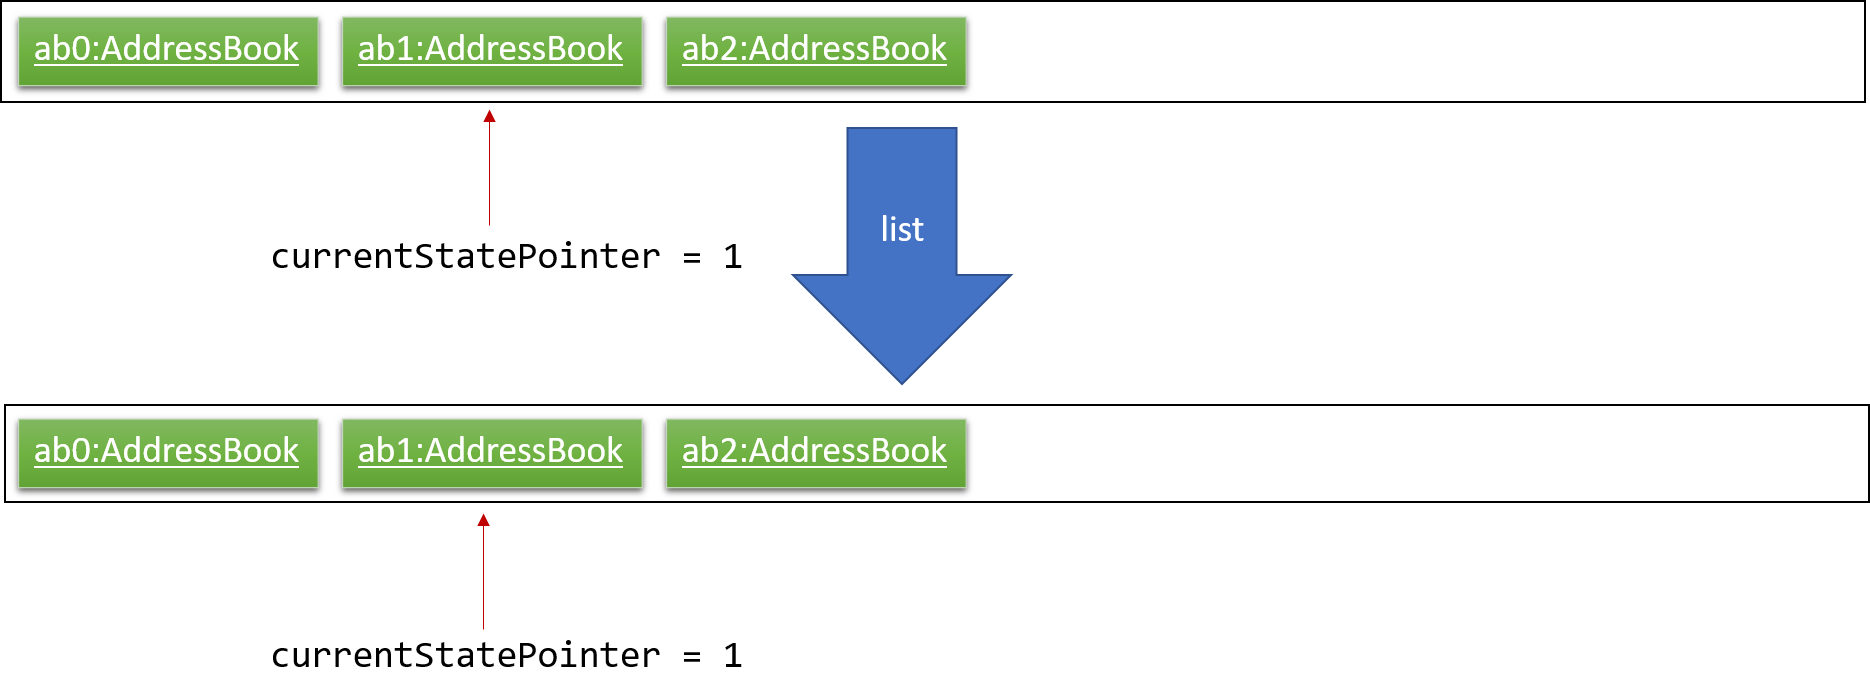
Step 5. The user then decides to execute the command list. Commands that do not modify the address book, such as list, will usually not call Model#commitAddressBook(), Model#undoAddressBook() or Model#redoAddressBook(). Thus, the addressBookStateList remains unchanged.
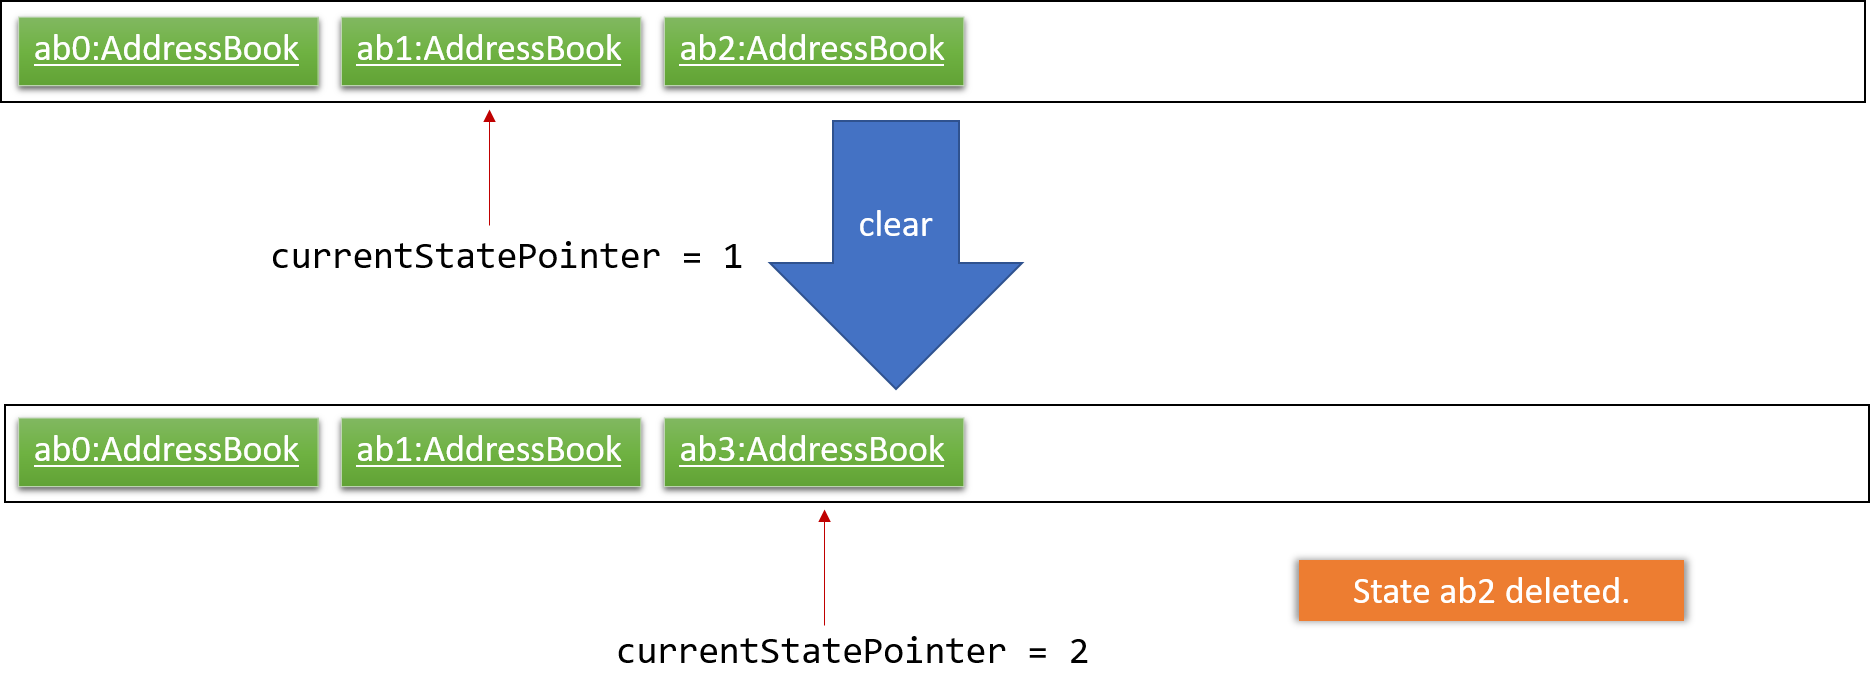
Step 6. The user executes clear, which calls Model#commitAddressBook(). Since the currentStatePointer is not pointing at the end of the addressBookStateList, all address book states after the currentStatePointer will be purged. We designed it this way because it no longer makes sense to redo the add n/David … command. This is the behavior that most modern desktop applications follow.
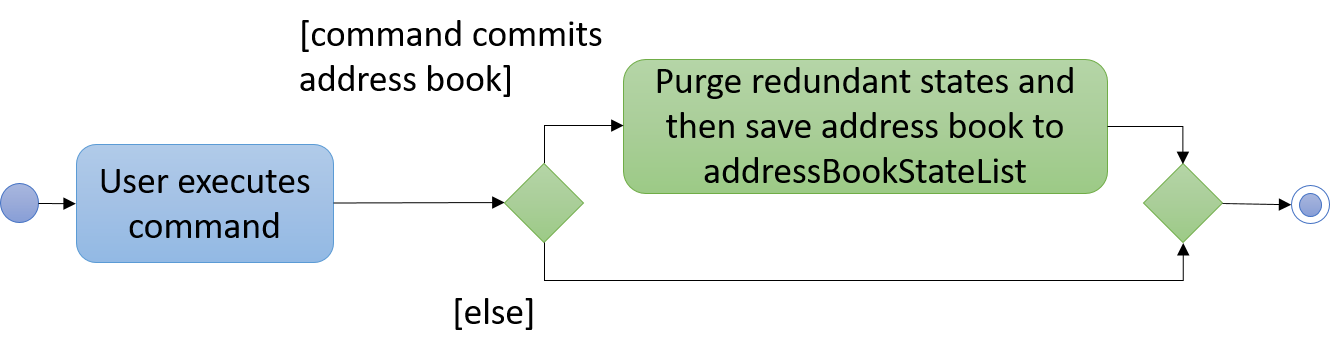
The following activity diagram summarizes what happens when a user executes a new command:
3.1.2. Design Considerations
Aspect: How undo & redo executes
-
Alternative 1 (current choice): Saves the entire address book.
-
Pros: Easy to implement.
-
Cons: May have performance issues in terms of memory usage.
-
-
Alternative 2: Individual command knows how to undo/redo by itself.
-
Pros: Will use less memory (e.g. for
delete, just save the person being deleted). -
Cons: We must ensure that the implementation of each individual command are correct.
-
Aspect: Data structure to support the undo/redo commands
-
Alternative 1 (current choice): Use a list to store the history of address book states.
-
Pros: Easy for new Computer Science student undergraduates to understand, who are likely to be the new incoming developers of our project.
-
Cons: Logic is duplicated twice. For example, when a new command is executed, we must remember to update both
HistoryManagerandVersionedAddressBook.
-
-
Alternative 2: Use
HistoryManagerfor undo/redo-
Pros: We do not need to maintain a separate list, and just reuse what is already in the codebase.
-
Cons: Requires dealing with commands that have already been undone: We must remember to skip these commands. Violates Single Responsibility Principle and Separation of Concerns as
HistoryManagernow needs to do two different things.
-
3.2. Timetable feature
3.2.1. Current implementation
FreeTime’s timetable feature allows users to store and view their own timetables.
FreeTime can also display a deconflicted timetable, highlighting mutually free timeslots among the current user and all other selected people.
The timetable feature can be broadly split into two parts:
1. The backend, which handles the storage and logic of TimeTable objects;
2. The frontend, which handles the display of TimeTable objects.
Backend implementation
The TimeTable object is composed under the Person class in Model. Each TimeTable is composed of any number of TimeSlot objects. Each TimeSlot consists of:
1. One DayOfWeek object to indicate the day of week of the TimeSlot;
2. Two LocalTime objects to indicate the start time and end time of the TimeSlot respectively.
3. One Color object to indicate the color of the TimeSlot when displayed on FreeTime’s UI.
The following class diagram summarises the relationship between the components of the TimeTable class:
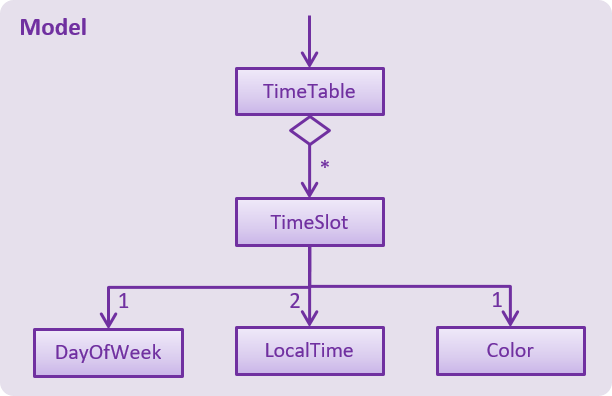
TimeTable ClassThe TimeTable class implements two key methods:
1. TimeTable#addTimeSlot() - to add a new TimeSlot to the TimeTable
2. TimeTable#deleteTimeSlot() - to remove an existing TimeSlot from the TimeTable
The class DeconflictTimeTable, which inherits from TimeTable, is used when the free command is executed to store mutually free timeslots among users.
When the free command is executed, a DeconflictTimeTable object is instantiated with all TimeSlot objects in the user’s TimeTable. Subsequently, the TimeTable objects of every Person that is passed as an argument to the free command is added to the DeconflictTimeTable.
The following sequence diagram shows the significant method calls for the method FreeCommand#execute():
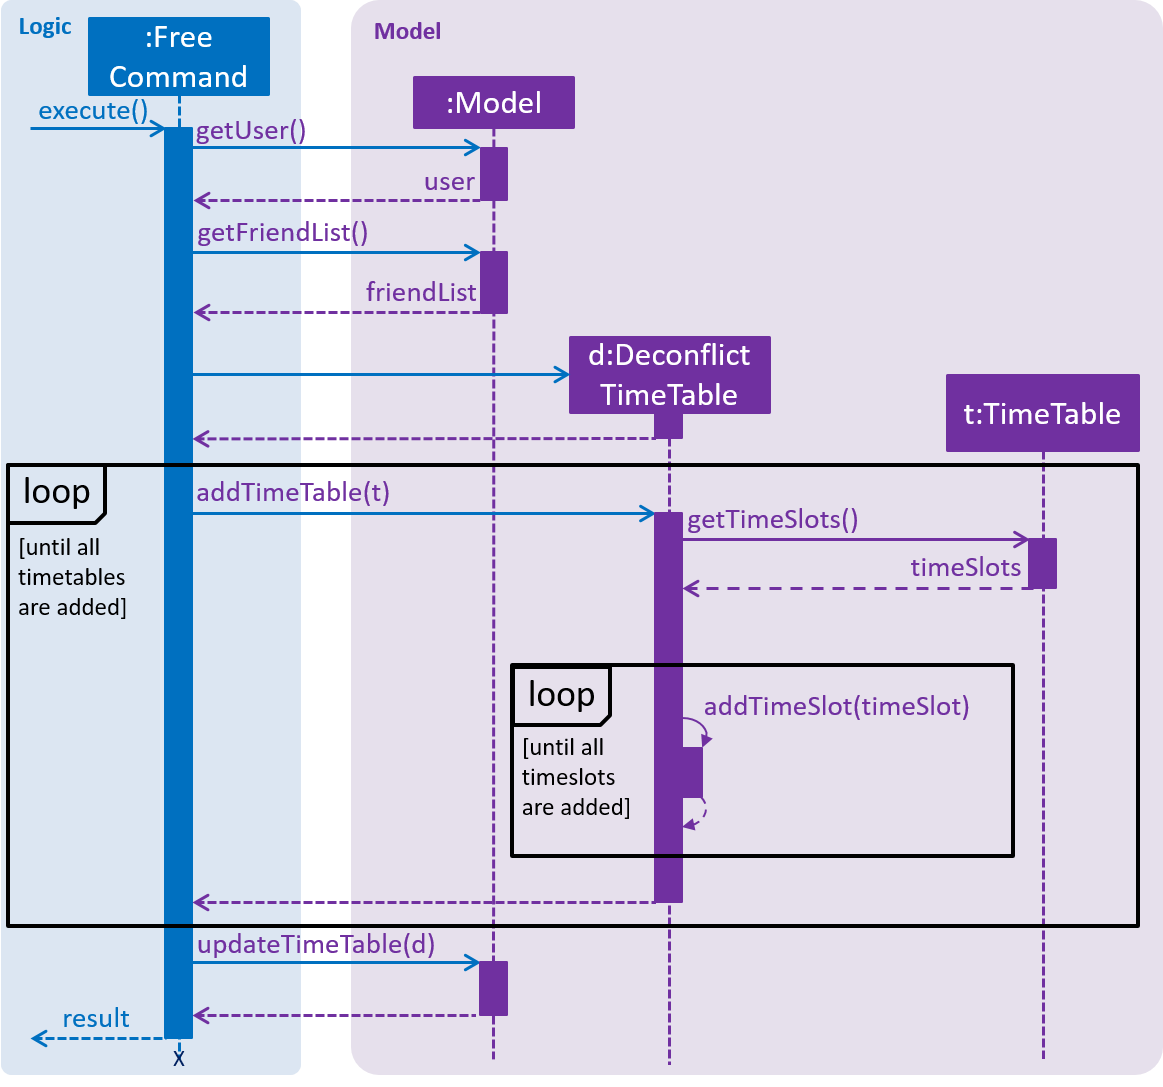
FreeTime#execute() MethodThe key difference between TimeTable and DeconflictTimeTable lies in the implementation of the addTimeSlot() method. TimeTable#addTimeSlot() throws a TimeSlotOverlapException when the TimeSlot to be added overlaps with an existing TimeSlot in the TimeTable.
However, DeconflictTimeTable#addTimeSlot() merges the TimeSlot to be added with all overlapping TimeSlot objects in the DeconflictTimeTable. Thus, DeconflictTimeTable#addTimeSlot() never throws TimeSlotOverlapException.
Frontend implementation
TimeTablePanel extends the abstract class UIPart and is implemented using a BorderPane. It is composed of the following classes:
1. TimeTableDayMarkerGrid - a GridPane on the left of the TimeTablePanel to display the days of the week;
2. TimeTableTimeMarkerGrid - a GridPane on the top of the TimeTablePanel to display the time markers
3. TimeTableMainGrid - a GridPane in the center of the TimeTablePanel. Composed of any number of TimeTablePanelTimeSlot objects.
The following class diagram summarises the relationship between the components of the TimeTablePanel class:
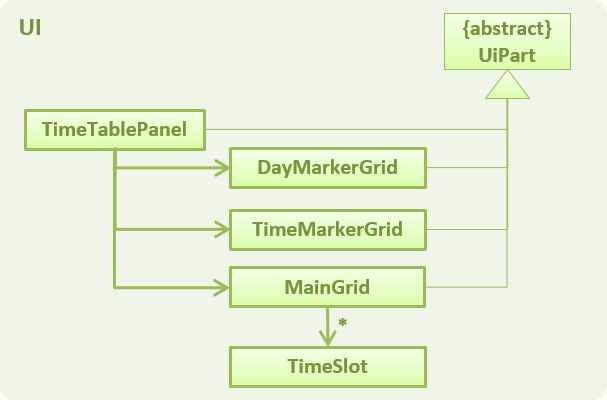
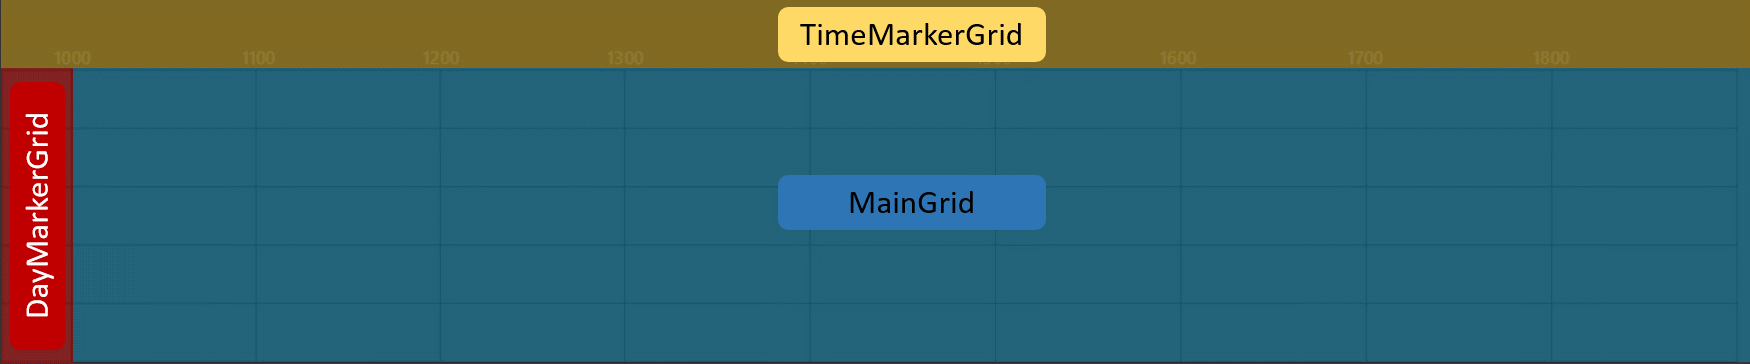
TimeTablePanel ClassThe following screenshot shows the relative position of all the components in TimeTablePanel:
FreeTime’s UI is updated through the EventsCenter every time Model#updateTimeTable() is called.
The following sequence diagram shows the significant method calls for the method Model#updateTimeTable().
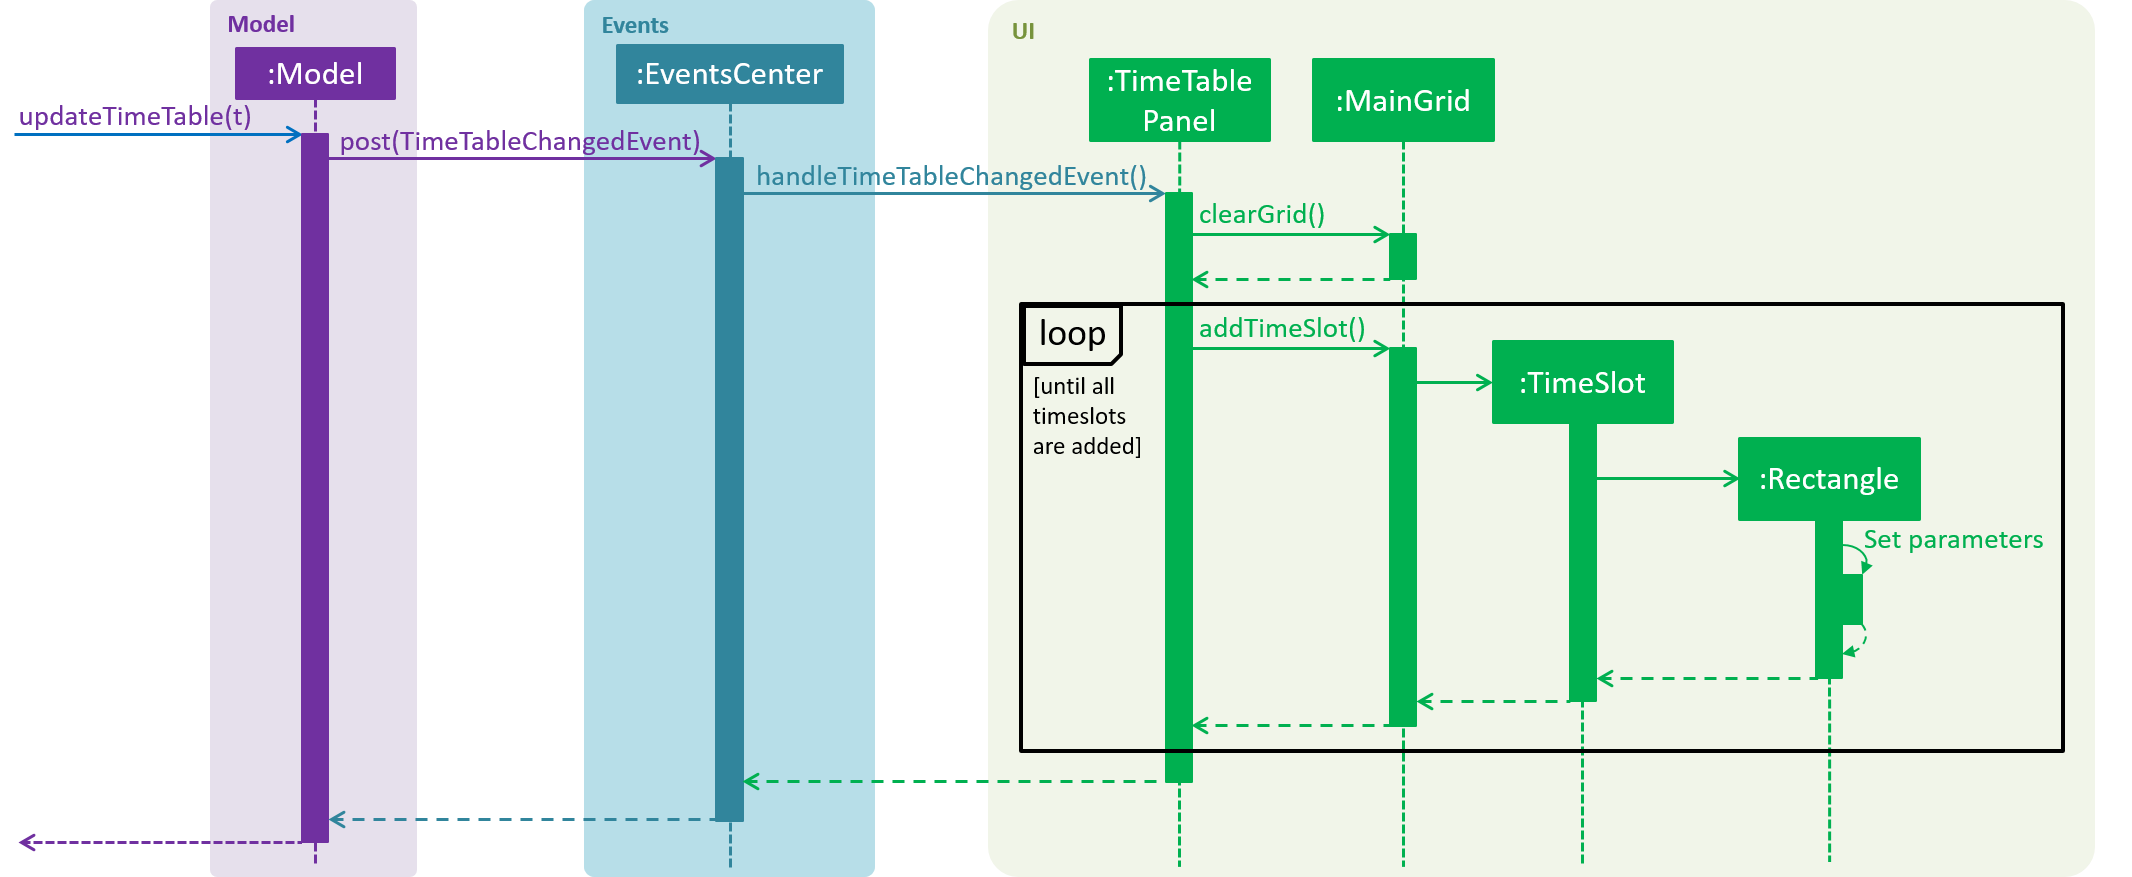
FreeTime#execute() Method
3.2.2. Design Considerations
Aspect: How the frontend updates the TimeTable to be displayed
-
Alternative 1 (current choice): Clears the entire
TimeTableMainGridbefore loading the newTimeTable-
Pros: Easy to implement, only one method (
loadTimeTable()) is required -
Cons: May suffer from performance degradation, especially when the
TimeTableto be loaded contains manyTimeSlotobjects
-
-
Alternative 2: Detect the difference between the currently displayed
TimeTablebefore adding or deletingTimeTablePanelTimeSlotobjects accordingly.-
Pros: Reduces execution time of methods which update the displayed
TimeTable -
Cons: A method to detect the difference between
TimeTableobjects must be implemented. May not result in significant performance improvements when switching betweenTimeTableobjects with few or noTimeSlotobjects in common.
-
3.3. Import and Export timetable feature
The import and export timetable feature allows users to import and export their timetables from and to external applications as .ics files.
The Import command currently supports timetables from NUSMODS. [https://nusmods.com] This makes it easy for existing users of NUSMODS to bring their timetables into FreeTime
The Export command currently supports FreeTime. This makes it possible to make backups of your timetable, or to share it with other users of FreeTime.
3.3.1. Current implementation
The import and export feature consists of two parts:
-
The frontend, which parses user input, and informs the user of success or failure.
-
The backend, which handles the reading and writing of .ics files, and the conversion between the .ics format and the TimeTable object.
Frontend implementation
Similar to the other commands; see Events-Driven nature of the design.
Backend implementation - IcsUtil Class
The IcsUtil class implements two public methods for handling .ics files:
-
IcsUtil#readTimeTableFromFile()- to read aTimeTablefrom a specified .ics file on the disk -
IcsUtil#saveTimeTableToFile()- to write aTimeTableto a specified location on the disk
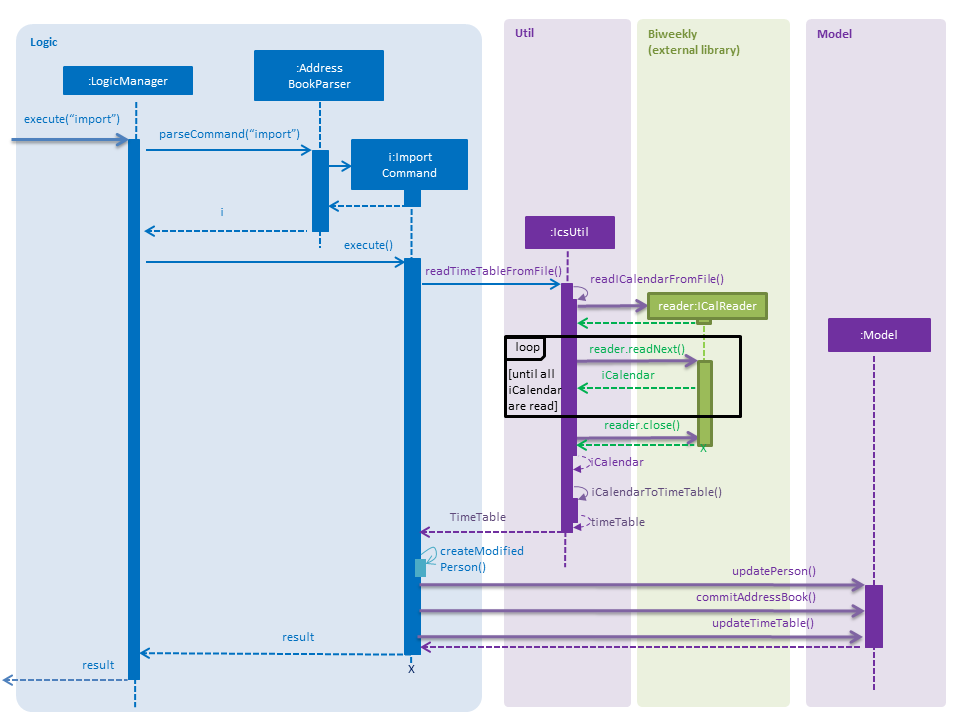
Backend implementation - Import
The general implementation are as follows:
-
Biweekly(external library) is used to obtain anICalendarobject, by reading the import file -
The
ICalendaris converted toTimeTableby IcsUtil. -
Using this
TimeTable, we can update the model.
The following sequence diagram shows how the TimeTable is imported:
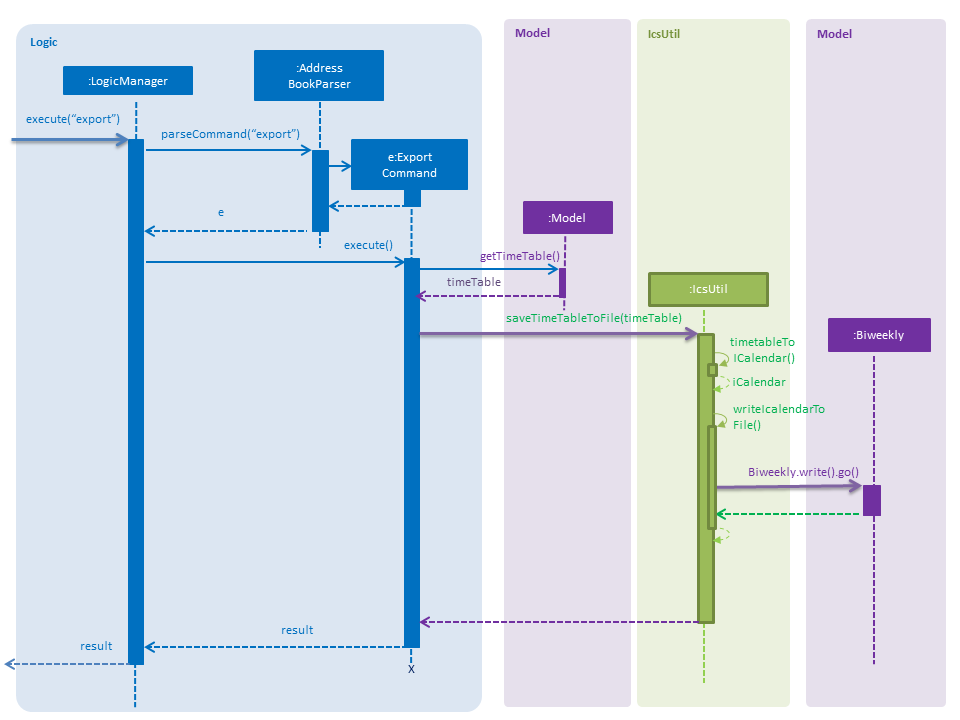
Backend implementation - Export
The general implementation are as follows:
-
The currently displayed
TimeTableis obtained from model. -
the
TimeTableis converted into anICalendarby IcsUtil. -
The
ICalendaris written to the file usingBiweekly(external library).
The following sequence diagram shows how the TimeTable is exported:
export Command3.3.2. Design Considerations
Aspect: Which Classes (and which system(s)) should parse the ics file format?
-
Alternative 1 (current choice): All code related to parsing .ics timetable files are inside 'IcsUtil' class. When executing ImportCommand/ExportCommand, it directly calls a method in IcsUtil.
-
Pros:
-
All methods that have to do with .ics parsing are in one class. Easier to implement and manage, given that there are only a few methods for now.
-
Less dependencies. (directly call IcsUtil to read/write .ics files; compared to having to call IcsStorage which then calls IcsUtil).
-
-
Cons:
-
Single responsibility principle is broken. Also, difficult to manage if the class expands and has more methods.
-
-
-
Alternative 2 (Go through the
Storagesubsystem): Follow the existing IO implementation ofaddressbook.xml; create an IcsTimeTableStorage class to access the ics file in hard disk.-
Pros:
-
Similar implementation to existing: Classes that have to do with IO are accessed using the Storage Interface.
-
-
Cons:
-
Increased dependency: LogicManager will then have increased dependency on Storage.
-
More difficult to implement: Storage subsystem needs to be created on starting the app, whereas the import and export commands are called ad-hoc.
-
-
3.4. Security Implementation
To begin this section, we would need to introduce the idea of a Authenticated User instance.
Whenever a user successfully logs in, or creates a new account, the application will create an Authenticated User in
Model. This User is an extension of the Person Class, which different part of the UI and SecurityManager will access it. One example would
be the friend’s UI panel, where FreeTime has to know the current user to display his friends
3.4.1. Current Implementation
This section will be broken down into
1. Front-End
2. Back-End
Front-End Implementation
-
CLI
CommandBox Class handles the command line interface, and passes every command to SecurityManager through the Security API. -
UI Prompt
Inside the UI package, there are two new windows created, LoginWindow and RegistrationWindow. Each Window would handle UI events such as clicks and passing relevant information to the SecurityManager similar to above.
Back-End Implementation
The Sequence Diagram when a user enters a command is seen in the figure below:
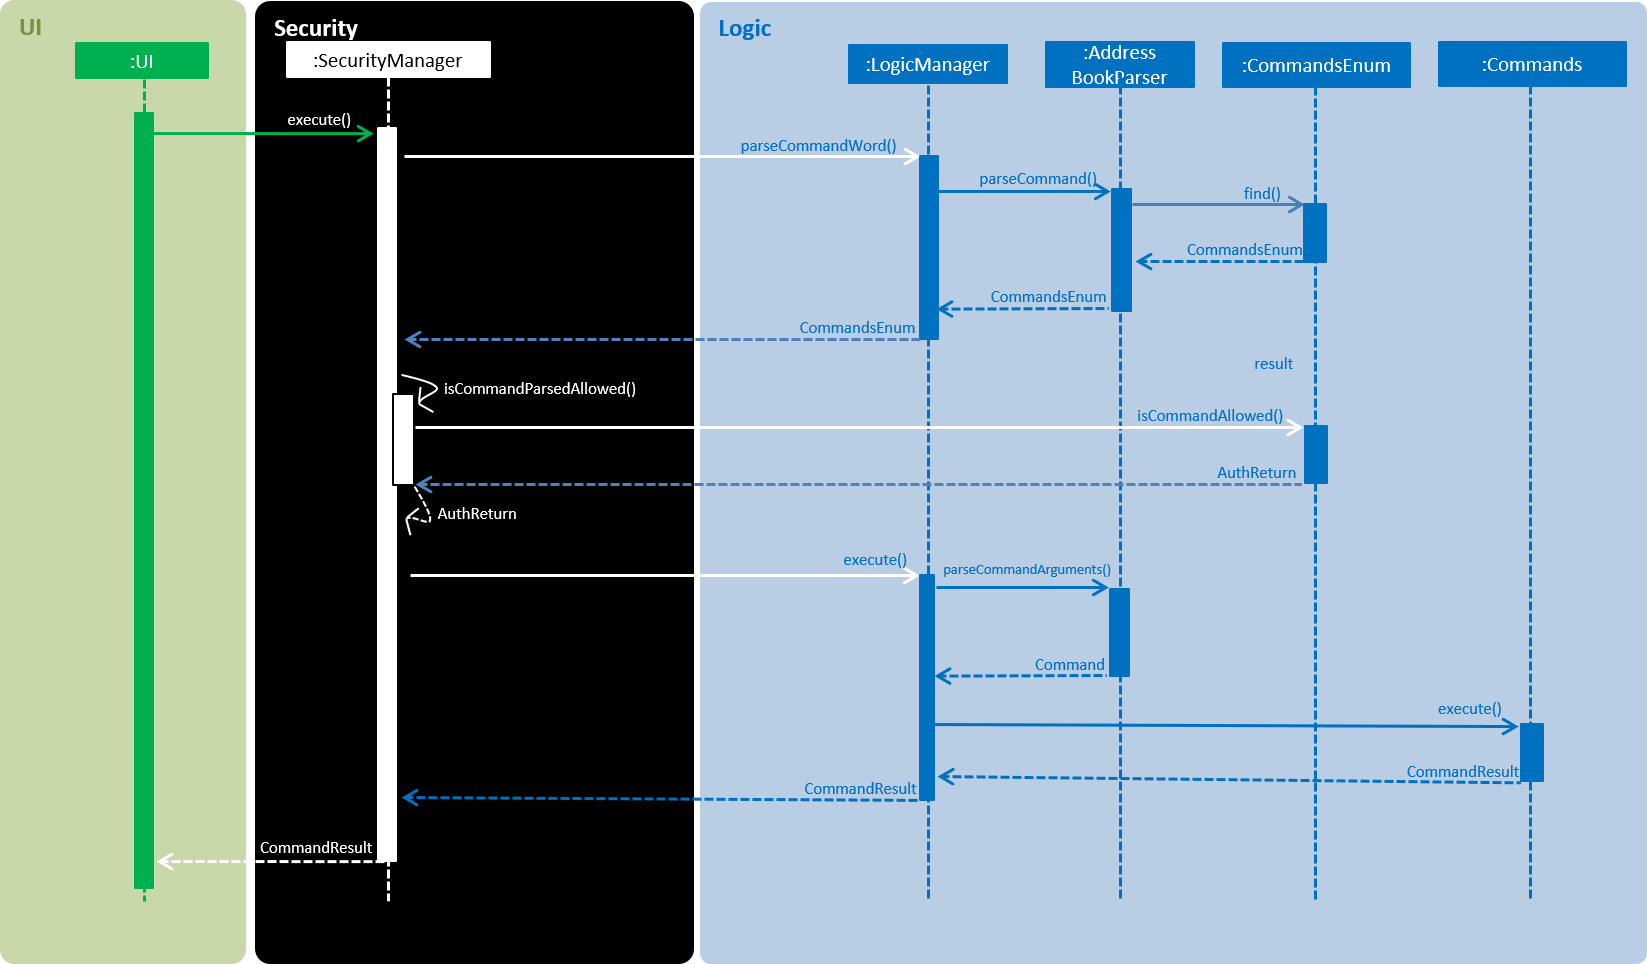
AuthReturn is a enum type that contains the following definition:
COMMAND_ALLOWED, COMMAND_LOGOUTFIRST, COMMAND_LOGINFIRST, COMMAND_ERROR;
The above figure shows the sequence when the AuthReturn is COMMAND_ALLOWED. When it is not that, there will be an SecurityAuthenticationException
thrown with the relevant message to the user.
CommandsEnum is another enum type that contains the method iscommandAllowed(). They are found in seedu.addressbook.commons package.
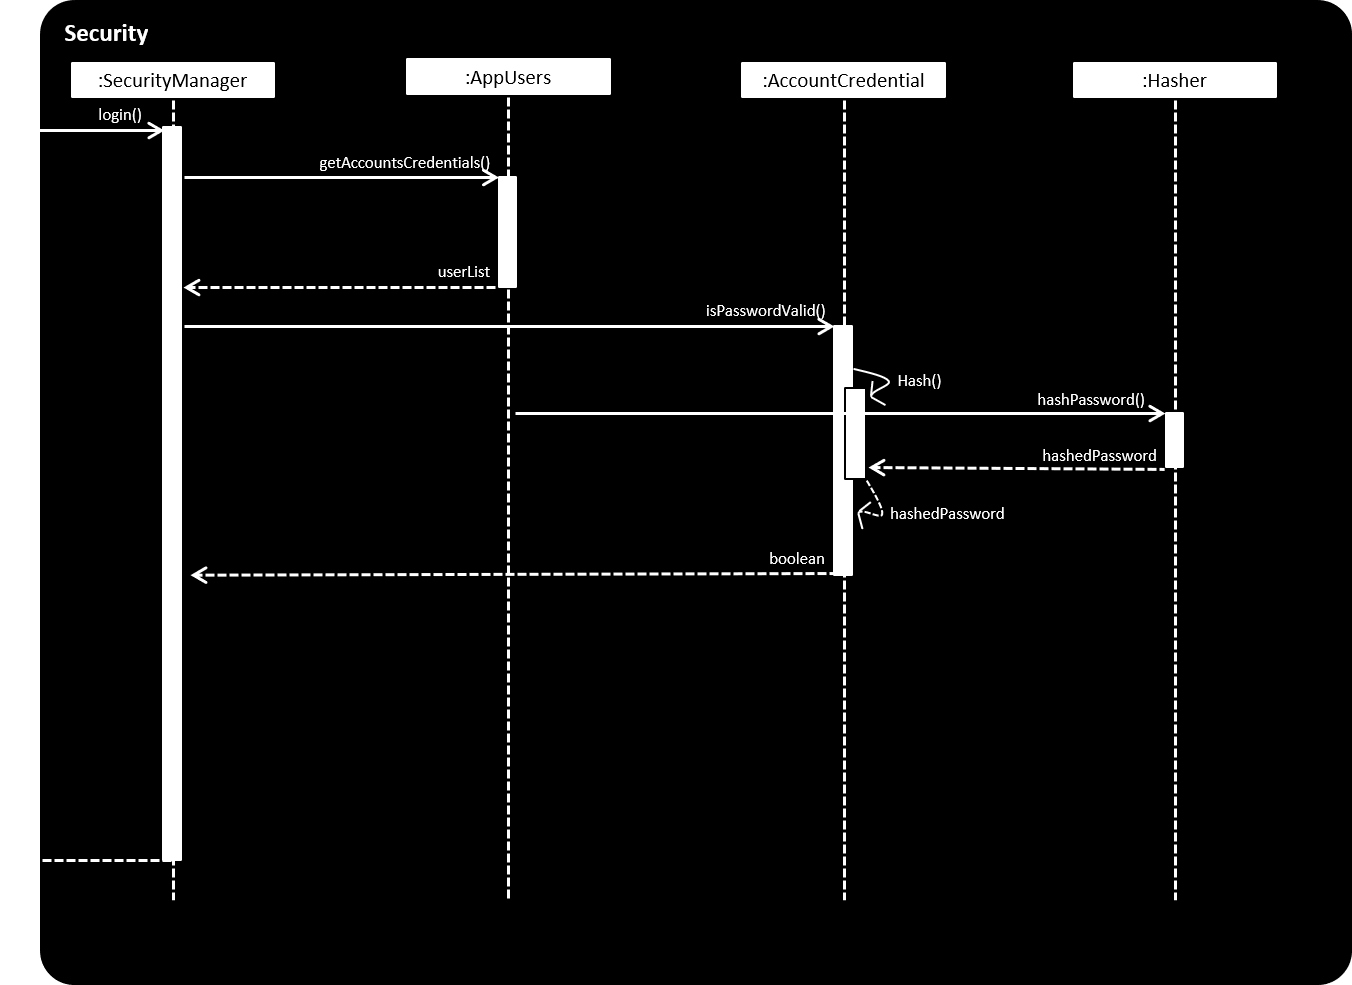
The figure above shows the steps when login is called after parsing the command (since login is a command too).
AppUsers contains an array of AccountCredentials, which has the attribute of Username and Password, and methods such isPasswordValid(). Here it also calls the static Hasher class, which takes the password and a salt to create the hash of the password.
Whenever a user logs in, the username is searched from userList returned by AppUsers. Once it matches a username, the input pasword is then salted and hashed (SHA-512), and finally compared to the stored hashed password. A boolean is then returned to the SecurityManager.
3.4.2. Design Considerations
Where to store Authenticated User object
-
Alternative 1 (current choice): Inside of ModelManager
-
Pros: All the methods in LogicManager can access User object
-
Cons: The concept of an authenticated user object should be inside SecurityManager
-
-
Alternative 2: Inside of SecurityManager
-
Pros: ModelManager does not have security related objects inside it
-
Cons: Logic and Model methods cannot access it
-
How to store user password credentials
-
Alternative 1 (current choice): To encrypt with a hash function
-
Pros: Password is protected
-
Cons: There is a slight computational overhead and code complexity
-
-
Alternative 2: Store the plaintext password
-
Pros: Less work to do
-
Cons: Anyone who have access to the credential file can have access to all the application users
-
3.5. Friend feature
3.5.1. Feature description
The friend feature allows users to befriend and add other users to their friend list. Timetables and personal information is only viewable for users in your friend list and timetables can only be deconflicted within your friends.
3.5.2. Current implementation
The feature is implemented with two main parts. The frontend and the backend, which will be explained below.
Frontend implementation
On the left side users will now see two panes, one above for friends and one below for the rest of the users not inside the friend list.
PersonListPanel is adapted to now have two Stackpane instead of one and is nested inside a Splitpane in the VBox.
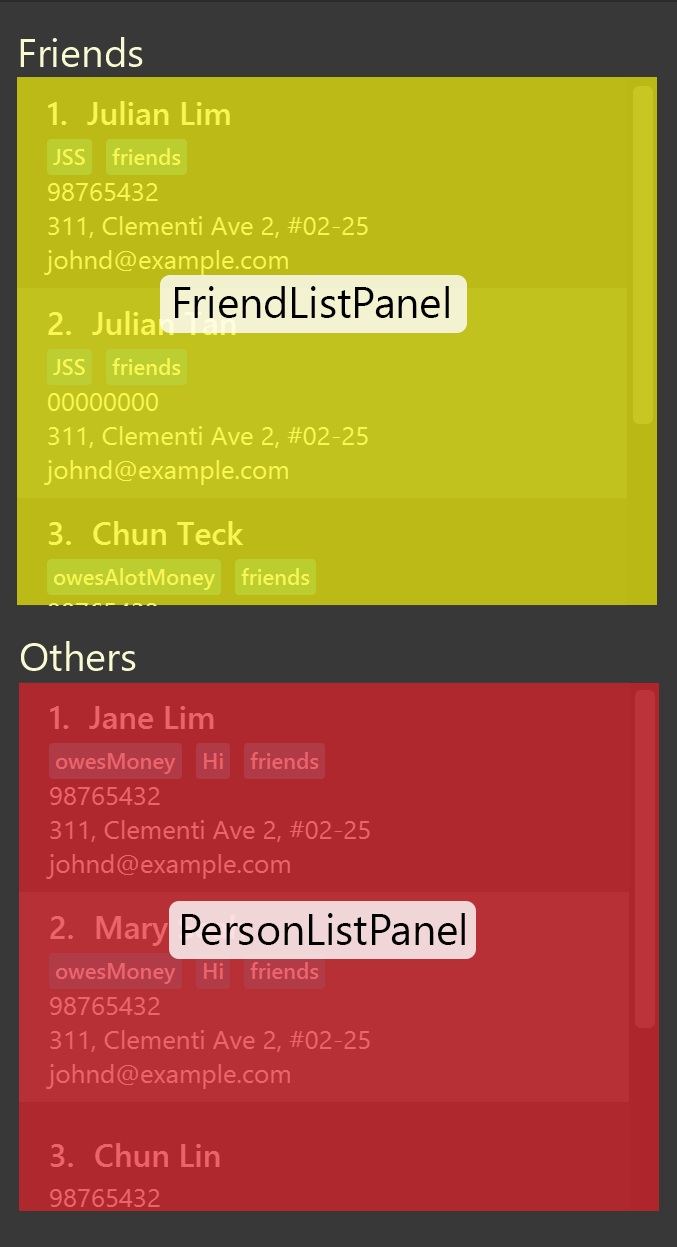
The two panels will be filtered based on two predicates, FriendListPredicate and OtherListPredicate.
The friends of the current user is iterated through and those that belong to the friend will be shown on the FriendListPanel.
The rest of the users will be shown on PersonListPanel. Both predicates will filter out the current user.
When additional filtering commands such as group or find are executed, the predicate produce from either of the commands will be added to a new CombinedFriendListPredicate and CombinedOtherListPredicate.
This creates a new predicate in which will filter the two panels accordingly.
Backend implementation
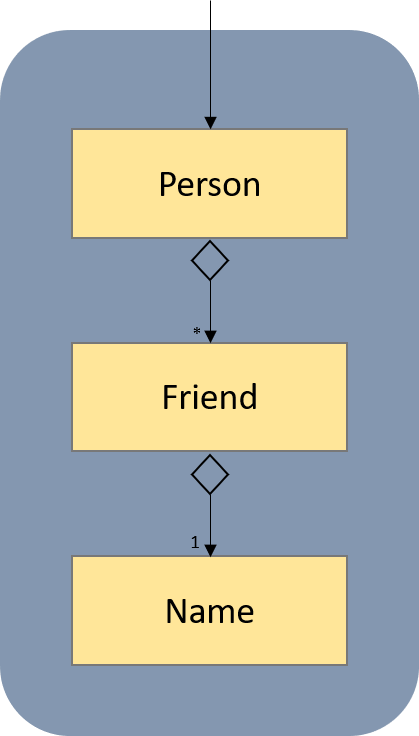
The User is associated with a specific Person. Each person can have any number of Friend objects.
Every friend will have a Name object that corresponds to the specific Person object in the list.
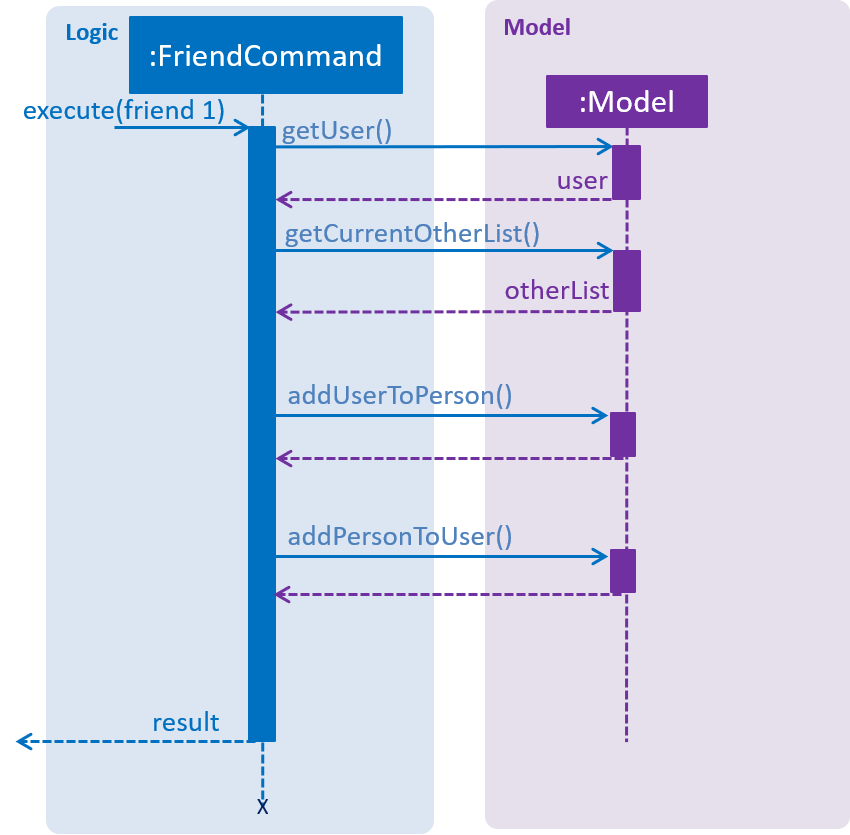
When the friend command is executed, the Person selected at the index will be added as a Friend to the current user.
Likewise, the reverse will occur and the user will be added to the Person selected as a Friend.
When the selected person logs in, he or she will see the user as a friend as well.
The following sequence diagram shows the execution of the Friend command:
How to store the friends of the User
-
Alternative 1 (current choice): Every Friend of the user has a name which matches a specific person in the database
-
Pros: Every friend only includes essential information about the specific person
-
Cons: Takes longer to match the person in the friends list to a person in the database
-
-
Alternative 2: Allowing every Friend to compose a Person object
-
Pros: Friend contains more information that can be used
-
Cons: Duplicated entries of the same Person
-
How to display the friends and others of the current User
-
Alternative 1 (current choice): Use of predicates to set the list to reflect only the desired people.
-
Pros: Allow different predicates to be nested when more filtering commands are called. More dynamic filtering can be done.
-
Cons: The list internally contains all the users of the database, extra information is being loaded.
-
-
Alternative 2: Send a list of all friends and non-friends at the start of the application to individual panels.
-
Pros: Correct users will be loaded at the start for each panel.
-
Cons: Friends panel and others panel have to be repopulated again after every friend/unfriend
-
3.6. [Proposed] Data Encryption
{Explain here how the data encryption feature will be implemented}
3.7. Logging
We are using java.util.logging package for logging. The LogsCenter class is used to manage the logging levels and logging destinations.
-
The logging level can be controlled using the
logLevelsetting in the configuration file (See Section 3.8, “Configuration”) -
The
Loggerfor a class can be obtained usingLogsCenter.getLogger(Class)which will log messages according to the specified logging level -
Currently log messages are output through:
Consoleand to a.logfile.
Logging Levels
-
SEVERE: Critical problem detected which may possibly cause the termination of the application -
WARNING: Can continue, but with caution -
INFO: Information showing the noteworthy actions by the App -
FINE: Details that is not usually noteworthy but may be useful in debugging e.g. print the actual list instead of just its size
3.8. Configuration
Certain properties of the application can be controlled (e.g App name, logging level) through the configuration file (default: config.json).
4. Documentation
We use asciidoc for writing documentation.
| We chose asciidoc over Markdown because asciidoc, although a bit more complex than Markdown, provides more flexibility in formatting. |
4.1. Editing Documentation
See UsingGradle.adoc to learn how to render .adoc files locally to preview the end result of your edits.
Alternatively, you can download the AsciiDoc plugin for IntelliJ, which allows you to preview the changes you have made to your .adoc files in real-time.
4.2. Publishing Documentation
See UsingTravis.adoc to learn how to deploy GitHub Pages using Travis.
4.3. Converting Documentation to PDF format
We use Google Chrome for converting documentation to PDF format, as Chrome’s PDF engine preserves hyperlinks used in webpages.
Here are the steps to convert the project documentation files to PDF format.
-
Follow the instructions in UsingGradle.adoc to convert the AsciiDoc files in the
docs/directory to HTML format. -
Go to your generated HTML files in the
build/docsfolder, right click on them and selectOpen with→Google Chrome. -
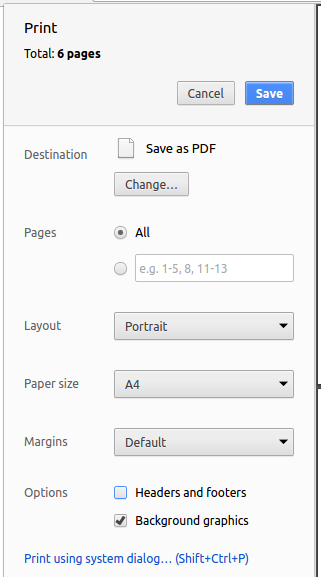
Within Chrome, click on the
Printoption in Chrome’s menu. -
Set the destination to
Save as PDF, then clickSaveto save a copy of the file in PDF format. For best results, use the settings indicated in the screenshot below.
4.4. Site-wide Documentation Settings
The build.gradle file specifies some project-specific asciidoc attributes which affects how all documentation files within this project are rendered.
Attributes left unset in the build.gradle file will use their default value, if any.
|
| Attribute name | Description | Default value |
|---|---|---|
|
The name of the website. If set, the name will be displayed near the top of the page. |
not set |
|
URL to the site’s repository on GitHub. Setting this will add a "View on GitHub" link in the navigation bar. |
not set |
|
Define this attribute if the project is an official SE-EDU project. This will render the SE-EDU navigation bar at the top of the page, and add some SE-EDU-specific navigation items. |
not set |
4.5. Per-file Documentation Settings
Each .adoc file may also specify some file-specific asciidoc attributes which affects how the file is rendered.
Asciidoctor’s built-in attributes may be specified and used as well.
Attributes left unset in .adoc files will use their default value, if any.
|
| Attribute name | Description | Default value |
|---|---|---|
|
Site section that the document belongs to.
This will cause the associated item in the navigation bar to be highlighted.
One of: * Official SE-EDU projects only |
not set |
|
Set this attribute to remove the site navigation bar. |
not set |
4.6. Site Template
The files in docs/stylesheets are the CSS stylesheets of the site.
You can modify them to change some properties of the site’s design.
The files in docs/templates controls the rendering of .adoc files into HTML5.
These template files are written in a mixture of Ruby and Slim.
|
Modifying the template files in |
5. Testing
5.1. Running Tests
There are three ways to run tests.
| The most reliable way to run tests is the 3rd one. The first two methods might fail some GUI tests due to platform/resolution-specific idiosyncrasies. |
Method 1: Using IntelliJ JUnit test runner
-
To run all tests, right-click on the
src/test/javafolder and chooseRun 'All Tests' -
To run a subset of tests, you can right-click on a test package, test class, or a test and choose
Run 'ABC'
Method 2: Using Gradle
-
Open a console and run the command
gradlew clean allTests(Mac/Linux:./gradlew clean allTests)
| See UsingGradle.adoc for more info on how to run tests using Gradle. |
Method 3: Using Gradle (headless)
Thanks to the TestFX library we use, our GUI tests can be run in the headless mode. In the headless mode, GUI tests do not show up on the screen. That means the developer can do other things on the Computer while the tests are running.
To run tests in headless mode, open a console and run the command gradlew clean headless allTests (Mac/Linux: ./gradlew clean headless allTests)
5.2. Types of tests
We have two types of tests:
-
GUI Tests - These are tests involving the GUI. They include,
-
System Tests that test the entire App by simulating user actions on the GUI. These are in the
systemtestspackage. -
Unit tests that test the individual components. These are in
seedu.address.uipackage.
-
-
Non-GUI Tests - These are tests not involving the GUI. They include,
-
Unit tests targeting the lowest level methods/classes.
e.g.seedu.address.commons.StringUtilTest -
Integration tests that are checking the integration of multiple code units (those code units are assumed to be working).
e.g.seedu.address.storage.StorageManagerTest -
Hybrids of unit and integration tests. These test are checking multiple code units as well as how the are connected together.
e.g.seedu.address.logic.LogicManagerTest
-
5.3. Troubleshooting Testing
Problem: HelpWindowTest fails with a NullPointerException.
-
Reason: One of its dependencies,
HelpWindow.htmlinsrc/main/resources/docsis missing. -
Solution: Execute Gradle task
processResources.
6. Dev Ops
6.1. Build Automation
See UsingGradle.adoc to learn how to use Gradle for build automation.
6.2. Continuous Integration
We use Travis CI and AppVeyor to perform Continuous Integration on our projects. See UsingTravis.adoc and UsingAppVeyor.adoc for more details.
6.3. Coverage Reporting
We use Coveralls to track the code coverage of our projects. See UsingCoveralls.adoc for more details.
6.4. Documentation Previews
When a pull request has changes to asciidoc files, you can use Netlify to see a preview of how the HTML version of those asciidoc files will look like when the pull request is merged. See UsingNetlify.adoc for more details.
6.5. Making a Release
Here are the steps to create a new release.
-
Update the version number in
MainApp.java. -
Generate a JAR file using Gradle.
-
Tag the repo with the version number. e.g.
v0.1 -
Create a new release using GitHub and upload the JAR file you created.
6.6. Managing Dependencies
A project often depends on third-party libraries. For example, Address Book depends on the Jackson library for XML parsing. Managing these dependencies can be automated using Gradle. For example, Gradle can download the dependencies automatically, which is better than these alternatives.
a. Include those libraries in the repo (this bloats the repo size)
b. Require developers to download those libraries manually (this creates extra work for developers)
Appendix A: Product Scope
Target user profile:
-
Has a need to manage complicated weekly timetable
-
Has a need to schedule meeting with many people across many groups
-
Prefer desktop apps over other types
-
Can type fast
-
Prefers typing over mouse input
-
Is reasonably comfortable using CLI apps
Value proposition: Can manage schedule and schedule meetings faster than a typical mouse/GUI driven app
Appendix B: User Stories
Priorities: High (must have) - * * *, Medium (nice to have) - * *, Low (unlikely to have) - *
| Priority | As a … | I want to … | So that I can… |
|---|---|---|---|
|
Teacher |
See when my students are free |
Find a good time to hold extra classes |
|
Student |
Book a slot in my friend’s calendar |
Automatically block out a timeslot in his schedule |
|
User |
Record my schedule |
Know when I am free |
|
Student |
Share my schedule with my friends |
Schedule meetings with them |
|
Student |
See my timetable in table form |
See things intuitively and quickly |
|
Student |
Know when my lecturer is free |
Arrange for consultation slots |
|
Student |
Form project groups with my friends |
Do projects with them |
|
Student |
Find times for me to meet my group members |
Have a meeting without any troublesome planning |
|
Student |
Start my meetings after a certain time |
Not wake up early |
|
Student |
End my before a certain time |
Make it home for dinner |
|
Student |
Have meetings that last for more than a set duration |
Complete the agenda for the meeting |
|
Student |
See when I can have meetings with my group mates in a graphical format |
See all potential meeting times at a glance |
|
Student |
Have meetings only on certain days of the week |
Minimise the number of days I need to go to school |
|
Friend |
Know when my friend is free |
Have lunch with him |
|
User |
Add friends on a platform |
I won’t be lonely |
Appendix C: Use Cases
(For all use cases below, the System is the AddressBook and the Actor is the user, unless specified otherwise)
Use case: Check student’s timetable
MSS:
1. Teacher logs into account.
2. Teacher checks one of her student groups.
3. Teacher selects "Find common free timeslots".
4. Address Book requests for confirmation.
5. Teacher confirms.
6. Address book returns a list of the free timeslots in descending order of availability.
Use case ends.
Use case: Block other user’s timeslot
MSS:
1. Student logs into account.
2. Student requests his friend’s timetable.
3. System prints friend’s timetable.
4. Student chooses one timeslot to block out.
5. System prints updated friend’s timetable.
6. System logs notification to friend’s account.
Use case ends.
Use case: Add user’s timeslot
MSS:
1. User logs into their account.
2. System shows the possible commands.
3. User chooses to add timeslot.
4. System shows the instructions to add timeslot.
5. Student adds one of their timeslots.
6. System confirms the timeslot has been added.
Use case ends.
Use case: User View Own Timetable
MSS:
1. User logs into their account.
2. System shows the possible commands.
3. User selects 'View timetable in table form'.
4. System shows timetable in table form.
Use case ends.
Use case: Find common free-slots (Group of students)
MSS:
1. Student logs into their account.
2. System shows the possible commands.
3. User selects 'Find common free timeslots'.
4. System asks for the people the user wants to find common free timeslots with.
5. Student inputs/selects the people.
6. System prints the free timeslots it has found.
Use case ends.
Extensions: (Only an option if one-time 'events' has been implemented)
1. Student selects one of those timeslots displayed.
2. System adds an 'event' at that timeslots.
Use case ends.
Use case: Import TimeTable (for a person)
MSS:
1. Student logs into their account.
2. System shows the possible commands.
3. User selects 'Import Timetable'.
4. System asks for the location of the file to import the Timetable from.
5. Student inputs the file location.
6. System acknowledges the command, and displays the timetable that was imported.
Use case ends.
Extensions: (user provided invalid file location)
5a. Student inputs invalid file location.
5b. System informs user about the invalid file location.
Use case ends.
Use case: Export TimeTable (for a person)
MSS:
1. Student logs into their account.
2. System shows the possible commands.
3. User selects 'Export Timetable'.
4. System asks for the location of the file to export the Timetable.
5. Student inputs the file location.
6. System indicates successful export.
Use case ends.
Extensions: (export fails for any reason)
6a. System indicates failed export.
Use case ends.
Appendix D: Non Functional Requirements
-
Should work on any mainstream OS as long as it has Java
9or higher installed. -
Should be able to hold up to 1000 timeslots without a noticeable sluggishness (response time of >500 ms) in performance for typical usage.
-
A user with above average typing speed for regular English text (i.e. not code, not system admin commands) should be able to accomplish most of the tasks faster using commands than using the mouse.
Appendix E: Glossary
- Mainstream OS
-
Windows, Linux, Unix, OS-X
- Timeslot
-
A fixed duration of time with a start and end time
- Timetable
-
A set of non-overlapping timeslots
- Group
-
A set of more than one user
- Account
-
A structure that stores all information related to one user. Only accessible to specified user.
Appendix F: Instructions for Manual Testing
Given below are instructions to test the app manually.
| These instructions only provide a starting point for testers to work on; testers are expected to do more exploratory testing. |
F.1. Launch and shutdown
-
Initial launch
-
Download the jar file and copy into an empty folder
-
Double-click the jar file
Expected: Shows the login page. The window size may not be optimual.
-
-
Saving window preferences
-
Resize the window to an optimum size. Move the window to a different location. Close the window.
-
Re-launch the app by double-clicking the jar file.
Expected: The most recent window size and location is retained.
-
F.2. Register, logging in, and logging out
-
Opening the help window
-
Test case:
help
Expected: The help window opens, showing the User Guide.
-
-
Logging in with a test account
-
Test case:
login u/test pw/test
Expected: The login is successful and the main GUI appears. TheMepanel should show a person card panel withtestin the name field.
-
-
Registering a new account
-
Test case:
register u/John Goe pw/testpassword p/98765432 e/johnd@example.com a/311, Clementi Ave 2, #02-25 t/CS2113T
Expected: The registration is successful and the main GUI appears. TheMepanel should show a person card panel withJohn Goein the name field.
-
-
Trying to register a new account with an existing username
-
Test case:
register u/test pw/testpassword p/98765432 e/johnd@example.com a/311, Clementi Ave 2, #02-25 t/CS2113T
Expected: An error message appears indicating that the user already exists.
-
-
Logging out
-
Prerequisites: Have logged in to a user account
-
Test case:
logout
Expected: The logout is successful and the login screen reappears with the message "Successfully logged out".
-
| All following sections assume that the user is currently logged into FreeTime. |
F.3. Basic commands
-
Editing your details
-
Test case:
edit p/91234567 e/johndoe@example.com g/CS2101
Expected: The details of the user in theMepanel is updated to specified details.
-
-
Showing command history
-
Test case:
history
Expected: The list of all previously-entered commands appears below the command box.
-
F.4. Adding and removing friends
-
Adding a friend
-
Test case:
friend 1
Expected: The first person in theOtherspanel moves to theFriendspanel. Hidden fields, namely phone number, address, and email of this person should now be visible.
-
-
Removing a friend
-
Prerequisites: Have previously added a friend
-
Test case:
unfriend 1
Expected: The first person in theFriendspanel moves to theOtherspanel. Hidden fields, namely phone number, address, and email of this person should no longer be visible.
-
F.5. Finding a person by name and by group
-
Finding a person by name
-
Test case:
find John
Expected: Only people with the wordJohnin their names in bothFriendsandOtherspanels are shown. The command box reflects the total number of people listed in both panels.
-
-
Finding a person by group
-
Test case:
group CS2101-A
Expected: Only people with the groupCS2101-Ain bothFriendsandOtherspanels are shown. The command box reflects the total number of people listed in both panels.
-
-
Listing all people
-
Prerequisite: Have previously used the
findorgroupcommand -
Test case:
listall
Expected: All people currently registered are shown in their respective panels.
-
F.6. Adding and removing timeslots from the user’s timetable
-
View the user’s timetable
-
Test case:
select me
Expected: If logged in with a newly-registed account, the timetable panel should be empty. Otherwise, the user’s timetable is shown on the timetable panel.
-
-
View a friend’s timetable
-
Prerequisite: Have previously added a friend
-
Test case:
select 1
Expected: The first person in theFriendspanel is highlighted, with his timetable showing in the timetable panel (should be non-blank for users pre-loaded into FreeTime)
-
-
Adding a timeslot to your timetable
-
Prerequisite: The timeslot from 0800 hrs to 1000 hrs on Monday is empty
-
Test case:
add mon 8-10
Expected: A new timeslot, represented by a colored rectangle, appears in the corresponding position on the timetable. The timetable should also automatically resize to begin at 0800 hrs instead of the default 1000 hrs.
-
-
Removing a timeslot from your timetable
-
Prerequisite: The timeslot from 0800 hrs to 1000 hrs on Monday is occupied by a single timeslot
-
Test case:
delete mon 8-10
Expected: The timeslot corresponding to Monday, 0800 hrs to 1000 hrs is removed from the timetable panel. If no other timeslots in the timetable begin before 1000 hrs, the timetable should automatically resize to begin at the default 1000 hrs.
-
F.7. Showing free timeslots across users
-
Showing free timeslots across users
-
Prerequisites: Have previously added a friend
-
Test case:
free 1
Expected: A deconflicted timetable should appear in the timetable panel. Timeslots where both the user and the friend at index 1 are available are highlighted in green. All other timeslots are highlighted in red.
-
F.8. Importing and exporting the user’s timetable
-
Exporting a timetable
-
Prerequisite: The User’s timetable is not empty.
-
Test case:
select me, followed byexport file
Expected: The user’s timetable is exported to[root]/import_export/file.ics, where[root]represents the directory where FreeTime.jar is located.
-
-
Importing a timetable
-
Prerequisite: An
nusmods_calendar.icsfile should be present in theimport_exportdirectory. This directory is located in the root directory (where the FreeTime.jar file resides). The file should have been downloaded from NUSMODS. -
Test case:
import nusmods_calendar
Expected: The user’s timetable is imported from the .ics file. The timetable will be shown on the timetable panel.
-