By: W13-1 Since: Sept 2018 Licence: MIT
- 1. Introduction
- 2. Quick Start
- 3. Registering and Logging In
- 4. Features
- 4.1. Viewing help :
help(h) - 4.2. Editing a person :
edit(ed) - 4.3. Locating persons by name :
find(f) - 4.4. Locating persons by group :
group(g) - 4.5. Listing all persons :
listall(l) - 4.6. Adding a person to your friend list :
friend(af) - 4.7. Removing a person from your friend list :
unfriend(uf) - 4.8. Selecting a person :
select(s) - 4.9. Add a timeslot to your timetable:
add(a) - 4.10. Delete a timeslot from your timetable:
delete(d) - 4.11. Clears your timetable :
clear(c) - 4.12. Show free slots among selected people:
free(fr) - 4.13. Import Timetable :
import(im) - 4.14. Export Timetable :
export(ex) - 4.15. Undoing previous command :
undo(u) - 4.16. Redoing the previously undone command :
redo(r) - 4.17. Listing entered commands :
history(hi) - 4.18. Logging Out :
logout(lo) - 4.19. Exiting the program :
exit(x) - 4.20. Saving the data
- 4.1. Viewing help :
- 5. FAQ
1. Introduction
Welcome to FreeTime!
FreeTime is a desktop app that allows you to find free timeslots to meet team members for projects. More specifically, it helps you identify the times during which everyone you want to meet is free. FreeTime is optimized for those who prefer to work with a Command Line Interface (CLI) while still having the benefits of a Graphical User Interface (GUI). Interested? Jump to the Section 2, “Quick Start” to get started. Enjoy!
2. Quick Start
-
Ensure you have Java version
9or later installed in your Computer. -
Download the latest
FreeTime.jarhere. -
Copy the file to the folder you want to use as the home folder for your application.
-
Double-click the file to start the app. The GUI should appear in a few seconds.
-
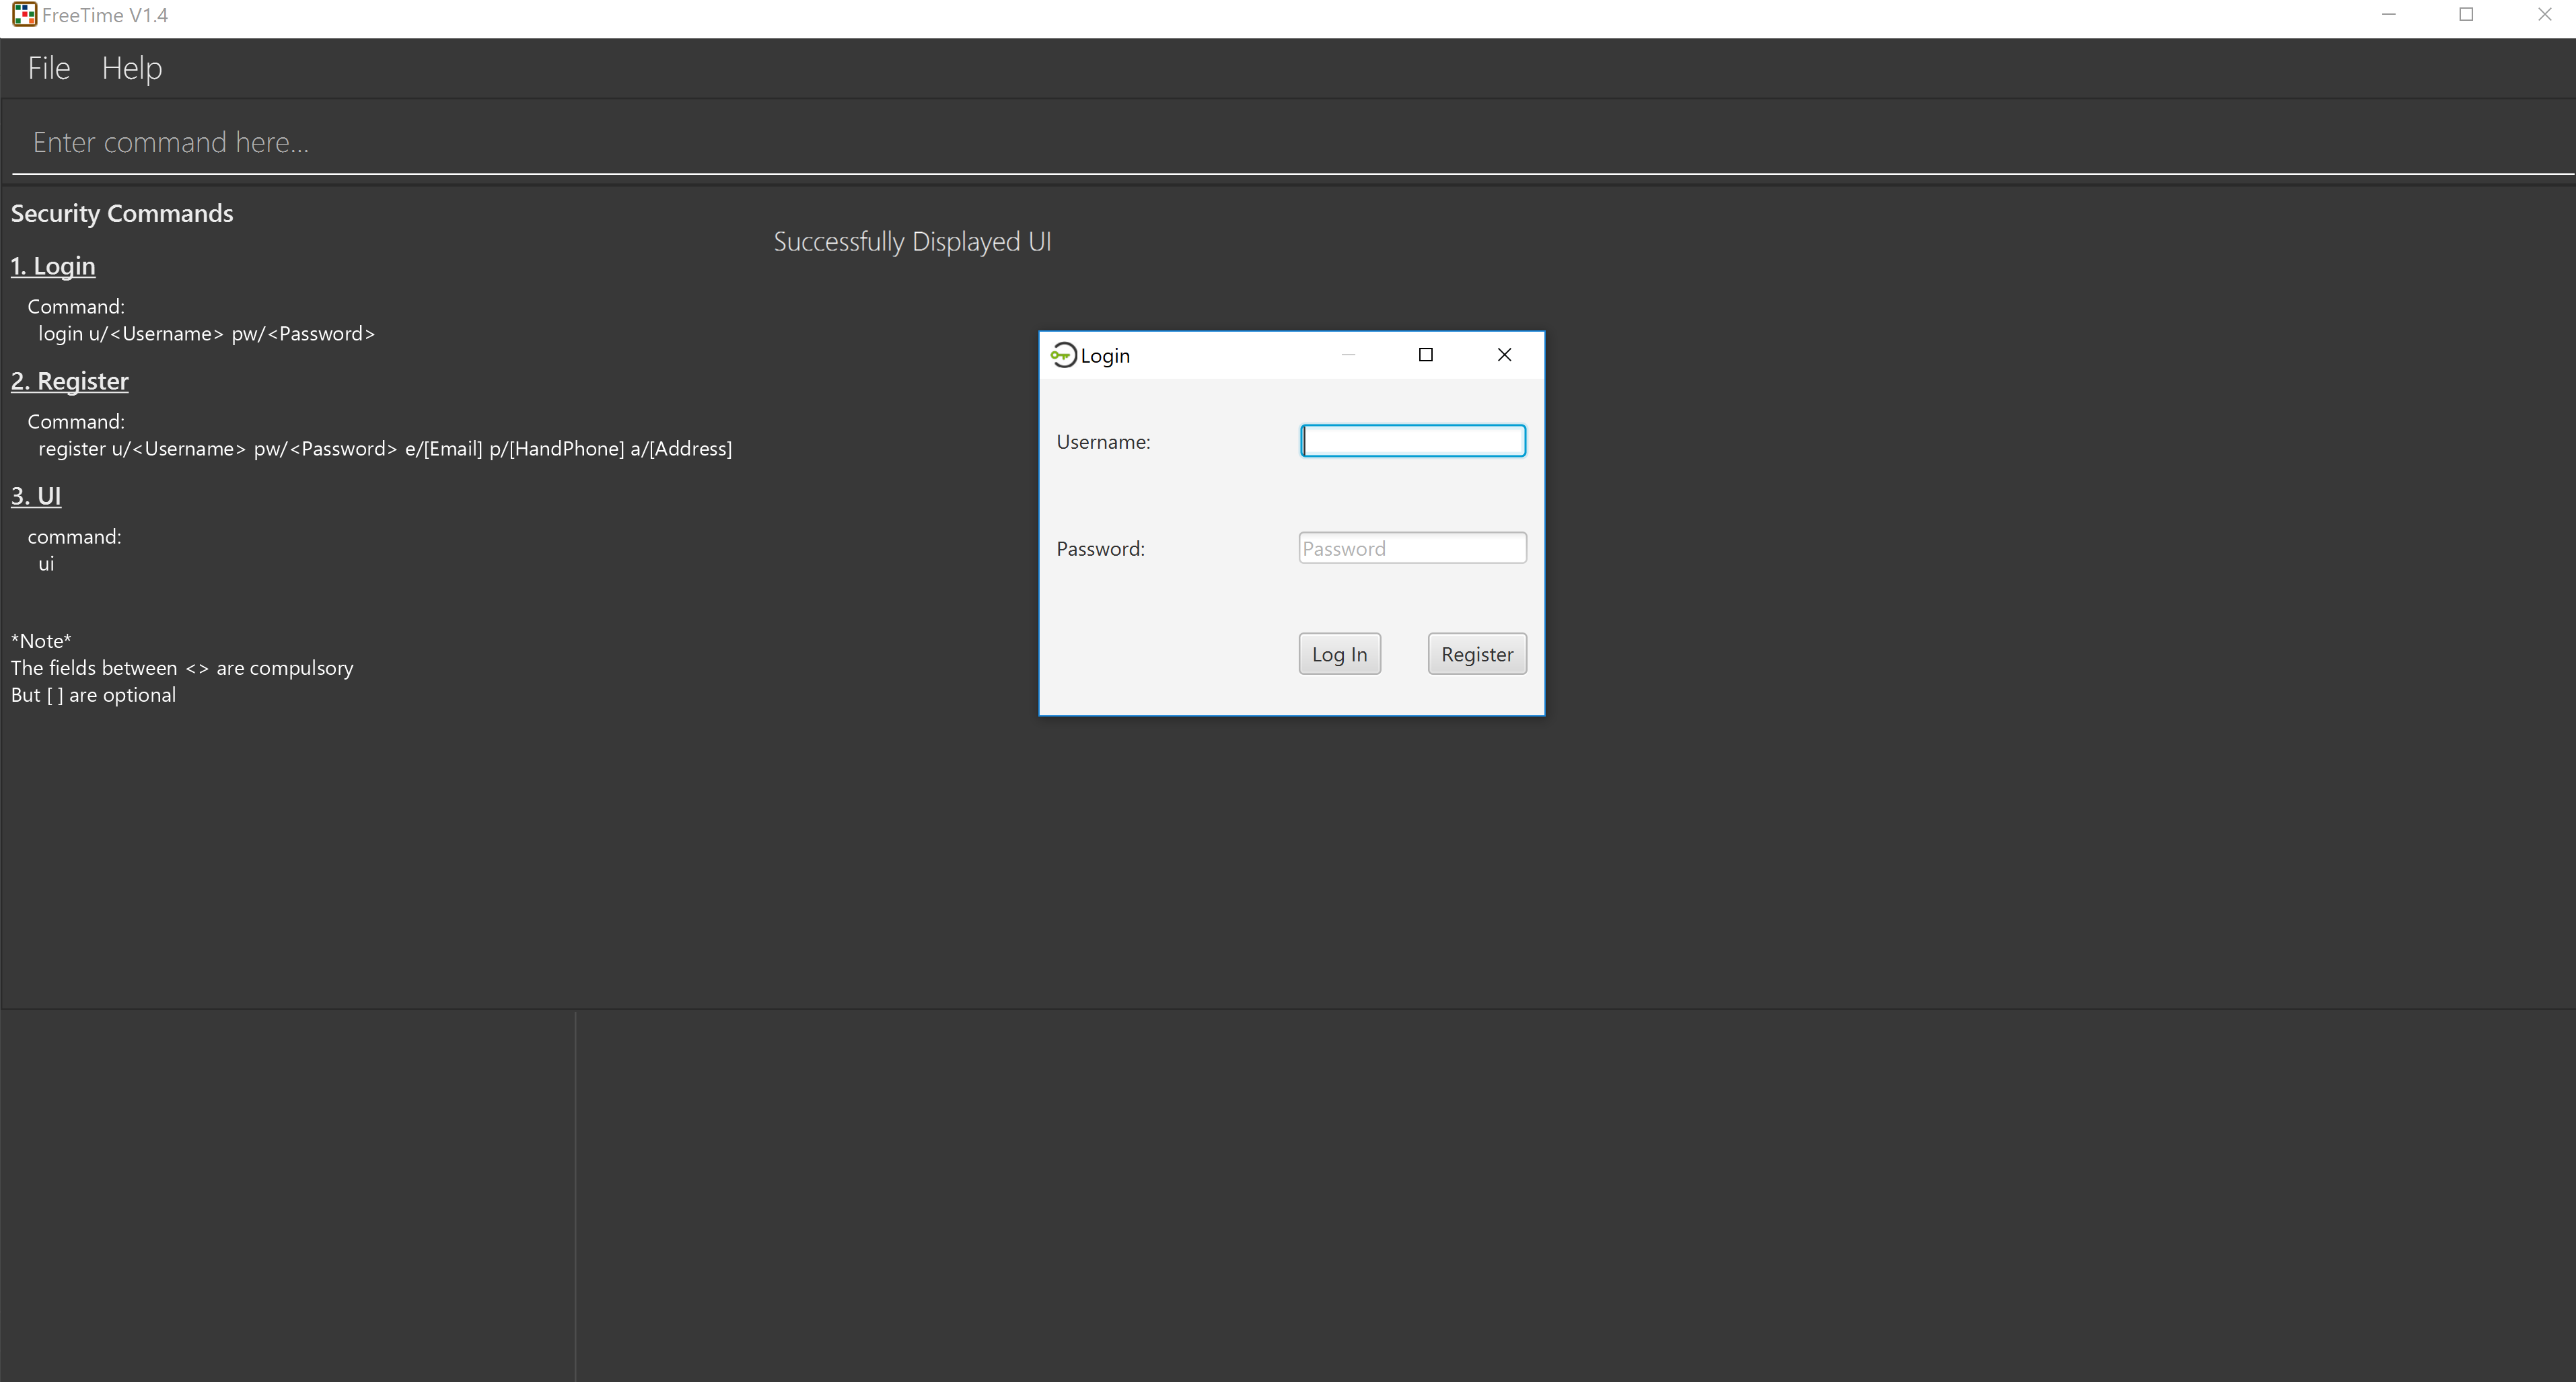
You should see FreeTime's login screen, as follows:
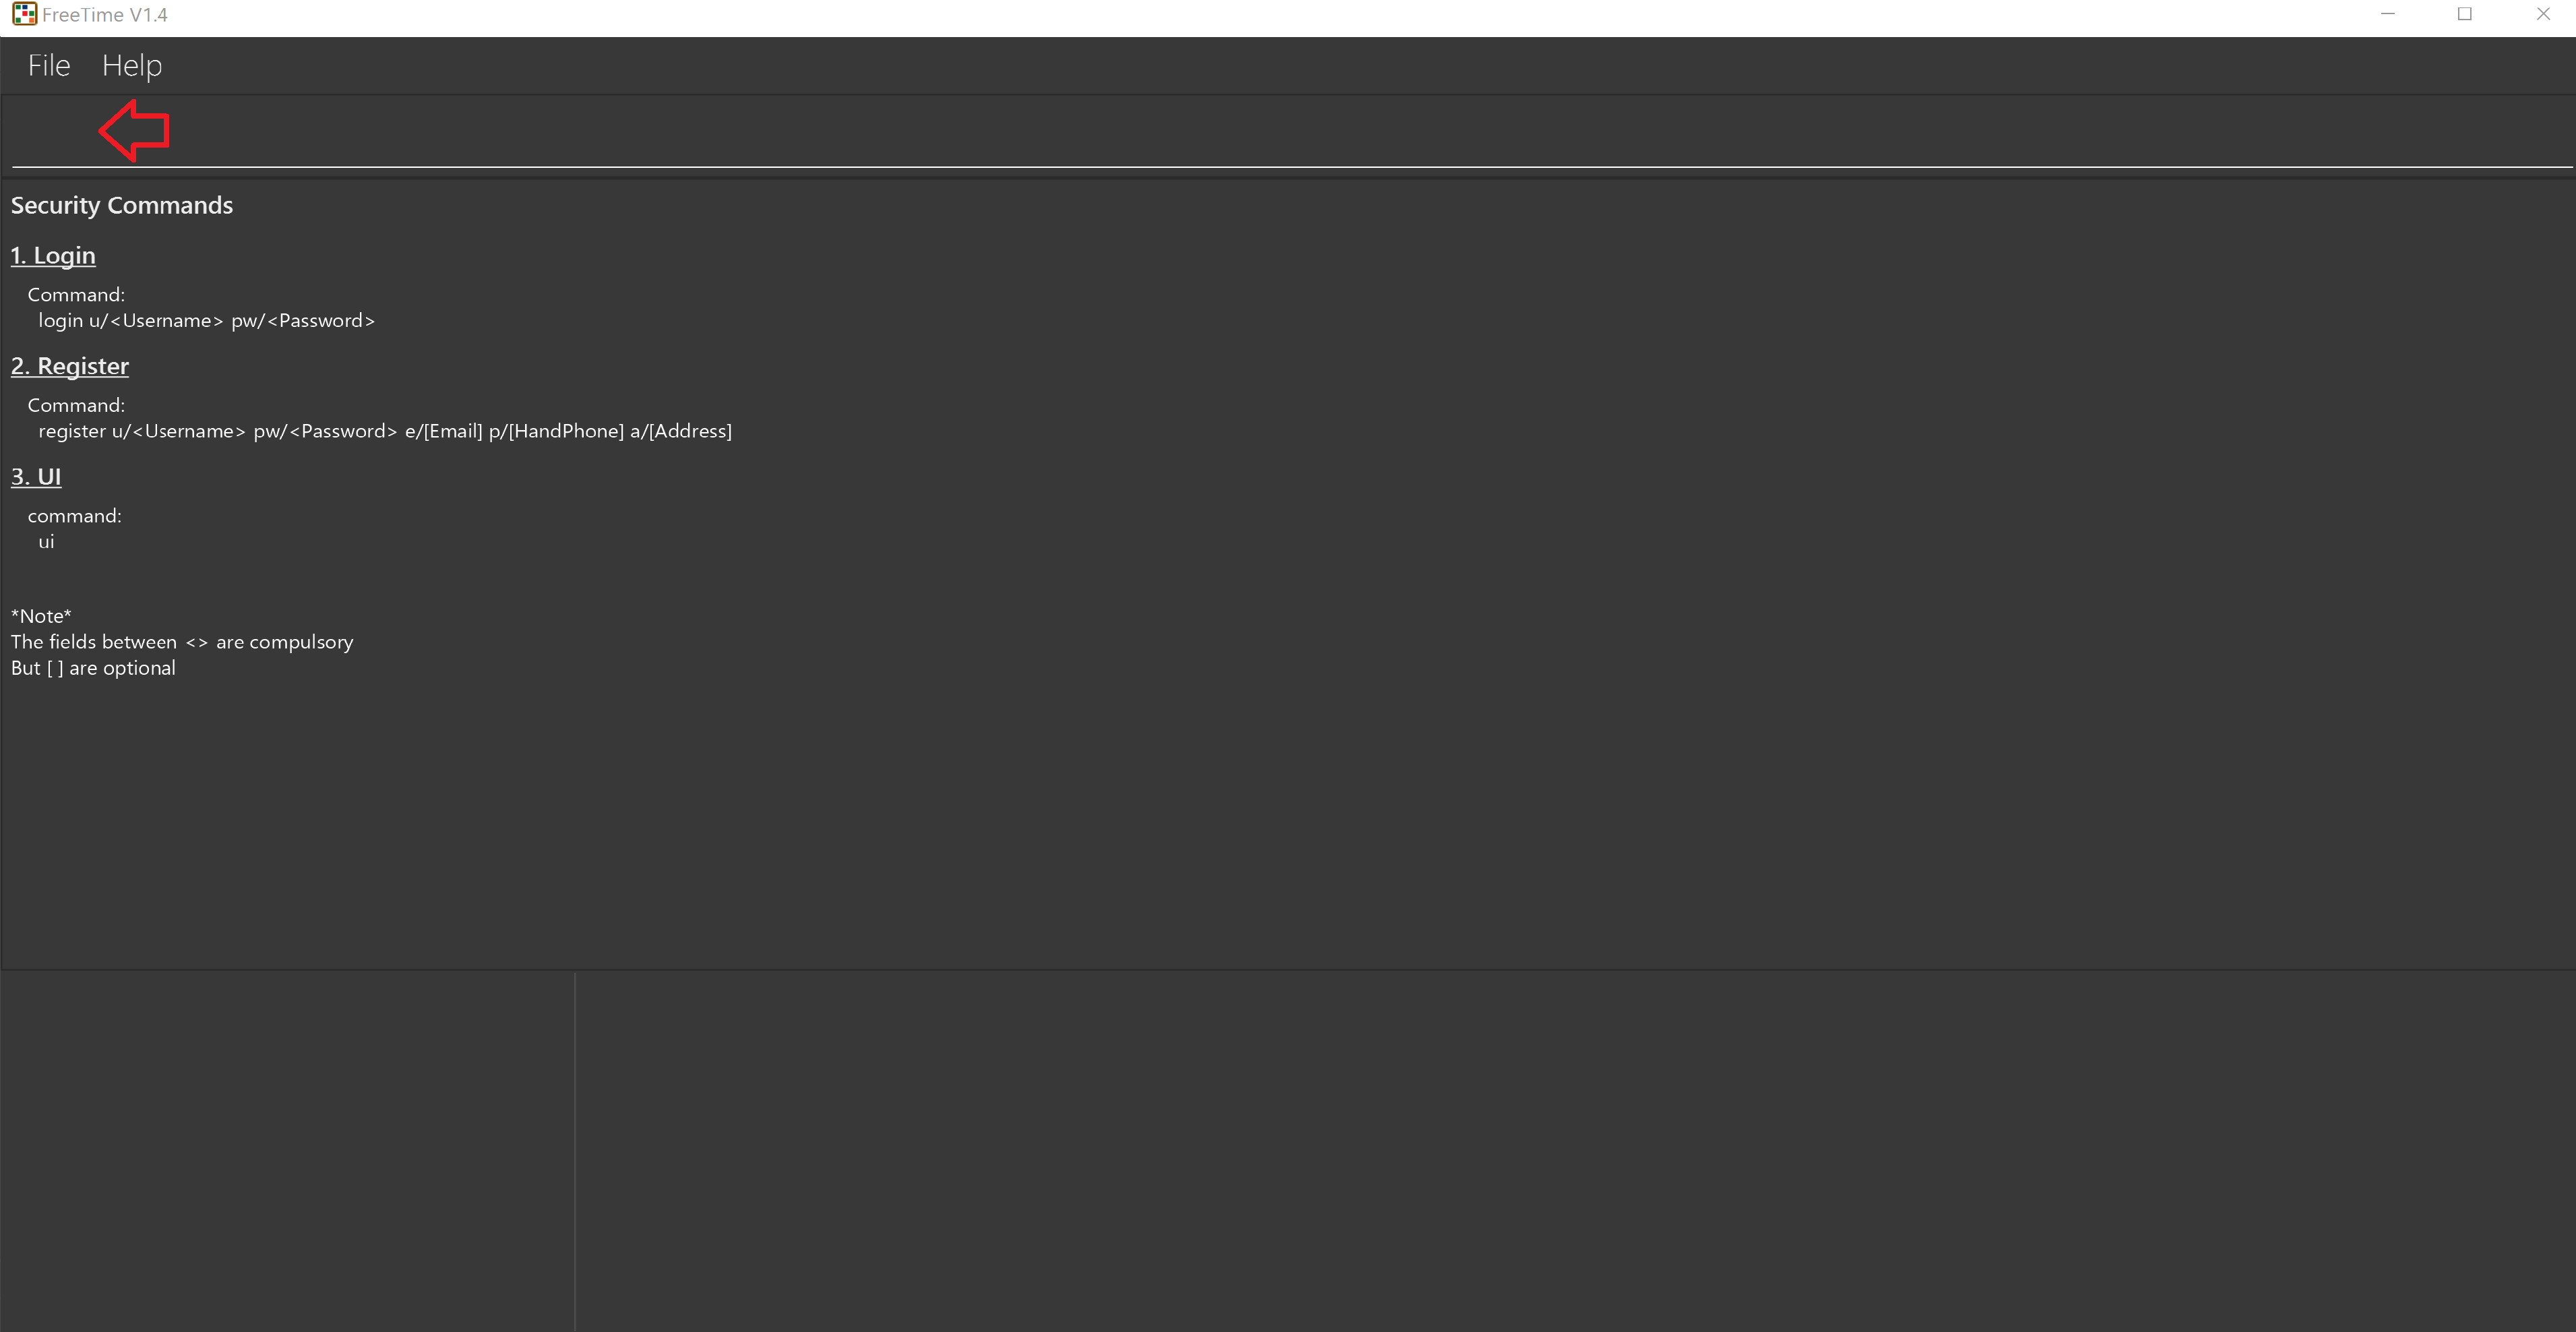 Figure 1. FreeTime’s login screen, shown when you first launch FreeTime
 -
The command line is indicated by the red arrow in the figure above. Type your commands here and press Enter to execute the command.
-
If this is your first time using FreeTime, follow the on-screen instructions to create your account.
-
After registering or logging in, you will be brought into FreeTime's main screen.
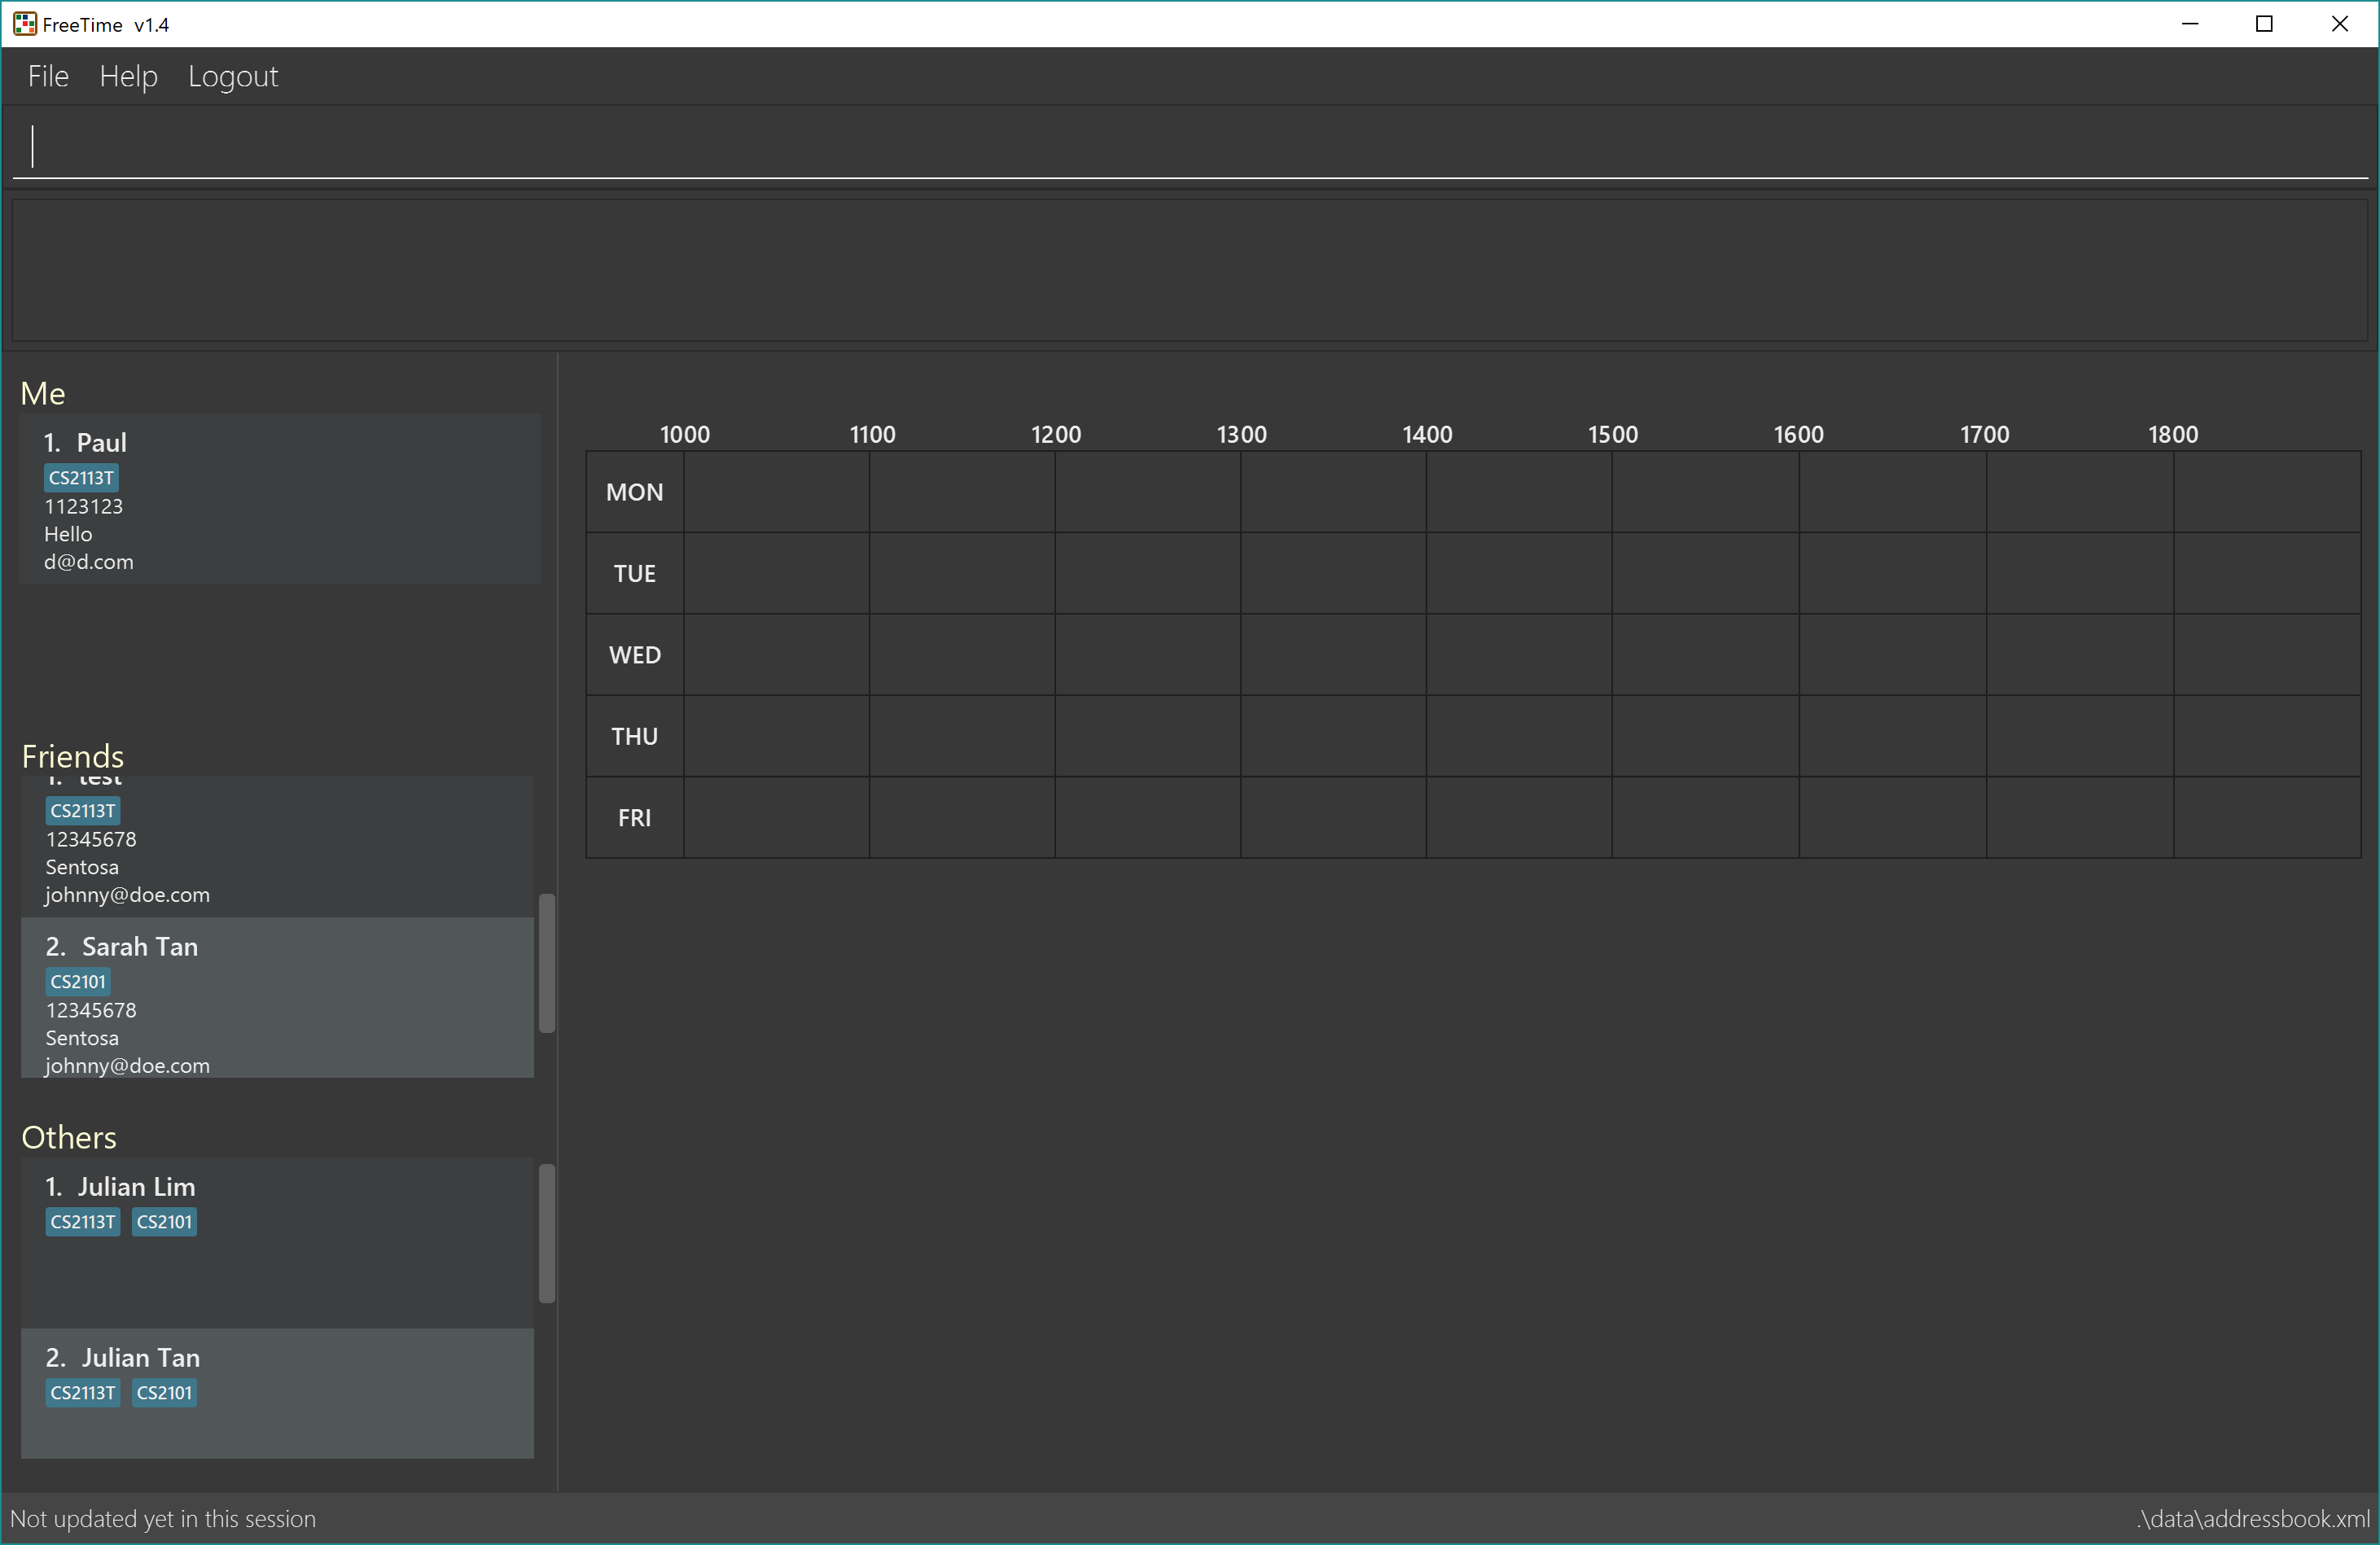 Figure 2. Window of the Main Screen of FreeTime after logging in
 -
Refer to Section 4, “Features” for details of each command.
3. Registering and Logging In
Whenever you open the application, the timetable content and commands are locked. You are required to either login with a pre-existing account, or register a new one.
| FreeTime has a default user with username: test and password: test |
There are five security related commands that can be entered on this command line:
-
login -
register -
ui -
logout(Only when you have logged in) -
exit
At this page you will have to enter your credentials to log in. Only then would you be able to edit and view your own timetable,
and view your friends' timetable.
|
Friends are other users that you have "friended", and all users start off without
having any friends. |
The timetable that belongs to users that are not your friends will not be available for you to see, till you add them as friends.
3.1. Logging In: login (li)
Command: login u/USERNAME pw/PASSWORD
Examples:
-
login u/test pw/test
Logins with Username: test and Password: test -
login u/tim pw/tam
Logins with Username: tim and Password: tam
| You are required to to enter a password that contains more or equal to 8 characters. To ensure that your account is well-protected, do use a password that is not common. |
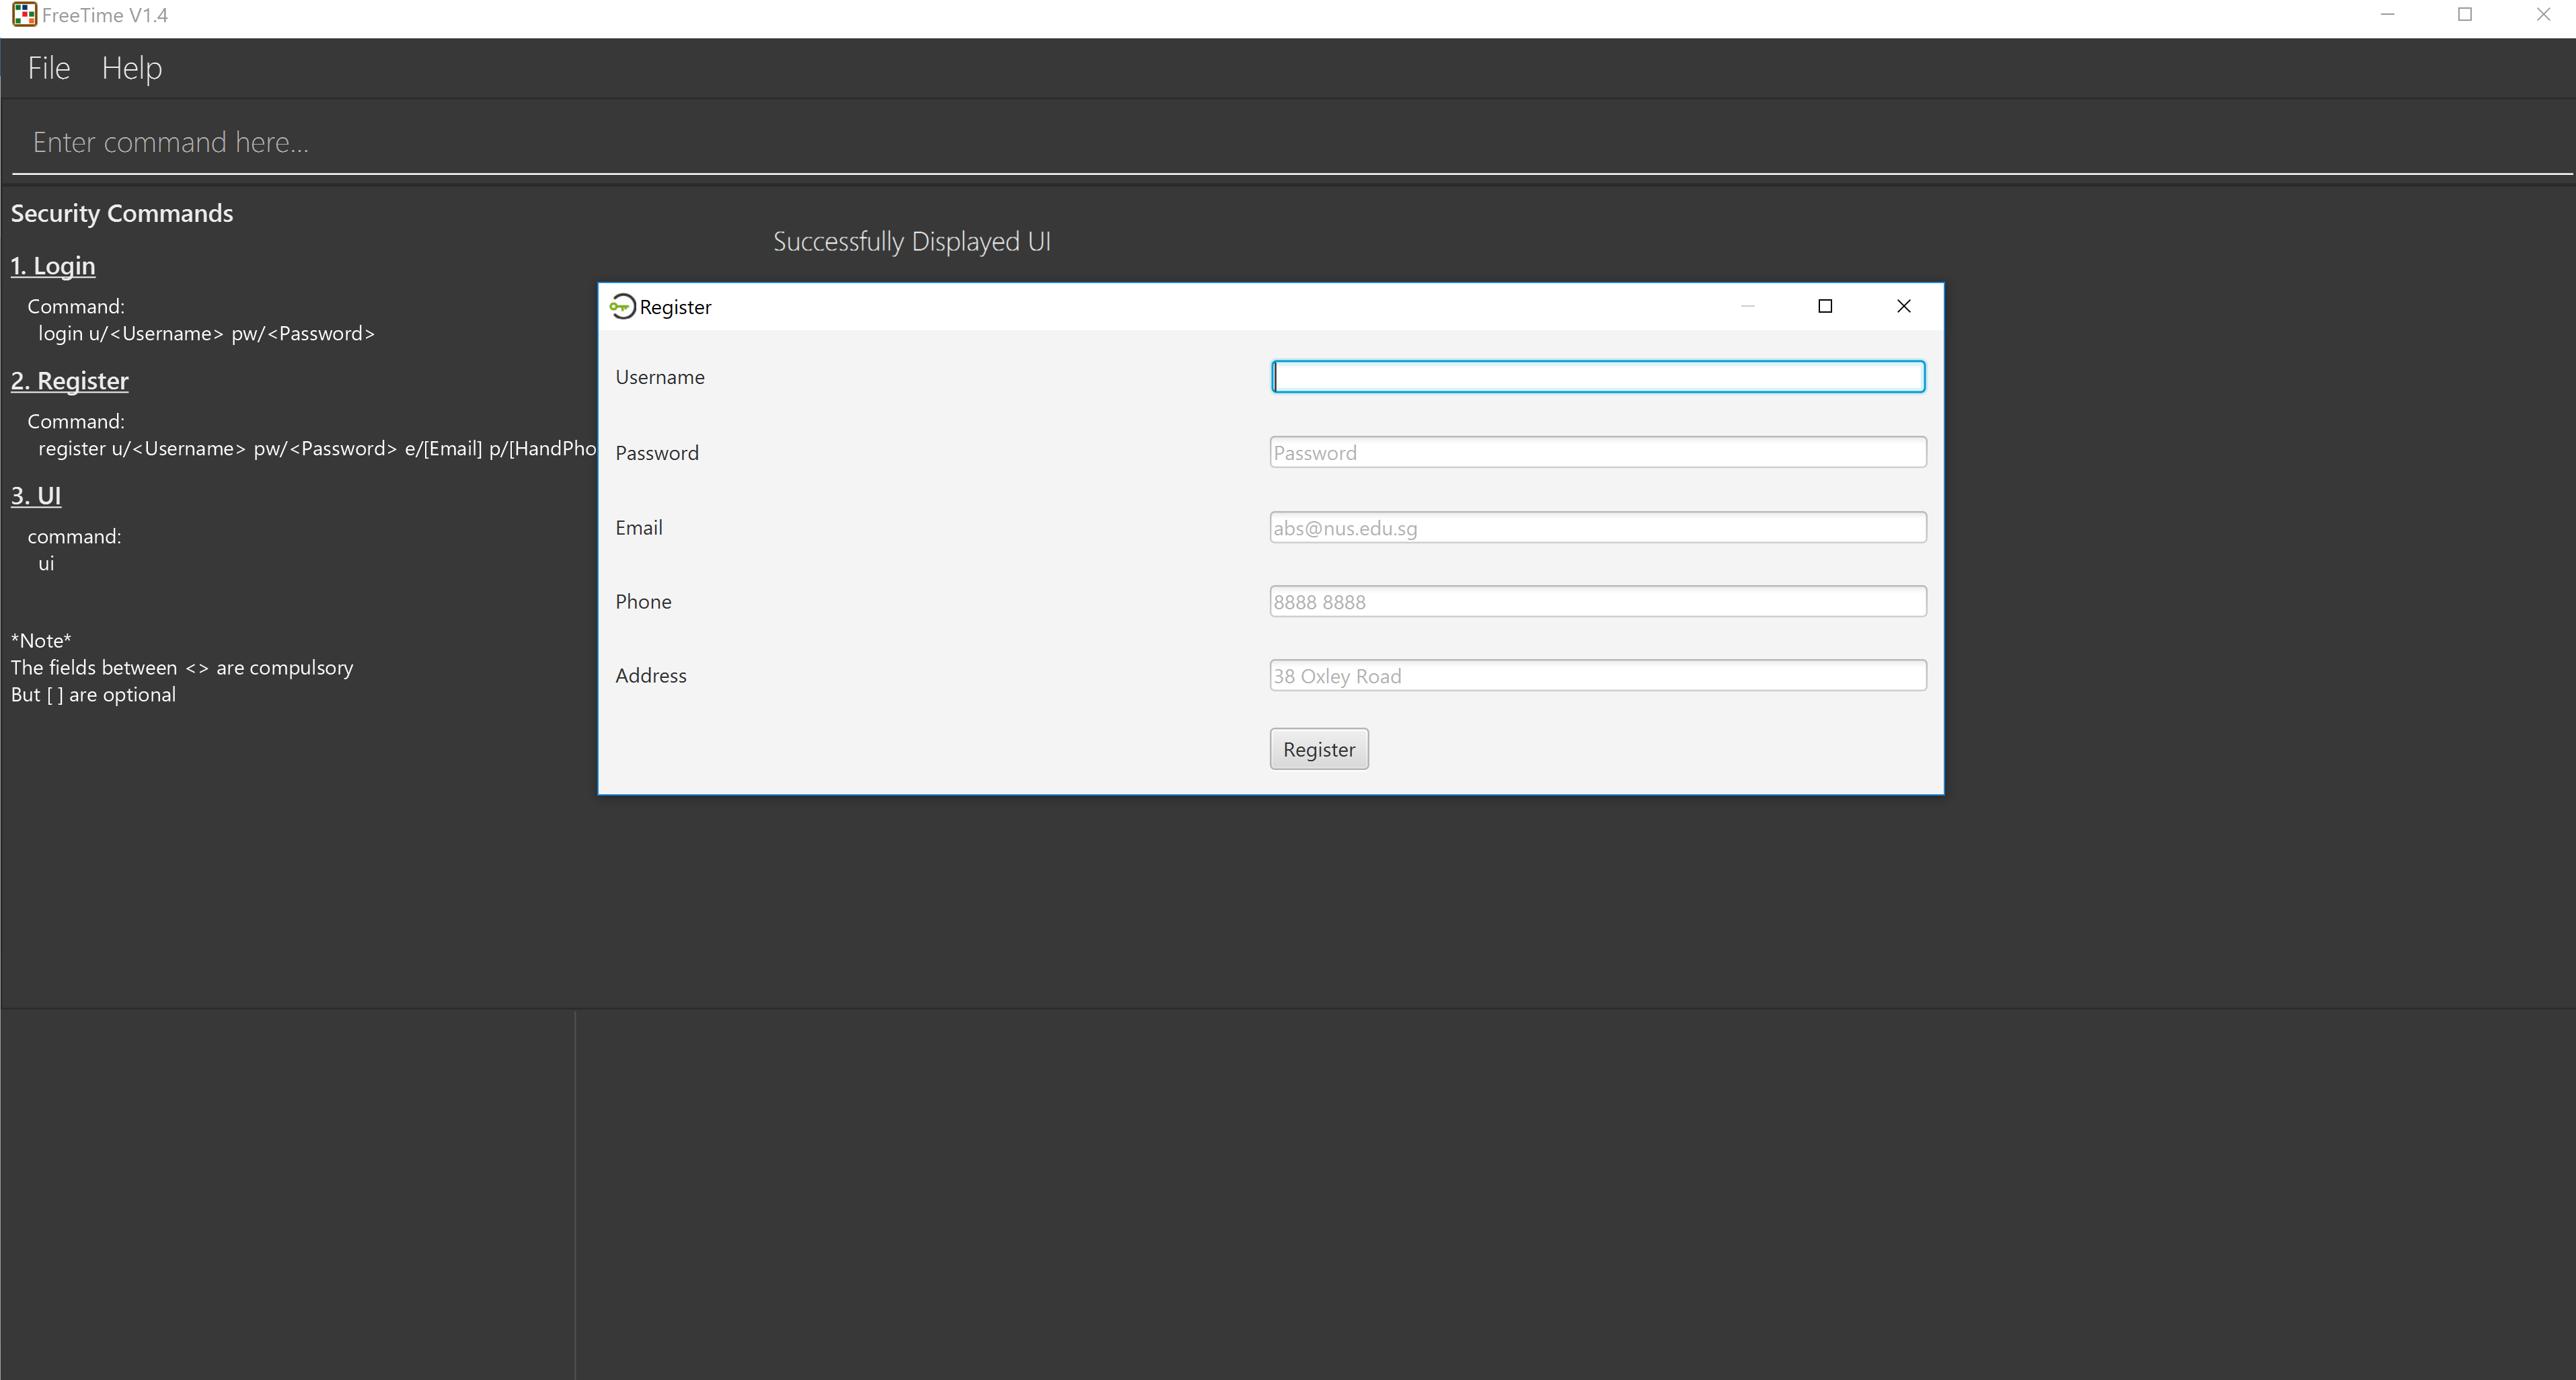
3.2. Registering: register (re)
Command: register u/USERNAME pw/PASSWORD e/[EMAIL] p/[MOBILEPHONE] a/[ADDRESS]
Examples:
-
register u/tim pw/tam e/tim@tam.com p/88888888 a/Tammy Road
Only the Username and Password fields are necessary, the others are optional and
you are not required to enter them.
|
3.3. Showing the UI Interface: (ui)
Command: ui
Entering the command ui will cause the Login Window to appear as seen in figure 4.
Clicking on the Register button changes your view to the Registration Window seen in figure 5.
4. Features
This section contains all of the features that are currently present in FreeTime. Feel free to click any one of the links to quickly jump to the feature!
| Feature | Function |
|---|---|
Opens the help window |
|
Edits your information in the database |
|
Filters the database based on the keywords specified |
|
Filters the database based on the group tags specified |
|
Lists all the users in the database |
|
Adds a user to your friend list |
|
Removes a friend from your friend list |
|
Selects a user in your friends list and shows their timetable |
|
Adds a timeslot to your timetable |
|
Removes a timeslot from your timetable |
|
Clears all timeslots from your timetable |
|
Highlights timeslots where you and everyone specified is free |
|
Imports a timetable for the current user from a specified (.ics) file |
|
Exports the currently-displayed timetable to the specified (.ics) file |
|
Restores the address book to the state before the previous undoable command was executed. |
|
Reverses the most recent undo command |
|
Lists all the commands that you have entered in reverse chronological order |
|
Logs out of FreeTime and brings you back to the login screen |
|
Closes FreeTime |
Command Format
-
Each command has an alias (given in round brackets after the command word) that can be used to replace the full command word. e.g.
find Johnis equivaluent tof John. -
Words in
UPPER_CASEare the parameters to be supplied by the user e.g. inedit p/PHONE,PHONEis a parameter which can be used asedit p/12345678. -
Items in square brackets are optional e.g
[p/PHONE_NUMBER][g/GROUP]can be used asp/12345678 g/CS2101or asg/CS2101. -
Items with
… after them can be used multiple times including zero times e.g.[g/GROUP]…can be used asg/CS2101,g/CS2113T g/W13-1etc. -
Parameters can be in any order e.g. if the command specifies
e/EMAIL p/PHONE_NUMBER,p/PHONE_NUMBER e/EMAILis also acceptable.
4.2. Editing a person : edit (ed)
Edits your information in the database.
Format: edit [p/PHONE] [e/EMAIL] [a/ADDRESS] [g/GROUP]…
4.3. Locating persons by name : find (f)
Finds persons whose names contain any of the given keywords.
Format: find KEYWORD [MORE_KEYWORDS]
Examples:
-
find John
ReturnsjohnandJohn Doe -
find Betsy Tim John
Returns any person having namesBetsy,Tim, orJohn
4.4. Locating persons by group : group (g)
Find persons whose groups match the specified groups.
Format: group GROUPNAME [MORE_GROUPNAMES]
Example:
-
group CS2101
Filters both the others list and the friends list to show only users with the group "CS2101". -
group CS2101 CS2113T
Filters both the others list and the friends list to show only users with both group "CS2101" and "CS2113T".
Use the command listall to revert the panels back to its original state.
|
4.5. Listing all persons : listall (l)
Shows a list of all persons in FreeTime.
Format: listall
After filtering your results by executing commands such as group or find, executing listall will revert the list back to it’s initial state
|
4.6. Adding a person to your friend list : friend (af)
Adds a person from the others list to your friend list.
Format: friend INDEX
|
Examples:
-
friend 1
Adds the first user in the others list to your list of friends.-
Before executing the command, your window might look like the following, without friends:
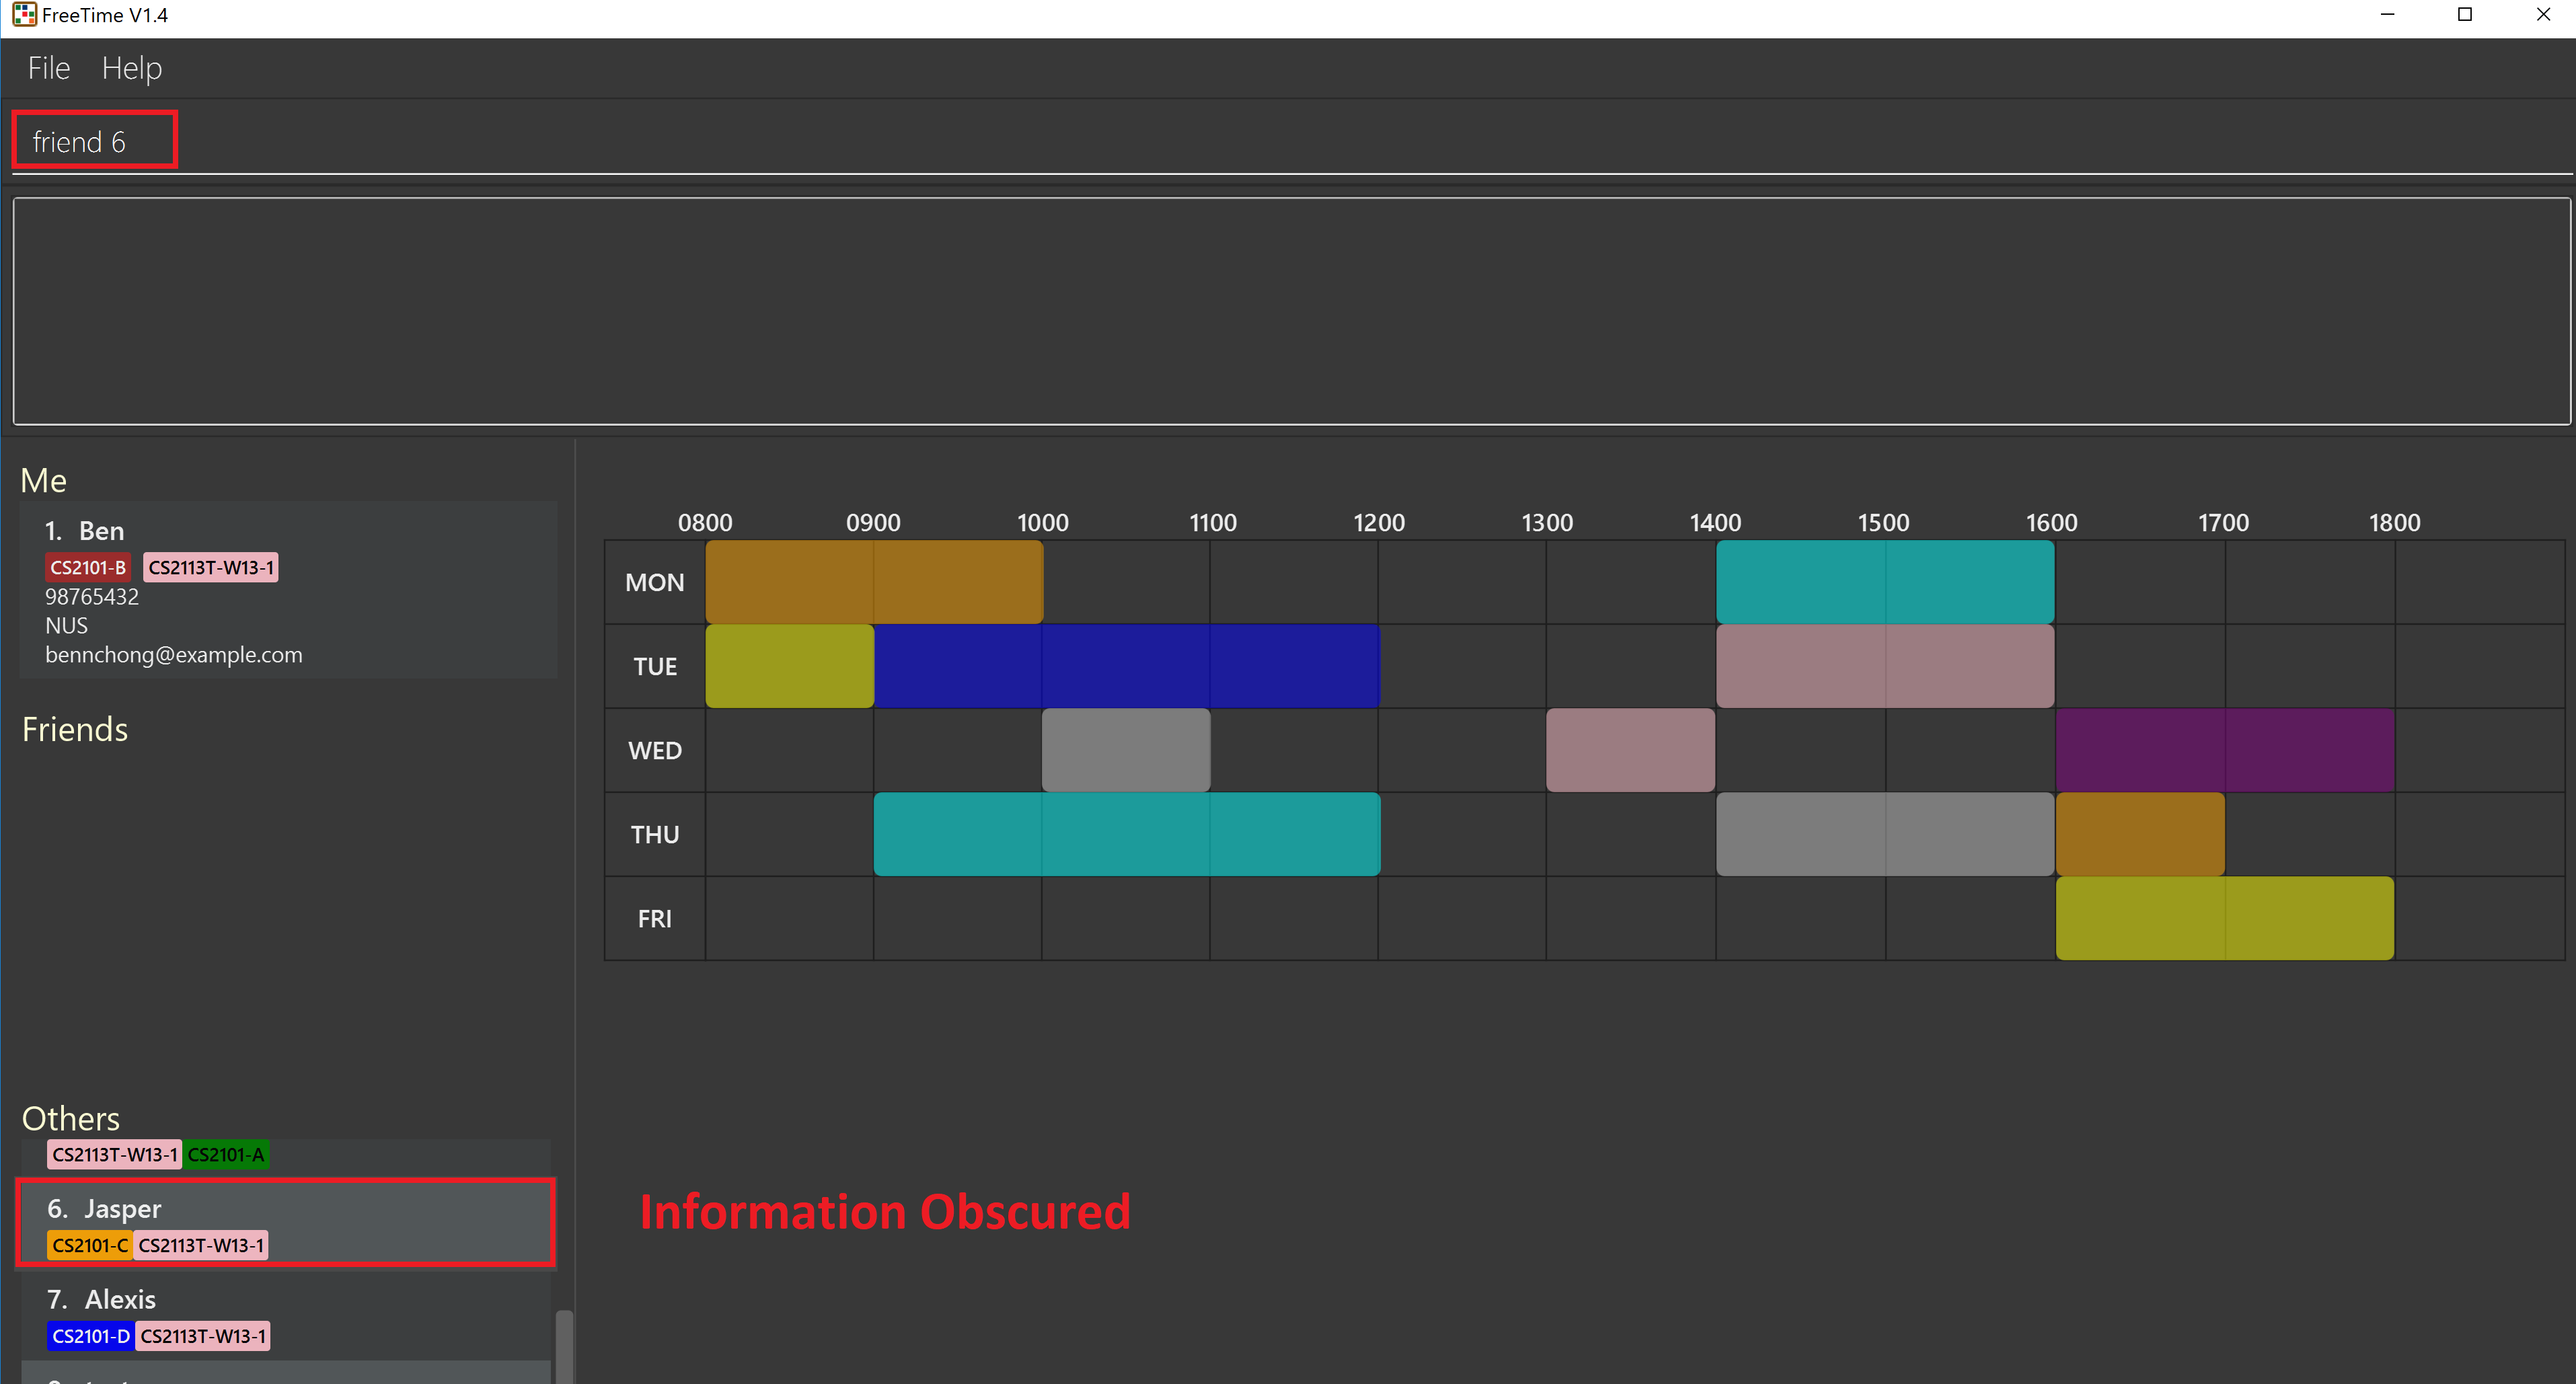 Figure 6. Before adding friend to your friend list.
 -
After executing
friend 6, there will be a success message and the first person should be added to the friend’s list, as follows: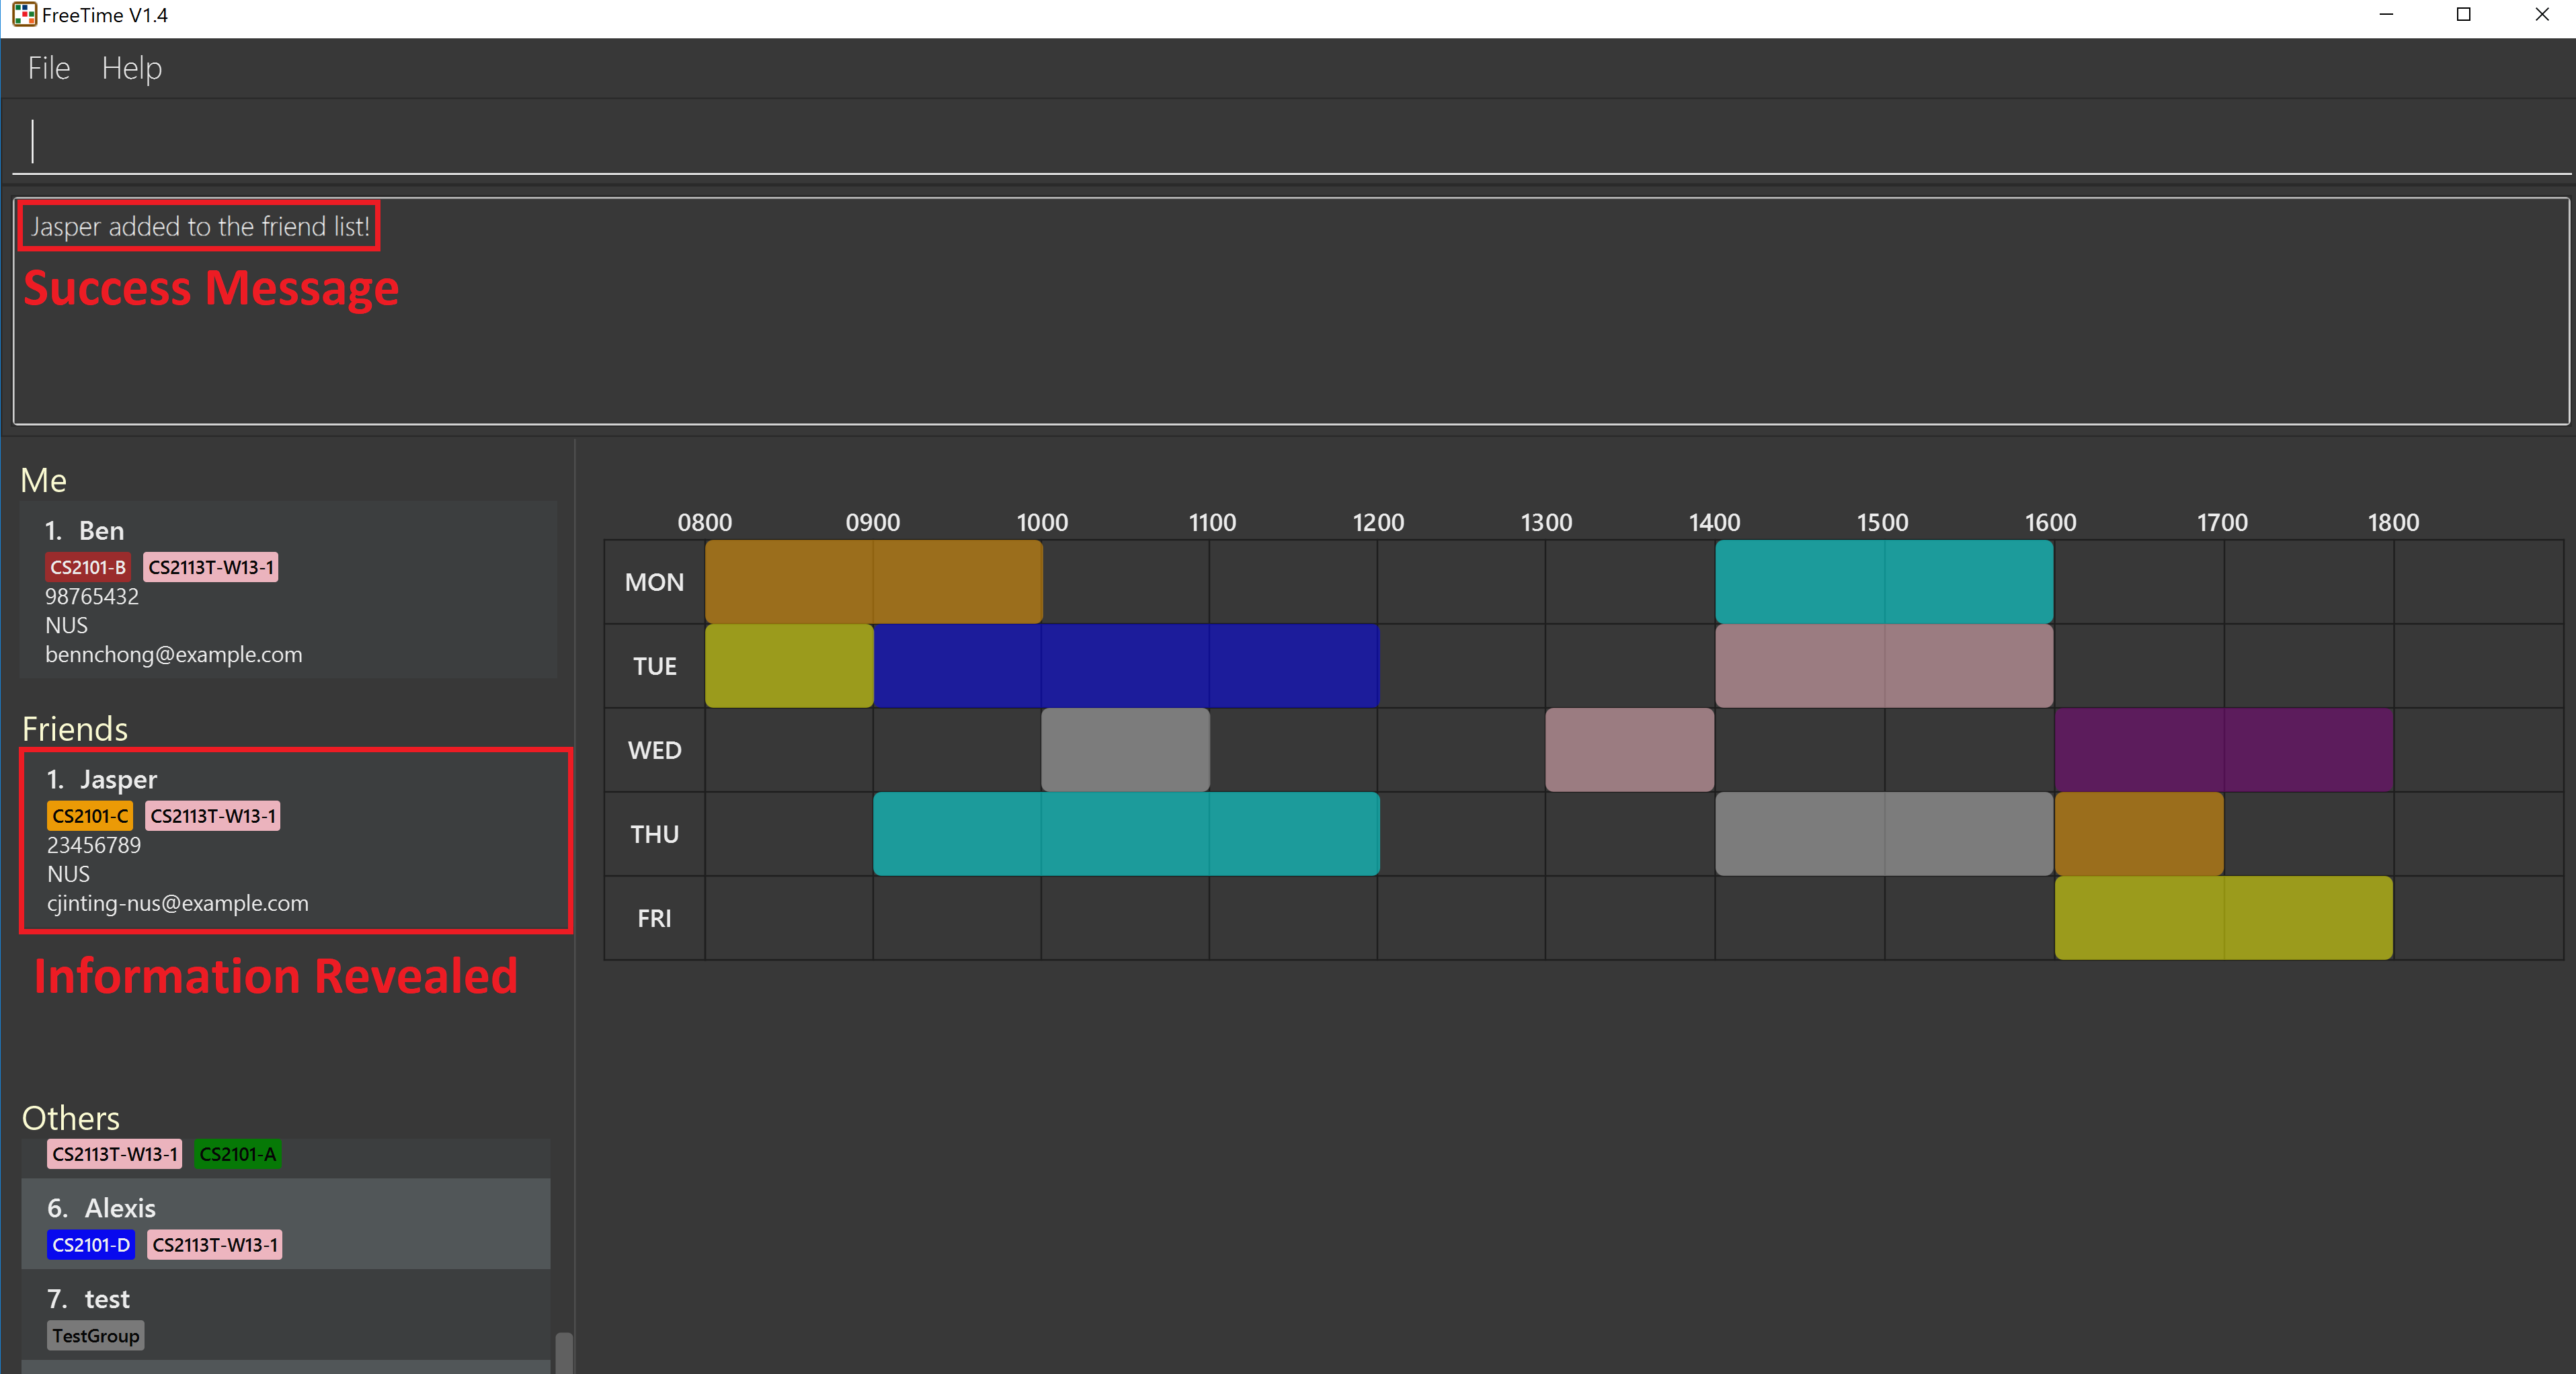 Figure 7. After adding friend to your friend list.
 -
More information about the user is now shown and commands such as
freeandselectcan now be used.
-
4.7. Removing a person from your friend list : unfriend (uf)
Removes a person from your friend list.
Format: unfriend INDEX
Example:
-
unfriend 1
Removes the first user from the friends list.-
Before executing the command, look for the index of the person you would like to remove from your list:
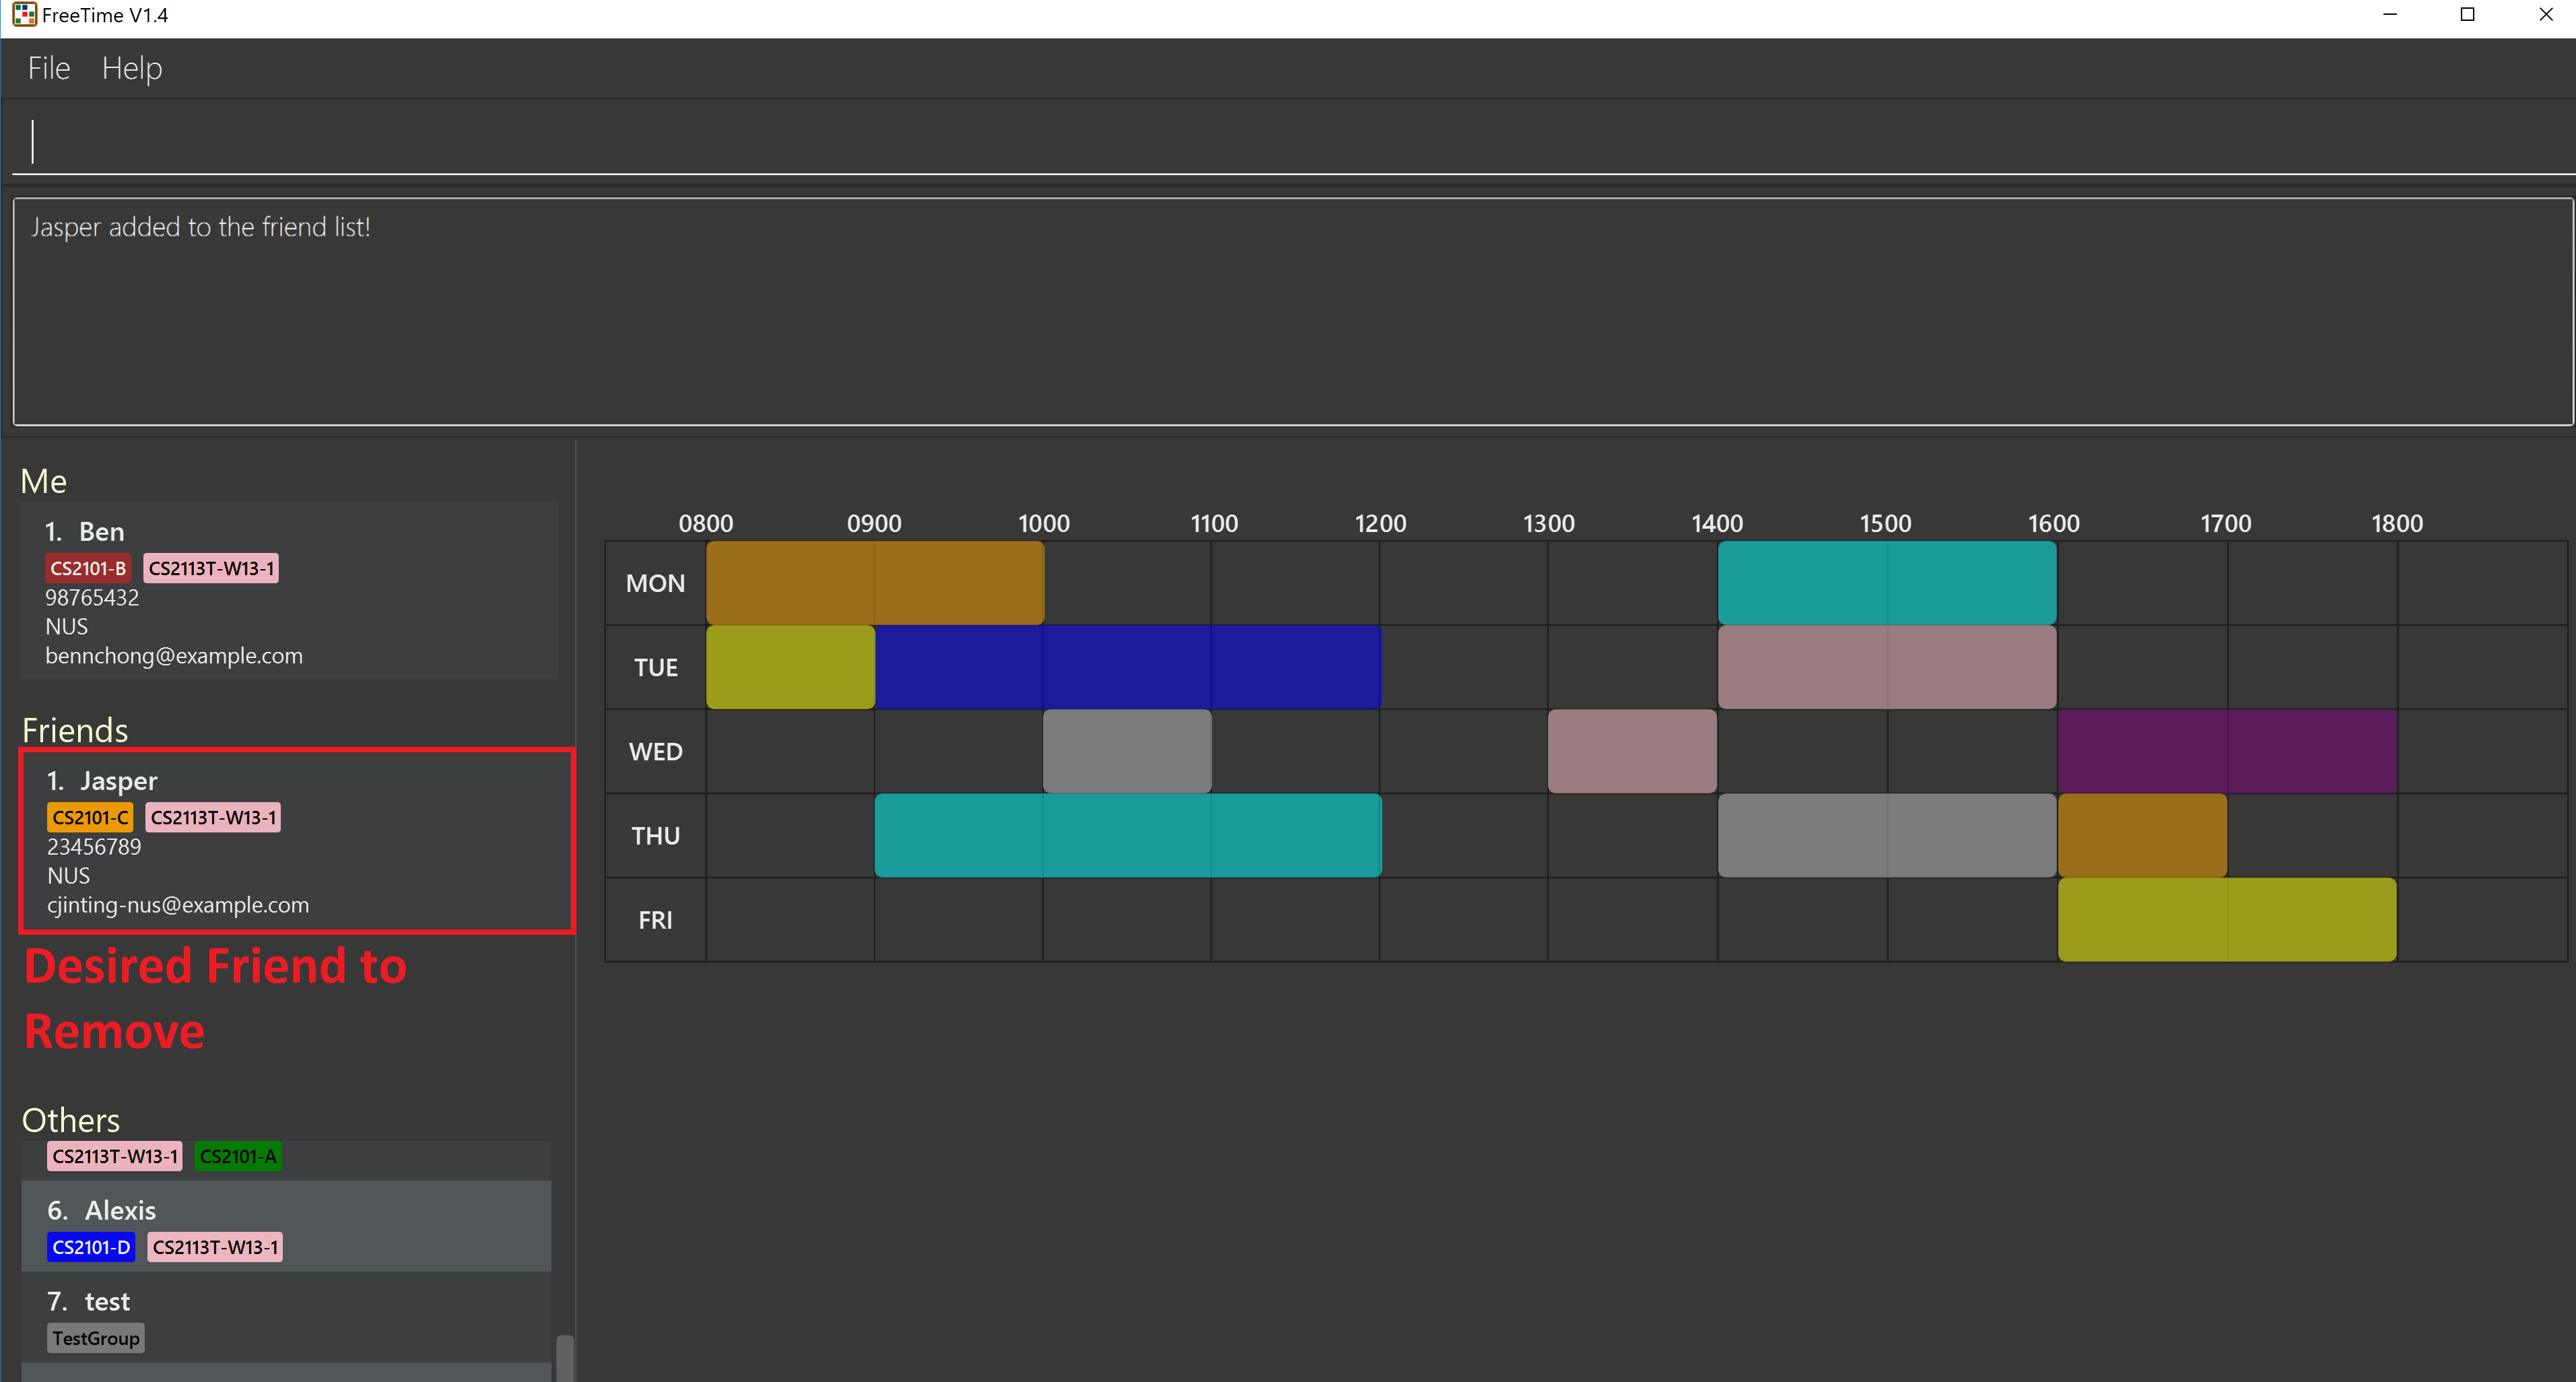 Figure 8. Before removing friend from friend list.
 -
After executing
unfriend 1, there will be a success message and the first person should be removed from the friend’s list, as follows: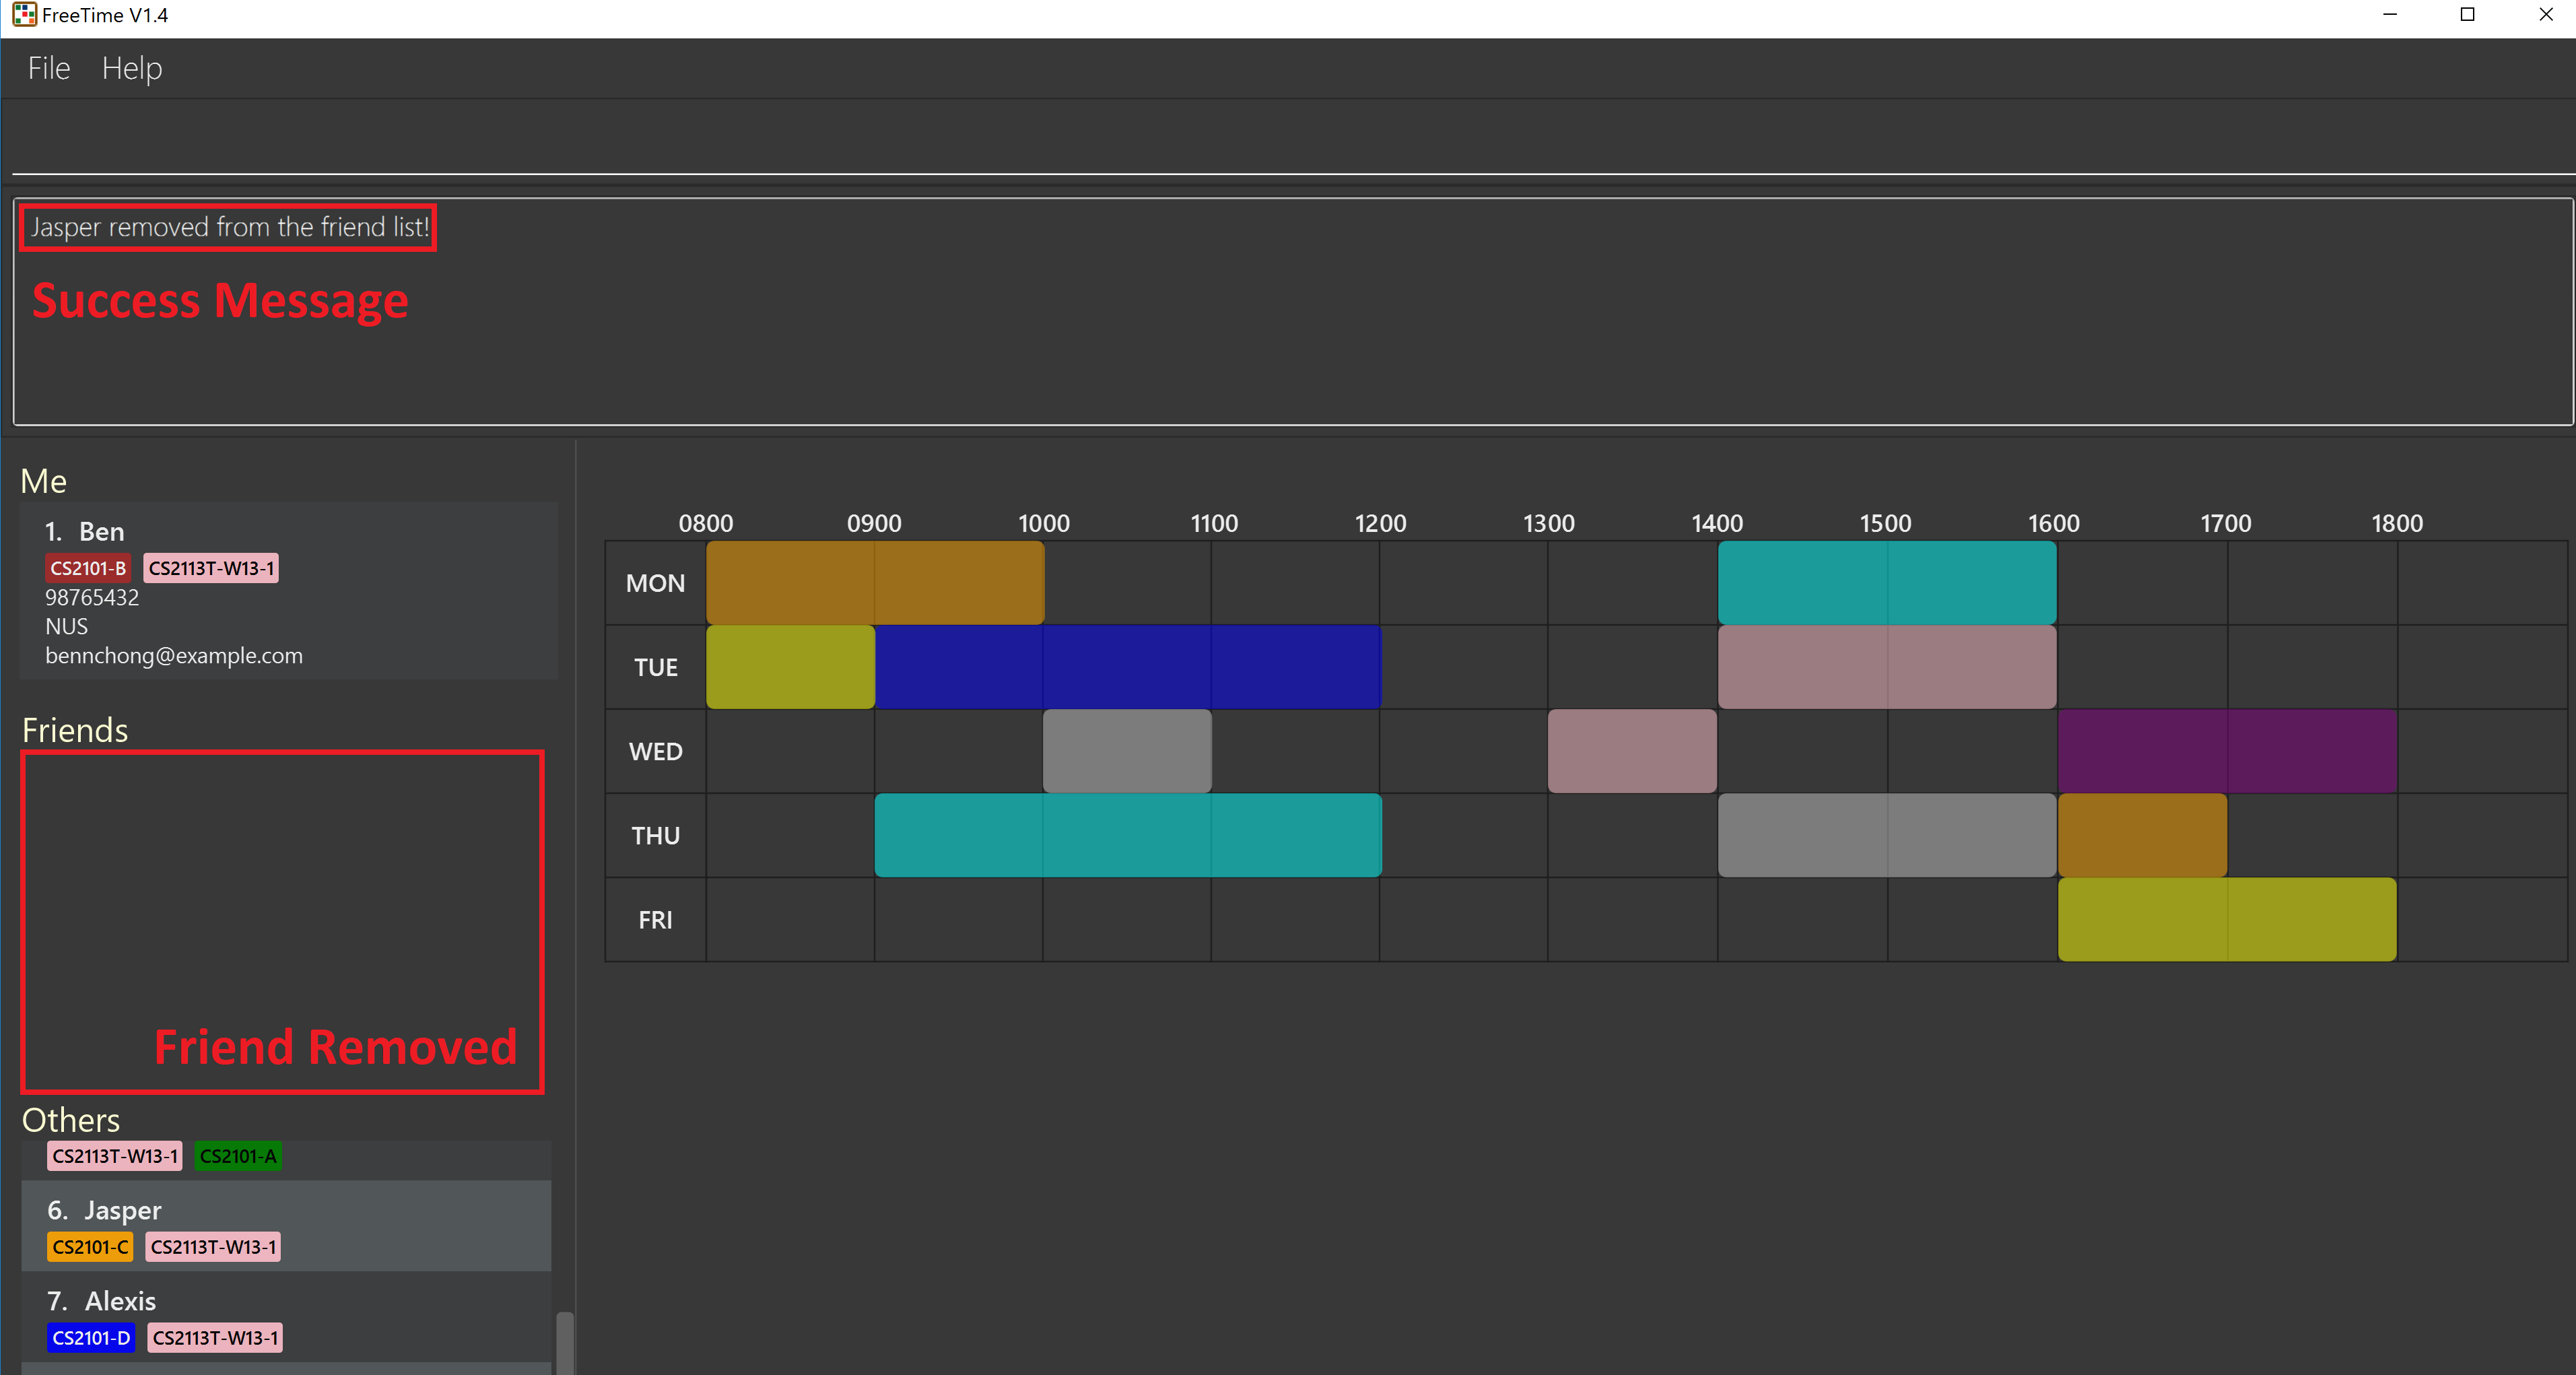 Figure 9. After adding friend to your friend list.
 -
More information about the user is now shown and commands such as
freecan now be used.
-
4.8. Selecting a person : select (s)
Selects your friend with the specified index, showing you their timetable.
Format: select INDEX
Examples:
-
select me
Selects yourself. -
select 2
Selects the 2nd person listed in your friend list. -
find Betsy
select 1
Selects the 1st person in the results of thefindcommand.
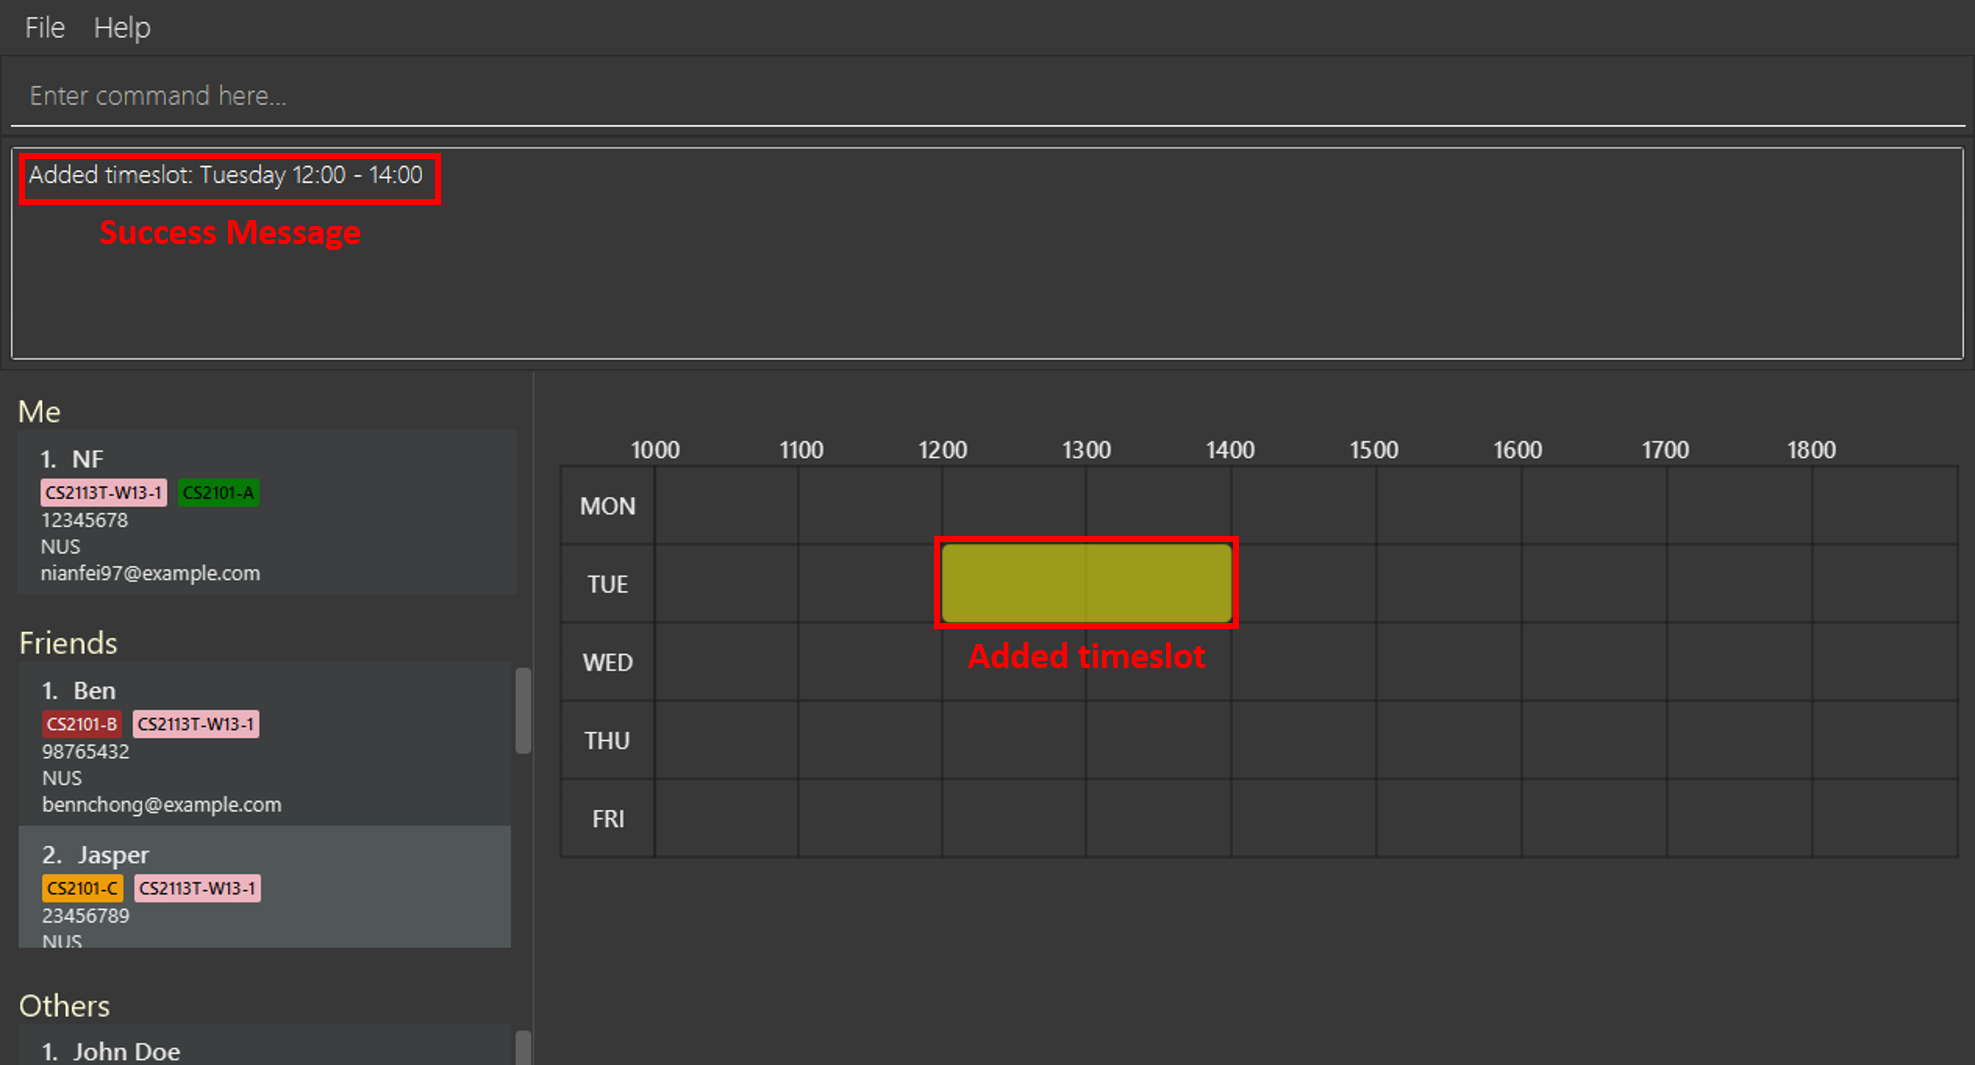
4.9. Add a timeslot to your timetable: add (a)
Adds a timeslot to your timetable.
Format: add Monday 10:00-12:30
Examples:
-
add Monday 10:00-12:30
Adds the timeslot from 10:00 to 12:30 on Monday to your timetable. -
add Fri 13:30-14:00
Adds the timeslot from 13:30 to 14:00 on Friday to your timetable. -
add Wed 17-18
Adds the timeslot from 17:00 to 18:00 on Wednesday to your timetable.
After adding a timeslot, you should see the following:
4.10. Delete a timeslot from your timetable: delete (d)
Deletes a timeslot from your timetable.
Format: delete Monday 10:00-12:30
Examples:
-
delete Monday 10:00-12:30
Deletes the timeslot from 10:00 to 12:00 on Monday from your timetable. -
delete Fri 13:30-14:00
Deletes the timeslot from 13:30 to 14:00 on Friday from your timetable. -
delete Wed 17-18
Deletes the timeslot from 17:00 to 18:00 on Wednesday from your timetable.
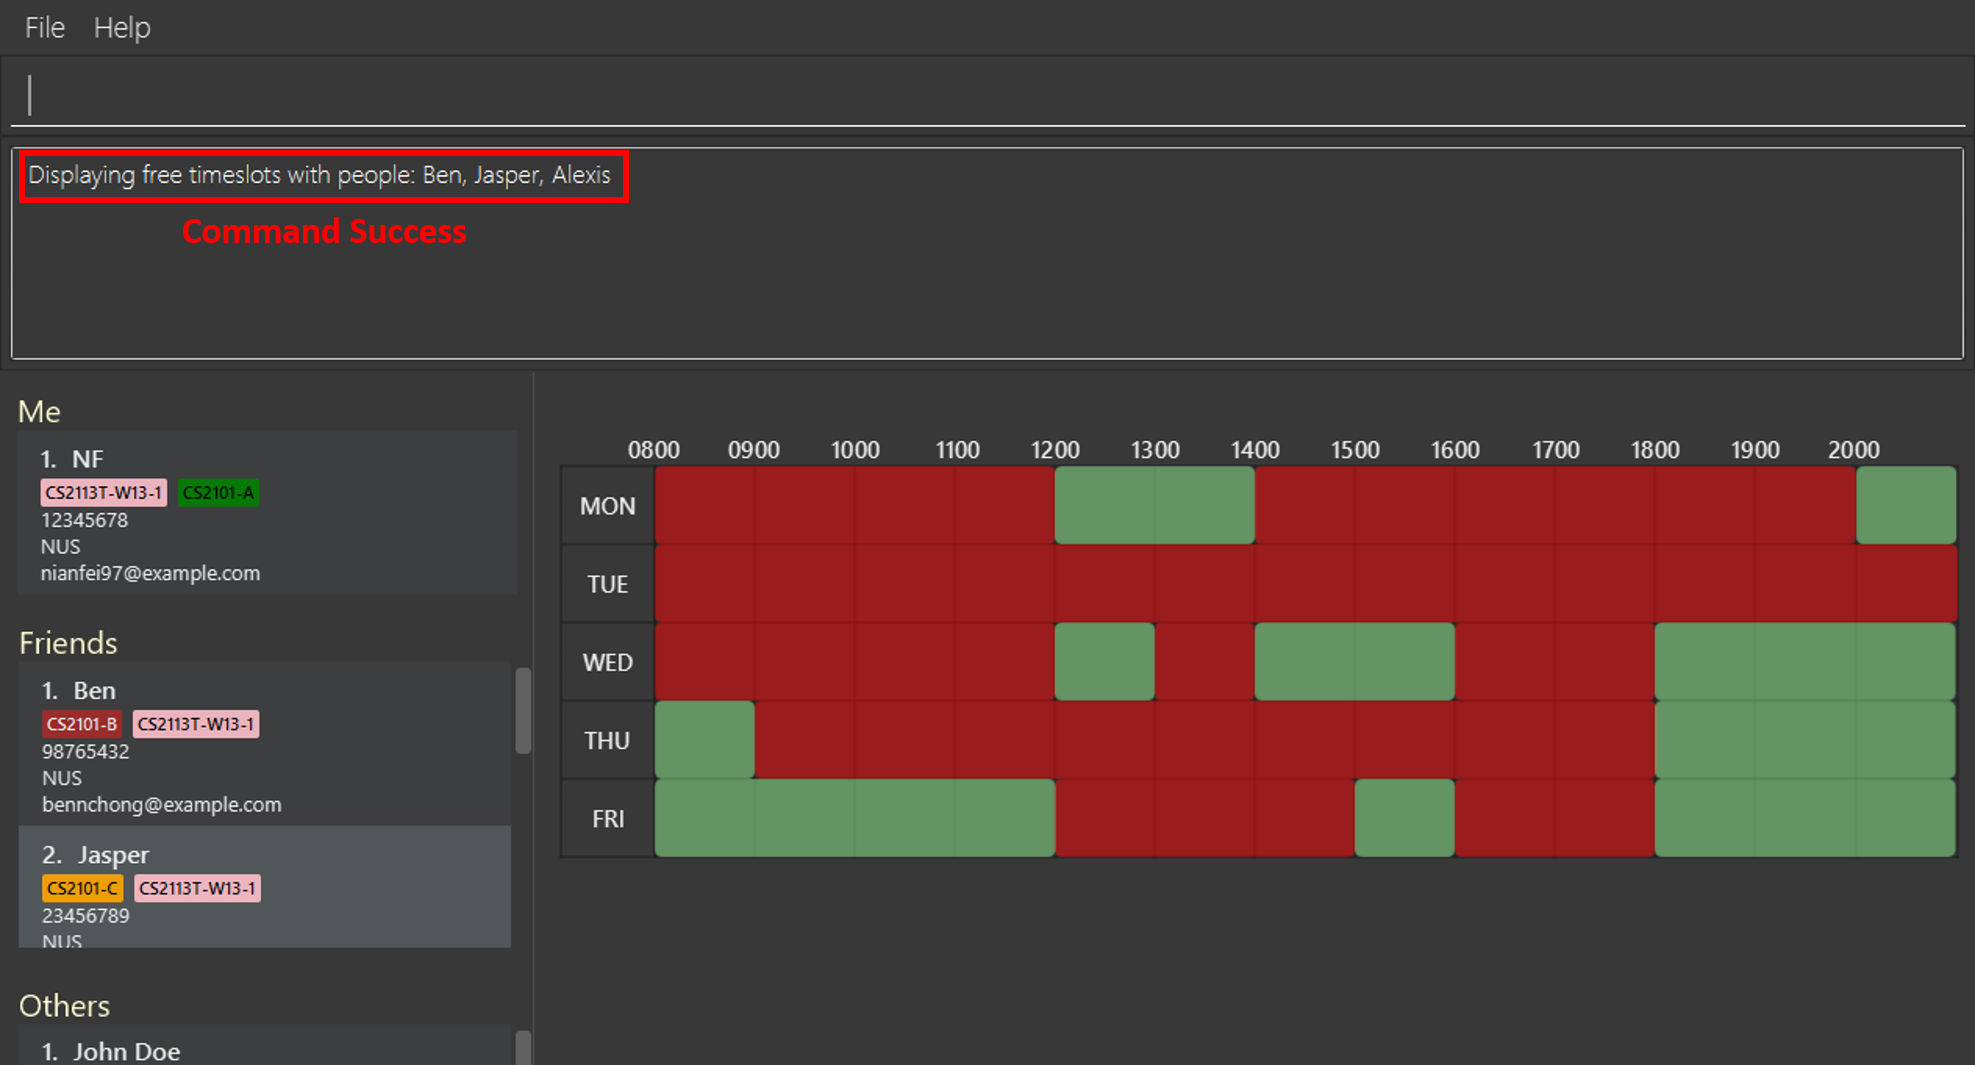
4.12. Show free slots among selected people: free (fr)
Highlights timeslots where you and everyone specified is free.
Format: free INDEX…
Examples:
-
free 1 2
Highlights timeslots where you, friend 1, and friend 2, are all free to meet up.
After executing the command, you should see the following:
4.13. Import Timetable : import (im)
Use this command to import a timetable for the current user from a specified file.
See the example below for a quick start!
Format: import FILE_NAME
Example:
-
import nusmods_calendar
Imports the timetable from.\import_export\nusmods_calendar.ics
(where.represents the folder that the application is in.)-
Download your file from NUDMODS website:
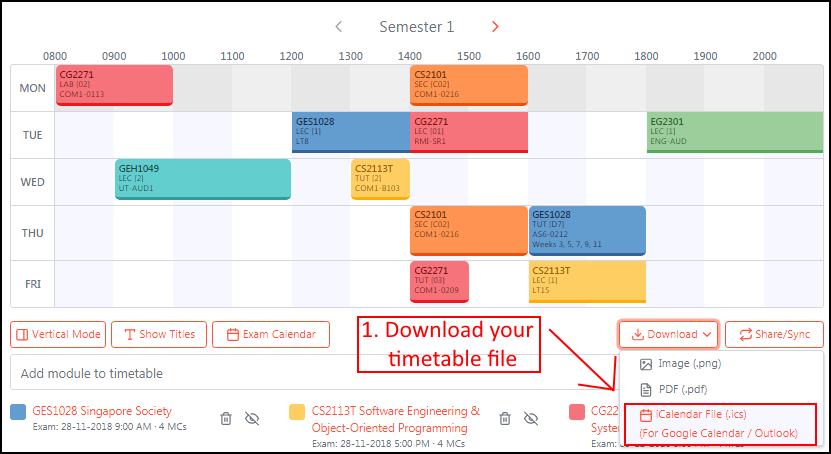 Figure 13. Download your file from NUDMODS website.
 -
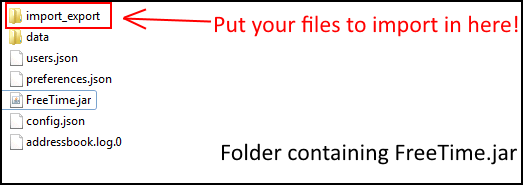
Copy your desired .ics file to the
import_exportfolder: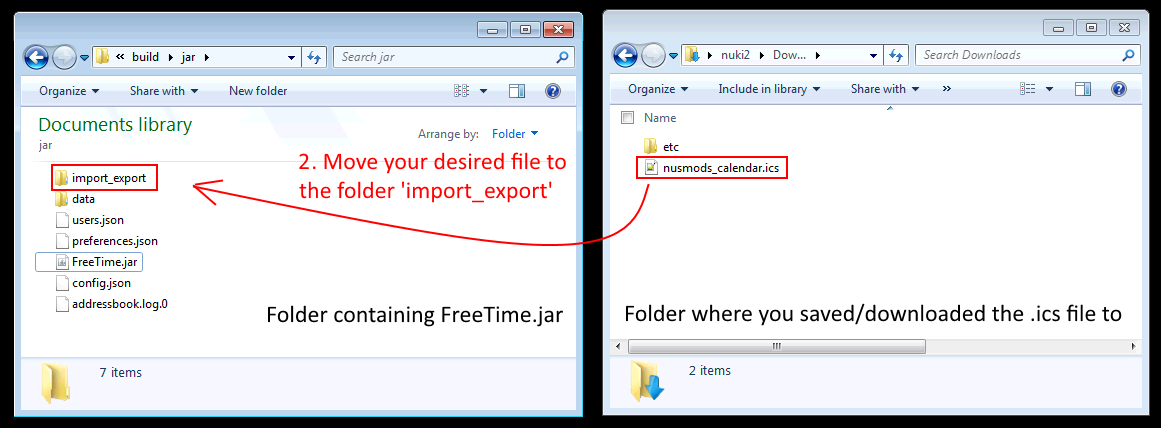 Figure 14. Copy your file to the correct folder.
 -
Go back to FreeTime, and type in the command
import nusmods_calendar: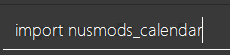 Figure 15. Type this, then press enter!
 -
If the import was successful, FreeTime should look similar to this :
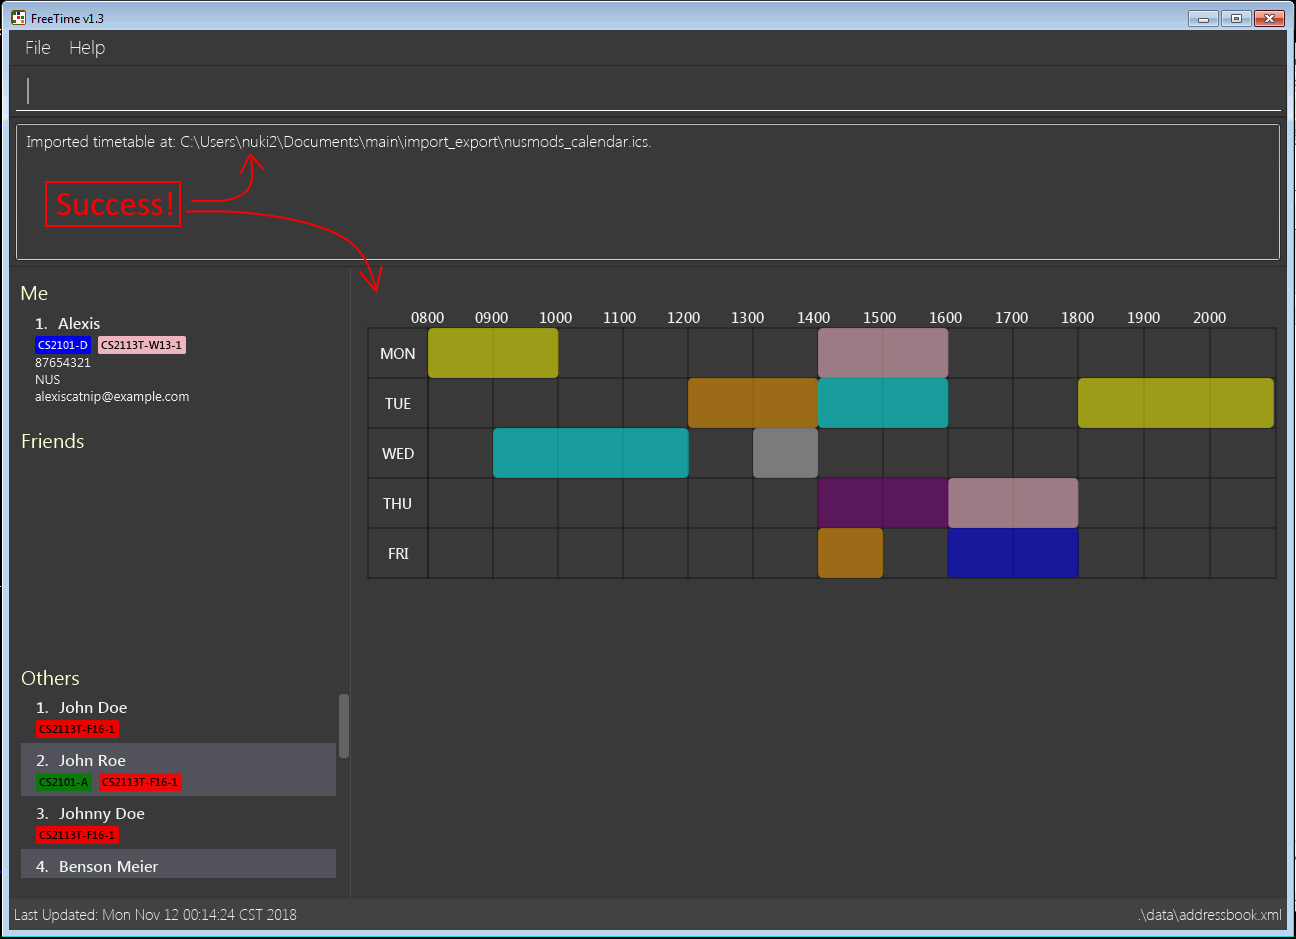 Figure 16. Import Success! :)
-
4.14. Export Timetable : export (ex)
Use this command to export the currently-displayed timetable as an .ics file.
See the example below for a quick start!
Format: export FILE_NAME
Example:
-
export my_timetable
Exports the displayed timetable to.\import_export\my_timetable.ics
(where.represents the folder that the application is in.)-
Ensure that the timetable you want to export is being shown:
-
type
select meto display your own timetable. -
type
select INDEXto display one of your friend’s timetable.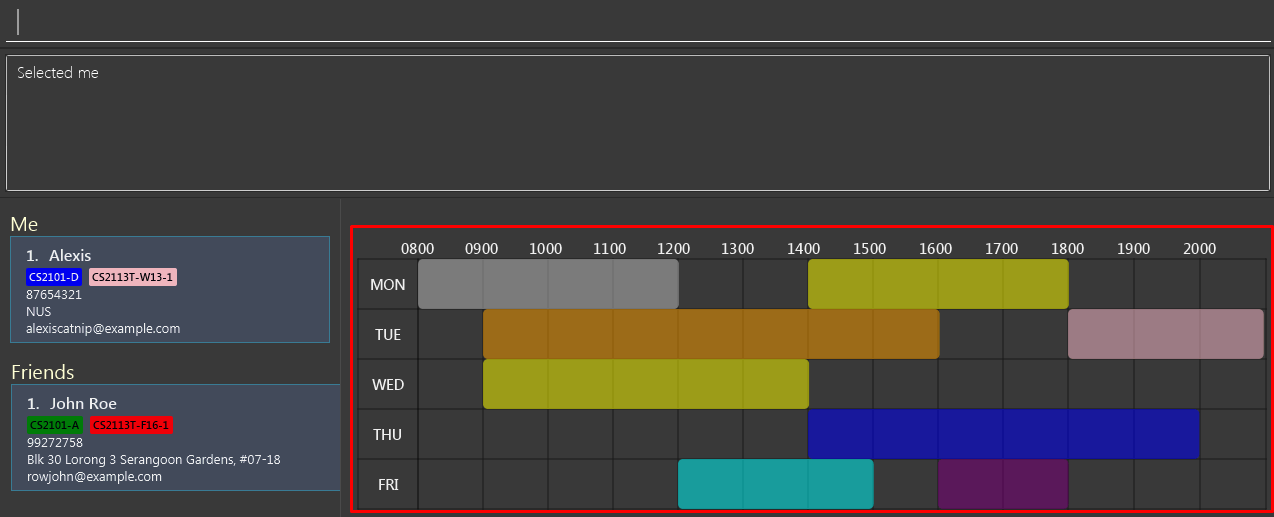 Figure 18. Select the desired timetable.
-
-
Type the command
export my_timetable: Figure 19. Type the command.
 -
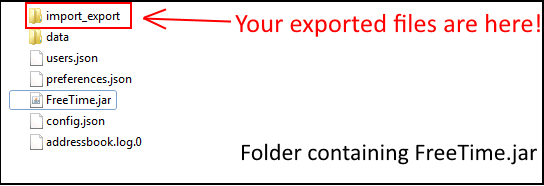
If the export was successful, Your timetable should be waiting for you in the folder :
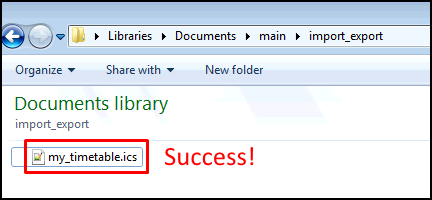 Figure 20. Exported file is in the import_export folder
-
4.15. Undoing previous command : undo (u)
Restores FreeTime to the state before the previous undoable command was executed.
Format: undo
|
Undoable commands: |
Examples:
-
import my_file
undo(reverses theimport my_filecommand) -
select 1
listall
undo
Theundocommand fails as there are no undoable commands executed previously. -
import my_file
clear
undo(reverses theclearcommand)
undo(reverses theimport my_filecommand)
4.16. Redoing the previously undone command : redo (r)
Reverses the most recent undo command.
Format: redo
Examples:
-
delete mon 8-10
undo(reverses thedelete mon 8-10command)
redo(reapplies thedelete mon 8-10command) -
delete mon 8-10
redo
Theredocommand fails as there are noundocommands executed previously. -
delete mon 8-10
clear
undo(reverses theclearcommand)
undo(reverses thedelete mon 8-10command)
redo(reapplies thedelete mon 8-10command)
redo(reapplies theclearcommand)
4.17. Listing entered commands : history (hi)
Lists all the commands that you have entered in reverse chronological order.
Format: history
|
Pressing the ↑ and ↓ arrows will display the previous and next input respectively in the command box. |
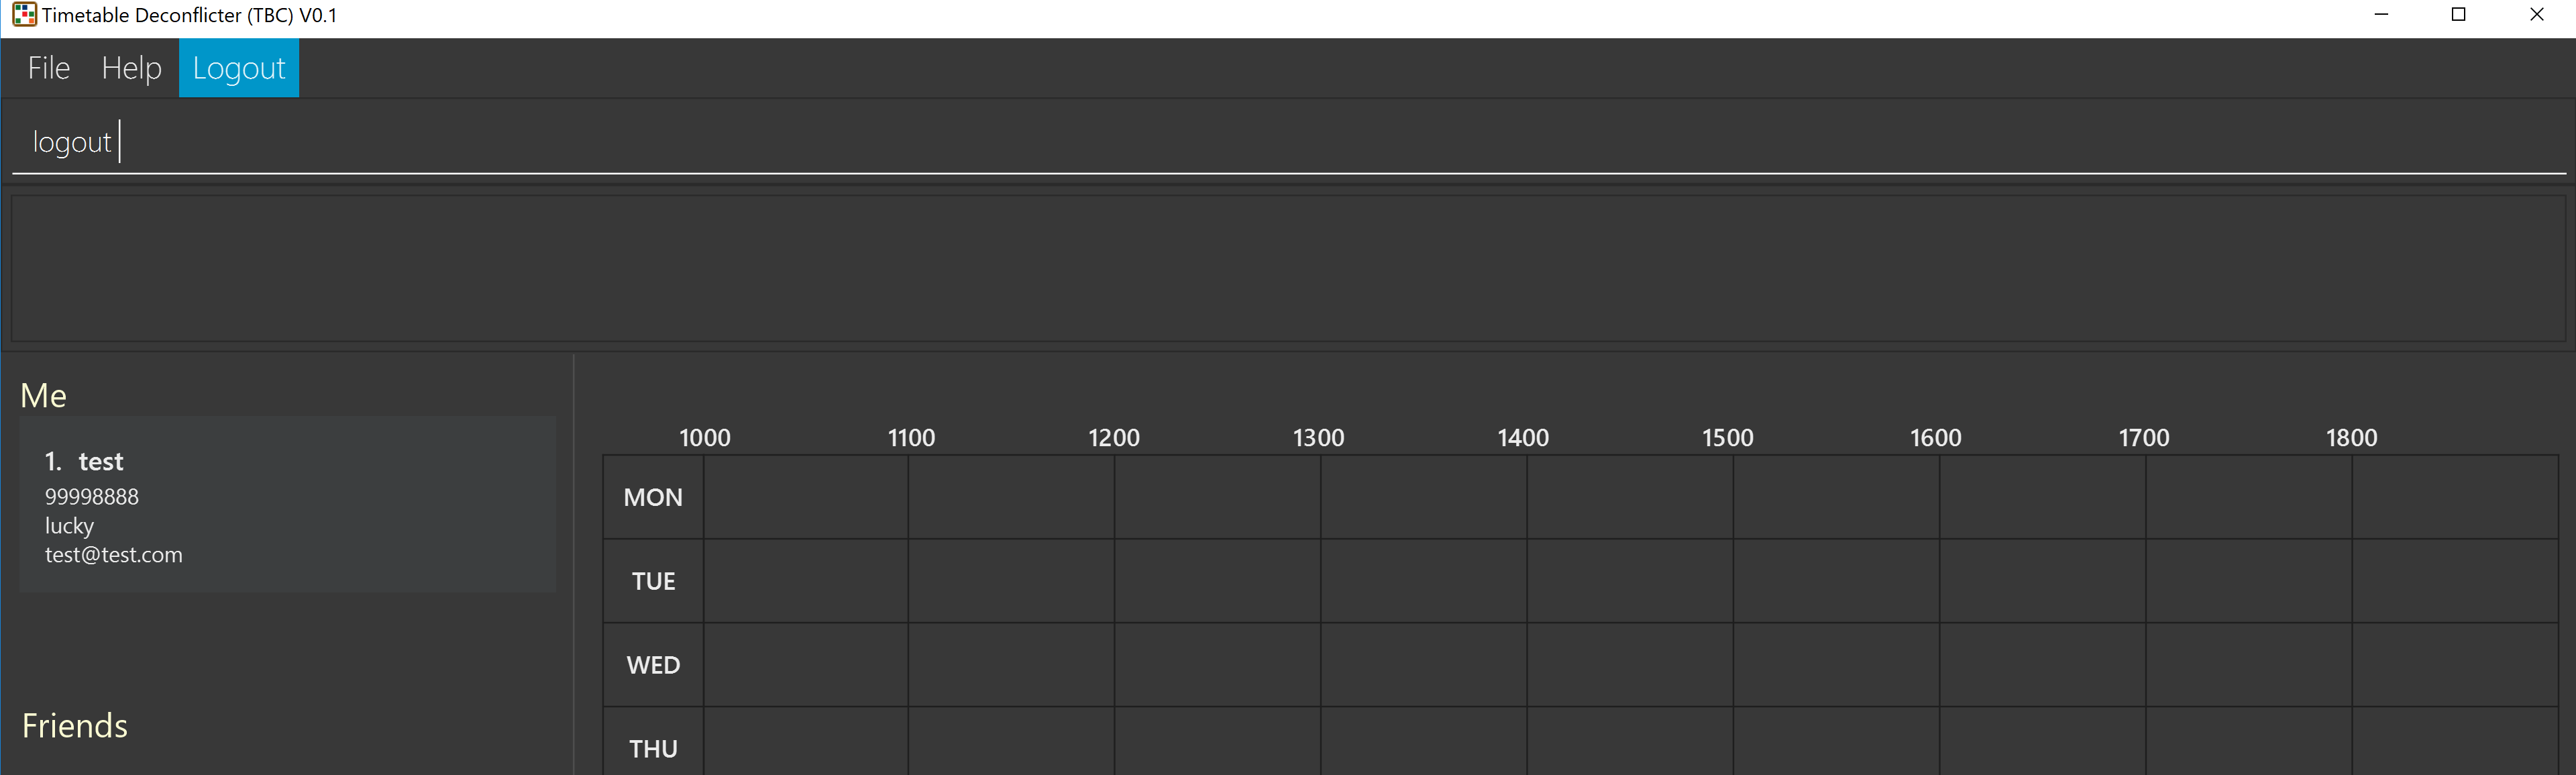
4.18. Logging Out : logout (lo)
Command: logout
To use this command, you would have to be logged in first. Typing logout as seen in the figure below
return you back to the login page.
4.19. Exiting the program : exit (x)
Closes the FreeTime application.
Format: exit
| This command closes the application without logging you out. It is recommended to logout before doing this, or the changes to your timetable might be lost. |
4.20. Saving the data
Application data is saved in the hard disk automatically, every time the data is changed.
There is no need to save manually.
5. FAQ
Q: How do I transfer my data to another Computer?
A: Install the app in the other computer and overwrite the empty data file it creates with the file that contains the data of your previous FreeTime folder.